What's new
What's new

Measuring for squareness on the production floor

openhearth

Plastic
Joined
Sep 9, 2012
Location
Linden, NJ, USA
What tools/processes does your shop have to measure and check for squareness on the production floor? If all you had available was a square and tolerance gage for the operator to check, what set-up would you use to get accurate readings for square/out of square tolerances? Thanks a million!!
 
Surface plate with a surface gauge?
Make a go-no-go sort of thing with gauge blocks?
I'm just taking a shot in the dark here.
 
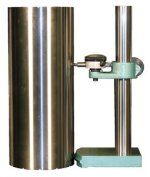
Whenever I had to worry about squareness, I used a comparator square and cylindrical square on personal or local small toolroom grade surface plate. The comparator square was just a height stand with a ground round disk on the bottom that was used to pivot against the work piece. The height stand positions the indicator at the extremities of the work piece quickly. The dial test indicator is zeroed at work-piece height by pivoting against the cylindrical square. Measurement is performed by pivoting the radius and indicator against the workpiece to determine the bottom of indicated travel. This way you can determine in a second how far the part is out of square in thousandths.

I am sure there are other ways to do it, but that was the only way we ever did it. Hope this helps.

If you need further info I will try to find a pic of one or perhaps one of the other toolmakers will chime in.

EDIT Corrected nomenclature and process. Here are a couple of pics of the setups. The one we used looked closest to the last example except ours had a replaceable ground disk bolted on the bottom of the base instead of a loose ball:
SqrGauge2.jpg this from: http://www.fvfowler.com/onlinecatal...age=flypage.tpl&product_id=341&category_id=42

SqrGauge.jpg this from: http://www.judgetool.com/taft-peirce9146comparatorsquare.aspx

Here's another type using ball: http://www.google.com/imgres?imgurl...a=X&ei=bAyEUoDuOLaosASA4IGoDQ&ved=0CDAQ9QEwAA

Best Regards,
Bob
 
All great answers that help out a lot.

Most of the material I'm dealing with is thin, .025 to .093 thick. Securing to an angle plate is a good idea. The boss wants the operators to be holding a square, the material on the blade and beam, and use a tolerance (feeler) gage to see how much, if any, that the part is out of square. Lengths of parts to be checked could be from 3" to 19". I feel we are running out of hands on this inspection process. Thanks to all whom have responded!!
 
Check out a light square...

squareness is a pretty hard thing to check and come up with numbers. best way I have found if your looking for numbers is the way rjs44032 suggested.
 
Wow. Thickness of 0.093" over a span of 19"?

Simple flexure is going to introduce far more error than your manufacturing tolerances.

You really can't clamp or fixture the part in any way since those stresses would influence your measurements.

I would suggest an optical system of some sort, since it would not apply pressure to the part.

- Leigh
 
What a second here while I wrap my head around this.
.025 thick and check the squareness with a feeler gauge?
A thou. is over 2 degrees out and you won't find a thou. by this method.
Perhaps the squareness is in another axis on the part?
Even optical is going to give you problems at this thickness as you are going to run out of light and lens capability down around 20-30 millionths.
Bob
 
A squaremaster if you can hold it properly.

square-master.JPG
 
What a second here while I wrap my head around this.
.025 thick and check the squareness with a feeler gauge?
A thou. is over 2 degrees out and you won't find a thou. by this method.
Perhaps the squareness is in another axis on the part?
Even optical is going to give you problems at this thickness as you are going to run out of light and lens capability down around 20-30 millionths.
Bob

Bob, I was thinking the same thing after the OP quoted those numbers. As Leigh suggested the geometry of the part prohibits inspection by contact. At first I thought optical comparator or interferometer maybe? Only if the parts command that level of pricing. Perhaps we're misunderstanding the requirement.

Can we please see the print spec?

Best Regards,
Bob


Back
Top