What's new
What's new

Micro-Vu M14 - possible issue - experienced input requested

Zahnrad Kopf

Diamond
Joined
Apr 5, 2010
Location
Tropic of Milwaukee
Just had a Micro-Vu M14 with DRO dropped off. Appears to be in wonderful shape, save for one issue that I've found. I'm hoping that it's something easily remedied and someone else has seen it and dealt with it.

I tried making sure that it measured correctly by placing a gauge block on the table and measuring it, observing the DRO, and adjusting the lens to compensate until the DRO displayed what the actual block's measurement is.

It appears that when one gets one edge "focused" in and "sharp" that the other, opposite edge is not. It almost appears like the table is not true to the lens????? If I manipulate the part/block/whatever with my fingers, I notice that "tilt" the part I can get both edges to focus nicely, but letting it rest back on the table blurs one or the other.

Anyone seen this?
 
I have an old vp30 comparator and prior to that a small J&L. I believe getting a sharp image across a thick surface (like the 1/2" depth of a gage block, or the end of a shaft between centers) is difficult. It seems that skewing the part always improves the sharpness because you are now focusing on the edge of the part instead of the complete width of a surface that is square to the table. Obviously skewing the part is moving it out of square & then you are distorting or increasing the length you are trying to accurately gage. When I need to check the length of a shaft from the end of the shaft to a shoulder my best resolution on the shaft end is near the O.D., as you follow further toward the center of the shaft the resolution gets blurry. I am not sure if all comparators are like this but I would assume so. It seems that as the light travels across a wide surface (depth wise) you lose the sharpness that is required to get an accurate result.
 
In any optical system there is only one plane of focus.

That plane is perpendicular to the optical axis of the lens.

The "depth of field", that being the sections of the subject closer to or farther from the lens that are "in focus", can be increased somewhat
by changing the lens aperture (f-stop). I don't know if your lens even has an aperture adjustment. I doubt it.

- Leigh

Leigh,

Thank you for the attempt at assistance, but all I got was Charlie Brown's teacher. ( here )

I can adjust the lens in and out withing the frame of the machine, and I can adjust the part's position on the table, as well as move the table in and out. Now, you may already know the facts of what I'm about to write, but I'm going to write it in attempt to make myself possibly more clear...

If I take a part ( like a gauge block ) that I know is ground square, I should be able to focus both the top and bottom edges of it in effort to measure its height. Right now, I cannot. I can get one or the other edge sharp, but not both. HOWEVER, if I gently grab the part and "rock" it toward me, bringing one of the bottom edges of it off of the table, I CAN get both in sharp focus.

More betterer?

Thanks.
 
It sounds like your plane of focus is not square with the instrument, for whatever reason.

I'm not familiar with the implementation of the vision system on those CMMs, but I am very familiar with optics.

- Leigh
 
It sounds like your plane of focus is not square with the instrument, for whatever reason.

I'm not familiar with the implementation of the vision system on those CMMs, but I am very familiar with optics.

- Leigh

Leigh,

This isn't a CMM or Vision System. It's a plain old, plane jane, optical comparator. So, that said, could this just be a simple adjustment to the lens or mirror?

Looks like this - 14" 12 Micro Vu M14 Optical Comparator 2X DRO Smaller Floor Model | eBay

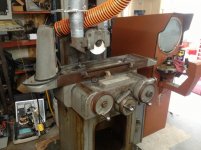
You can see it in this pic, next to my surface grinder.
 

Attachments

  • IMG_0987b.jpg
    IMG_0987b.jpg
    67.6 KB · Views: 515
Most likely your light source is not aligned correctly.
If you have front lighting use this to look at your block but focus alignment problems in the imaging side rarely occur unless you have dropped the machine off the back of a semi truck and broken something.

Position of the light filament to the lighting lens and aiming of the lens to the front side of the optic train is critical for what you are trying to do. Sounds like your beam is angled towards one side giving you the "ghosting" effect you describe.
This is adjusted by moving the lights lens in it's housing and moving the blubs mount in the housing.
I don't know just what is in your lamphouse.
Simpler systems like my little benchtop MicroVu just have a bulb and a lens in front.
On this just twisting the bulb socket so that the filament is smaller and more approximating a point source can help a lot.
Fancier systems will have a blub, then a condenser lens, a telecentric stop and then a final multi-element lens.

Make small adjustments and mark where you start from, it's easy to get way off.
Test on both gage blocks and pins watching both edges.
Bob
 
Most likely your light source is not aligned correctly.
Position of the light filament to the lighting lens and aiming of the lens to the front side of the optic train is critical for what you are trying to do.
This is adjusted by moving the lights lens in it's housing and moving the blubs mount in the housing.
Make small adjustments and mark where you start from, it's easy to get way off.
Test on both gage blocks and pins watching both edges.
Bob

This I can grok. I'll see what covers come off and what looks adjustable. Thank you. Fairly certain I'll F this up fairly quickly so feel free to chime in with more... :D
 
Thanks for posting the info, Bob. I'm not adequately familiar with the adjustment procedures for this instrument.

ZK... The filament in the bulb wants to be parallel to the display screen.

- Leigh
 
Eureka! Success!

Thanks, Bob. ( and as well, Leigh )

Long story, or short story? Short, then...

Seems the sheet metal framework took a bit of a twist during travel.
If I push upwards on the cantilever arm that houses the bulb ( boy they're such simple little buggers, aren't they? ) and first lens ( that condenser lens thingy, I think ) the edges clear up and sharpen nicely. I "honked" on it a few times, but it will take more to get it correct. As a test, I loosened the cantilever arm from the frame and shimmed up the bottom edge.

PERFECT.

Adjusted the inner side ( multifocal? ) lens and gauge blocks and pins measure perfectly now. I can have confidence in its measurements now. :) I'll see about "straightening" the sheetmetal framework or if I cannot, making a more permanent shim this week.

Thanks!

Looks like it might be time to pass on the little Micro-Vu 300 to someone else. Or maybe I'll just put it upstairs... It's been a nice little helper.


Back
Top