What's new
What's new

Shops with no CMM

ewlsey

Diamond
Joined
Jul 14, 2009
Location
Peoria, IL
I'm wondering how shops handle 3D profile tolerances and measurement of complex pockets and machined ports without a CMM.

Do you just not check them and assume they are correct?

I know that the quality guys where I work will collapse in a heap if they can't measure some stupid dimension on a drawing. Of course they get in trouble when it's time for first article inspection, so I can understand.

So how do you guys do it? There are lots of shops out there with no CMM. Some things you just can't readily measure with a height gauge and pins or even a comparator.
 
A client HAS a CMM, and I wonder how they measure with it.... I don't know what kind it is.

We asked for some output from it to make a drawing of a part to fit, and what we got was a "cloud" of measurements, no two of which were alike on the same measurement. The spread was larger than I expected. Even averaged, it seemed rather questionable.

We tossed the results and ended up making mic & height gage measurements to obtain useful data.

The part from the drawing fit perfectly.

At the risk of a hijack, is that normal? I have zero other experience with CMM.
 
I guess I would turn it around and ask how we won WWII without computers, CNC, CMM's and all of the other modern marvels? It would be interesting to take a group of engineers, drafters and machinists into a building with only tools (state of art, say 1944), give them a something simple like a Jeep engine, have them make all the drawings and make one working prototype.

Tom
 
There was one part that I was prototypeing several yrs ago that was tough to use hard guages on. A guage could have easilly been built for production prolly. (tapers and such)

I sent them out to a nother shop with a CMM and pd them.

Other times you can usually fixture up a dial indicator and check a trouble feature to a nother known datum point.

I am kind of holding out for a Faro type arm.


--------------

Think Snow Eh!
Ox
 
This subject drives me crazy as many a person has told me my parts are bad because their piece of junk CMM told them so.:angry:

:soapbox:
The repeatability and accuracy of CMMs vary widely depending on what you have.

Some are lucky to hit .0007 in their volume while others can hit a micron.
I used to sell CMMs, I don't trust anyone's number till I know what they have and when it was calibrated and I most certainly know how to fool you during the demos.

I don't know why people trust these numbers so much.
Very few CMMs out there will compete with a new micrometer and to get into the range of LVDTs you are well into the 6 figure machines.
A good set of gauge blocks, a height gauge, and a 50 millionths indicator will check closer than at least half of the CMMs in the field.

CMM's are very handy since they do 3D work but until you get to the big buck stuff they are not very accurate.
Nifty to have and they impress the visitors, but if you get deep into the design and understand the errors involved in a 3D measuring gauge it's surprising that they work at all.

Without a good gauge R&R test you have no idea where you are.
No one in their right mind is gonna try to calibrate a gauge block or worse yet a gauge roll with a CMM.
Bob
 
Make use of the available instruments

I guess I would turn it around and ask how we won WWII without computers, CNC, CMM's and all of the other modern marvels?
Excellent point. We were making precision machinery long before automation.

I took my apprenticeship in the early 1960's. The only thing approaching automatic readout was the optical scales on my Bridgeport.

The key lies in understanding the instruments and processes available, and doing designs that don't require non-existent capabilities.

- Leigh
 
I guess I would turn it around and ask how we won WWII without computers, CNC, CMM's and all of the other modern marvels? It would be interesting to take a group of engineers, drafters and machinists into a building with only tools (state of art, say 1944), give them a something simple like a Jeep engine, have them make all the drawings and make one working prototype.

Tom

Do you realize how much automation existed 50 years prior to then? For a lot of things servos have just replaced cams etc.
 
If the feature allows you can use an optical comparitor. I'm not sure I would trust a profile measurement from a CMM, unless it's something high dollar with a compentent operator and ideally a scanning head.
 
Examples of things that would be hard to measure with no CMM:

True position of holes. Some parts have hundreds of holes.

Compound angles such as 4 and 5 axis work.

Profile tolerances. 2D and 3D.

Features called back to multiple datums.

Flatness over a set area.

Tapers.


You guys must have more forgiving customers than us. For first piece approval we need to have a minimum 5 part sample. We have to provide a measurement for EVERY dimension on the print. I just don't see how it is practical with no CMM.
 
I guess I would turn it around and ask how we won WWII without computers, CNC, CMM's and all of the other modern marvels? It would be interesting to take a group of engineers, drafters and machinists into a building with only tools (state of art, say 1944), give them a something simple like a Jeep engine, have them make all the drawings and make one working prototype.

Tom


It doesn't matter how much you have or don't have, as long as you are ahead of the competition. They didn't have them yet either.

Also - not much built during that war had longevity in mind. As long as she can hold together for a cpl yrs - good enough. Git it out the door and build 500 more just like it.

The 40's is where qty counted.

We'll build the quality in the 50's. ;)


--------------------

Think Snow Eh!
Ox
 
I guess I would turn it around and ask how we won WWII without computers, CNC, CMM's and all of the other modern marvels? It would be interesting to take a group of engineers, drafters and machinists into a building with only tools (state of art, say 1944), give them a something simple like a Jeep engine, have them make all the drawings and make one working prototype.

Tom

Are you saying that we should stop improving?

I don't know that much about WWII equipment, but it sure seems like we have come a long way. A Sherman tank looks like a slow, unreliable death trap compared to a M1 Abrams.

I doubt that any WWII defense contractor was waxing poetic about hand made flintlock rifles or bronze cannon. They were using state of the art machinery for their time. If they had access to a magical machine that could be programmed to automatically measure any part and spit out a paper report, you better believe they would have used it!
 
This subject drives me crazy as many a person has told me my parts are bad because their piece of junk CMM told them so.:angry:

:soapbox:
The repeatability and accuracy of CMMs vary widely depending on what you have.

Some are lucky to hit .0007 in their volume while others can hit a micron.
I used to sell CMMs, I don't trust anyone's number till I know what they have and when it was calibrated and I most certainly know how to fool you during the demos.

I don't know why people trust these numbers so much.
Very few CMMs out there will compete with a new micrometer and to get into the range of LVDTs you are well into the 6 figure machines.
A good set of gauge blocks, a height gauge, and a 50 millionths indicator will check closer than at least half of the CMMs in the field.

CMM's are very handy since they do 3D work but until you get to the big buck stuff they are not very accurate.
Nifty to have and they impress the visitors, but if you get deep into the design and understand the errors involved in a 3D measuring gauge it's surprising that they work at all.

Without a good gauge R&R test you have no idea where you are.
No one in their right mind is gonna try to calibrate a gauge block or worse yet a gauge roll with a CMM.
Bob

I'm quoting you because what you wrote is important enough it bears repeating.

People believe fancy, well formatted readouts as some people still think computers don't lie.
 
Examples of things that would be hard to measure with no CMM:
True position of holes. Some parts have hundreds of holes.
Compound angles such as 4 and 5 axis work.
Profile tolerances. 2D and 3D.
Features called back to multiple datums.
Flatness over a set area.
Tapers.
Those can all be done with regular tools, with one exception...

... Features called back to multiple datums.

That's a design error that should be rejected by your quote department.

We live in an era when computers can generate marvelous drawings, much of which is just fluff to sell the CAD program in the first place without adding any functionality or reliability to the machine being built.

- Leigh
 
This subject drives me crazy as many a person has told me my parts are bad because their piece of junk CMM told them so.:angry:

:soapbox:
The repeatability and accuracy of CMMs vary widely depending on what you have.

Some are lucky to hit .0007 in their volume while others can hit a micron.
I used to sell CMMs, I don't trust anyone's number till I know what they have and when it was calibrated and I most certainly know how to fool you during the demos.

I don't know why people trust these numbers so much.
Very few CMMs out there will compete with a new micrometer and to get into the range of LVDTs you are well into the 6 figure machines.
A good set of gauge blocks, a height gauge, and a 50 millionths indicator will check closer than at least half of the CMMs in the field.

CMM's are very handy since they do 3D work but until you get to the big buck stuff they are not very accurate.
Nifty to have and they impress the visitors, but if you get deep into the design and understand the errors involved in a 3D measuring gauge it's surprising that they work at all.

Without a good gauge R&R test you have no idea where you are.
No one in their right mind is gonna try to calibrate a gauge block or worse yet a gauge roll with a CMM.
Bob
:willy_nilly:

Man! How can you possibly doubt a computer? They never make mistakes. :rolleyes5:
 
Those can all be done with regular tools, with one exception...

... Features called back to multiple datums.

That's a design error that should be rejected by your quote department.

We live in an era when computers can generate marvelous drawings, much of which is just fluff to sell the CAD program in the first place without adding any functionality or reliability to the machine being built.

- Leigh

What?

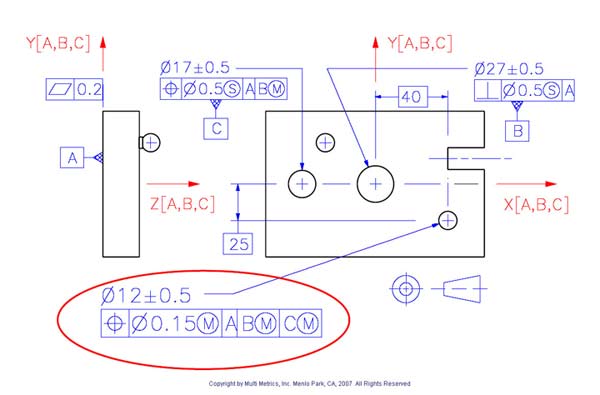
IM1114MMfigure_1.jpg


True position and profile tolerances are almost always called back to multiple datums.

How could you specify the true position of a hole using only one datum? Maybe if the datum was also round, and in the same plane.

Statements like that are making me lean more to my theory that people are not really checking all the dimensions.
 
To those of you that responded to my post: The point I was trying to make is that the fundamentals machining and metrology do not and have not changed. The modern tools and equipment make life easier and the end products better when properly used. A lot of this equipment is so accurate and precise that they can provide accurate but miss leading information. They are like a Tukon tester. They can provide very good information about a very small area but are almost worthless for gross measurements.

An operator knowledgeable of the old ways might recognize that something doesn't look right and use an alternate method to check his results. An operator without this skill and knowledge might well conclude that that's what the machine said, therefore that's what it is.

I've heard complaints on this forum that a lot of engineers know nothing about shop operations. That didn't use to be. After Sputnik it wasn't important be know how to run a lathe, pour a casting or wire a motor-generator set. Just stay in the office with your slide rule, that work is for the technicians. I see that same thing happening with the new classes of NC machinists and metrologists.

Tom
 
Do you realize how much automation existed 50 years prior to then? For a lot of things servos have just replaced cams etc.

I do, except it is referred to a mechanization. Maudslay's 1800 screw cutting lathe is one of the earliest, using gears and screws to control motion of the carriage.

And what drove the servos? Magnetic amplifiers.

Tom
 
I have taught CMM classes where I work in an R&D facility. One of the things that is very difficult to get across to people is the fact that the CMM has no visual perception and therefore is mathematically trying to make sense out of points in space. That being said, the result (or outcome) is absolutely dependent on the approach that the technician uses in setting up and measuring the workpiece.

If the technician does not select the correct feature to "auto level" the work piece and is not careful in establishing a line to "clock" the work piece and selects the wrong feature as his "point of origin"; every corresponding relationship will be wrong.

I have worked with very good technicians that had an excellent understanding of how to go about measuring but the results of the majority of them is that their conclusions are very hit or miss. I certainly would not sit across the table from a vendor with the results that many of these techs produced and argue that their parts are out of spec.

As Tom mentioned, you simply cannot beat the overall understanding of someone who has been well trained in a machining environment. They tend to carry their understanding of feature relationships with them wherever they go and as a consequence it affects the way they go about inspecting workpieces.

That being said, I love CMMs and believe them to be an invaluable resource to manufacturers.
 
Our world has changed since the beginning of the space race, and the birth of computers, integrated circuits, pocket calculators, dro's, digital measuring tools, and all of the various segments of the info. age, including ISO, and other guarantees of perfect parts.
Manufacturing methods, have changed dramatically,in this period, as well as the standards of measuring the completed parts.
In the years before "digitalization", it was necessary of a part, or an assembly of parts, to work together. In many situations today, working, is not acceptable.
Today's CAD/CAM software, and CNC, machine tools, in the hands of properly trained personel, can create great things, that need a CMM, to certify.
Some CMM's, have an accuracy rating of +/-.0002". Is this a machine, that can inspect .002" tolerances?
Regards,
Bob


Back
Top