What's new
What's new

What kind of Metrology system should I go for? Small shop

mikethezipper

Plastic
Joined
Jun 2, 2015
Howdy gentlemen,

I've got a small shop, and I really need to up my game when it comes to inspecting parts. For the record, I'm a job / R&D shop so volume isn't a big issue for me, and the parts I make change frequently. Most parts will be in Al, some stainless, and some delrin or Ultem parts in sizes usually much smaller than an 8"x11".

My problem is that I don't have much money, and I'm not sure what sort of system I should get. I've used OCs before, and I really dislike them for reasons I think should be obvious (blind holes anyone?). I've also used video measurement systems, (in this case the Vertex by Micro-Vu), which I loved, especially compared to the OC. I've never used a CMM.

It looks like I can get a "working" CMM on fleabay in the $6k range. I'm talking about 80s, 90s machine manual machine with software that looks like its running in DOS.

Of course I want something better, but I honestly can't afford to spend more than $10k on any system.

What do ya'll recommend?

-Mike
 
I don't know how small you're talking, but it sounds like the manual CMMs we have around the shop would be good for you.

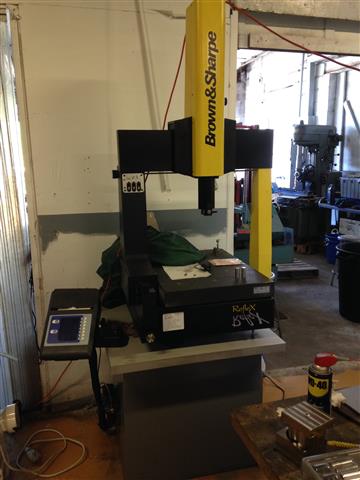
Ours are Brown & Sharpe Reflex models. We have 2 in our controlled QA lab and 2 out on the floor.

This model looks a bit newer than the ones we have, I think, but is the first used machine that came up on the googles when I searched for our Reflex 4.5.4 CMM: Reflex 4.5.4., Used CMM - CMM Inc. (no idea who they are)

Everyone who works on the floor knows how to use them. We expect everyone who makes parts to learn how to use it, and make sure they are trained properly to do so within their first few months here, if they don't already know. I think they must be somewhat common as we've had some machinists come work here from other shops - already knowing their way around 'em.

edit-to-add: here's a picture that looks like the exact same model & vintage as ours:
Brown%20&%20Sharpe%20Reflex%20454%20CMMr%205.jpg
 
I'm completely ignorant when it comes to CMMs so excuse my ignorance, when it is a manual machine, is it expected to have a pendent, and the XYZ axis are motorized, or is the user physically moving the head around with their hands?

Also, I'm guessing the operator is using that setup on the left to set origins and its basically a DRO right?

Thanks for helping me!
 
There is a spectrum of reality in this area. Older machines may be manual only, and work more or less as you would think, such that you move the probe with your hands to take measurement data. In more recent machines, which may be operated either "manually" or in DCC (direct computer control) mode, the manual operation is by joystick or pendant to acquire data, where in the DCC mode, the computer does all the work of directing the machine probing via the program which you have painstakingly created. There are also be CMM models that can ONLY be operated via a program; these are typically the higher-dollar system with scanning probe capability.

My own experience is with a Zeiss Eclipse (mid-90's), which is a manual/DCC machine. When purchased new this machine was $60K+. Probably down in your price range now, as are many other brands and models. Check for offline programming capability if you decide to go this way; having to program at the machine means you can't otherwise use the machine at that time, generally.
 
We have a micro-vu matrix. That thing is awesome! I think it is a larger model (41x28 table size), although i am not familiar with how big they get. As to your budget, I think a small cmm would be the most flexible, and much more 'recognizable' for you to print out reports and such for your customers. I have used a small Brown&Sharpe similar to what jnieman posted, but I think much more vintage. :) It was hooked up to a printer that used the paper that had the holes along the edges to feed it, don't remember what it was called. All manual, meaning you used your hands to move the probe head around in all 3 axis, no joystick. I think it had locking levers as well, although it has been more than 10 years since I worked at that shop....
 
@mikethezipper

Regarding the B&S I posted a pic of, we operate them by unlocking the XYZ axes(or XY or...) grabbing the head, and physically bumping the probe to the features we want to check. The readout is for telling it what you want to do... establish a datum reference plane, measure a cylinder, measure between two planes, etc. Then you bump the feature in that 'mode' until you have enough points to satisfy the computer enough to figure the geometry properly.
 
Ok, I've watched some videos and I get the theory of operation now. I guess my next concern is the interface between these machines and computers. Are most of the connectors on these standard, or do they require proprietary systems to get info out of them? I see some hooked up to Quadra Check units where you do everything on there (similar to what is seen above) and some with computers, and some with... ancient computers. Can you upgrade any cmm's system (if necessary, I'm aware that the software side is more expensive than the machine itself for what I'm trying to do with it) with PC-DMIS, or only certain systems? Thanks guys!

-Mike B
 
You have defined X-Y size but not if a lot of Z work is needed.
Next you need to call out tolerances involved. Part size/shape then tolerance or at a minimum some kind of range you want to be in.
.0001 on a CMM?That is very hard do do even in your small envelope. Simply crazy dollars.
It's the pitch yaw and roll along with extending that darn arm and controlling the forces on it. None of which show up on the 1/10 micron scales to the computer.
So it's kind of guess at beam sag or direction of the probing for these things and the software does what it can.

Used CMMs are cheap, getting them adjusted in and calibrated sometimes is not.
DCC or CNC verision are way more repeatable and accurate than manuals but do you need it?
Think hard about what you need or can live with in repeatability and accuracy and do you need it in 2D or 3D.

You can retrofit anything with enough money. You can also build a road racer from a coffee table using this method.
Bob
 
In response to Carbide Bob,

For Z height, I doubt we would ever have parts greater than 12" in height. Almost everything we do is parts for medical instruments, so they are usually on the smaller side of things. I'm guessing that as with mills, bigger is better in CMMs because it gives you more capabilities?

As for tolerances, generally the parts we make are in the greater than .001" range, very rarely is there a positional tolerance less than that, but definitely never less than .0005" Bore sizes can be different as we know for pressing in bearings etc. Is it not standard for a CMM to be able to measure a bore size accurately in the .0001" range?

I would of course love a CNC CMM, however, We don't need it as this time since we are mostly doing <10 prototype runs which only generally need first article inspections.

I'm asking about retrofits because I don't want to spend a lot of time or money on doing a retrofit. I'm wondering if there is a practical and economical way to deal with a scenario such as buying a used/ancient CMM, and having the ancient computer die shortly thereafter. Am I left with a piece of equipment whose new controller/data collector/software is going to cost more than another old cmm?


As for Edster,

An important consideration for us is not having to do many setups to do inspections. So to tie into what Carbide Bob said, we would prefer a 3D cmm, since I don't want to have to do several extra setups per part, and then have to take my fixturing and setup into account while looking at the numbers.

Although I don't have a fancy height gauge, I have do have a normal style unit. I have used it to do a lot of inspection, and I don't care for the number of setups required to measure features. Also, I can't measure how things like perpendicularity might be off.
 
She'll like that

No, in this world smaller is better. Big structures are hard to control and move fast.
Bob

I'll make sure to tell my girlfriend that experts say that smaller is better for those reasons^

Ok, I'll let you guys know how it goes, I'm talking to a couple people now, so hopefully I'll have a machine in the shop within a couple weeks.

Thanks!
 
The 10k budget does limit your options. Something else you could try is just building a good supply of hand tools, such as a height gage and various types of micrometers, calipers, and indicators. You could also supplement those tools with a cheap digital measuring microscope like the ones Insize and Starrett makes. They have to be calibrated often but they may work for you since your tolerances aren't super tight.

Also note that having an automated CMM only saves time if you have a lot of parts to run. For only a few parts, a manual CMM may be just as fast depending on the number of dimensions.
 
To close the loop:
I ended up getting a CMM. I wanted to be able to inspect a plate full of holes in a single setup. Given my price limitations... wow, it was a pain in the butt. I started another thread here called " My experience buying an old/cheap CMM and getting it up and running " wherein I document everything I went through, as well as the limitations I am finding with using an old heavy CMM.

-Mike Bair


Back
Top