What's new
What's new

reliance motor problems

perky

Plastic
Joined
Oct 21, 2013
Location
lockport ny
ok I finally got around to rewraping my field coils with # 27 3m tape and glyptol . Motor worked fine when i took it out. Insulation was half gone on field coils. On the bench i was reading 73 ohms at f1 and f2 and infinite on other poles. Put the motor in and i have bad brush sparking and motor only runs in reverse at slow speed. Now my readings are 54.6 ohms on f1 and f2 . A1 to f1 is 1.7 ohms and 1.6 at a1 to f2 . I am not very good at electric and would appreciate any help. thanks
 
sounds like the insulation was so badly deteriorated that just handling the coils caused turn to turn shorts. Perhaps others have better suggestions, but it sounds like it is now a motor shop rebuild job.
Tom
 
I seemed to have fixed some of my problem. I refitted the brushes to the commutator and now it runs up to speed in forward but a little rough in reverse. Does anybody know where to get new brushes? My forward problem was the contactor in dc panel. I think with some new brushes and some brush timing i might have it licked. Thank you for the replies.
 
Monarch can supply motor brushes. They are a regular expendable service item, if you're going to use the machine keep a spare set on hand. And, who knows how long those original equipment items will be available?

Don't cobble up brushes unless it's an emergency, they all may look similar but they're not. Composition of brushes varies widely by application. The wrong brush composition can damage your motor very quickly.

All resistance readings of the motor must be made with the motor isolated from the control circuitry of the machine. Disconnecting either A1 or A2 from the machine wiring will isolate the armature for measurement, similarly with either F1 or F2 for the field. What your are trying to do is have the motor measurements made in a state similar to your bench measurements. If in doubt go ahead and disconnect all of the machine wires from A1, A2, F1 and F2, then there's no question hanging in the air and it takes all of two minutes to do.

Get good bedded brushes in place, then time the motor. Many ways to do it, the proof of success is the same RPM in forward and reverse for the same speed setting. I prefer the method of applying low AC voltage to the field, F1 and F2, moving the brush plate until the minimum measured AC is measured A1 to A2 with a sensitive AC voltmeter. It's done without running the motor in less than a minute.
 
Perky:

Dave caught (or remembered) what I had missed. Not mentioned HERE, (shudda been..) but In your OTHER thread, that this was a Reliance Engineering 3 HP DC motor from a 1944 vintage MG-era 10EE.

Yes. Monarch has the brushes. Sets of FOUR.

Dave:

Great point on the 'static' timing procedure. I may drag the vintage RCA VoltOhmist VTVM down out of the attic for that just to be 'period correct'.

:)

Bill

i just got around to working on this. My other thread was so old i thought i would start a new one. Sorry. I have it running pretty good in forward. reverse i get a lot of brush arching . I think it is all in the brush timing. If i understand correctly you apply low ac voltage to f1 and f2 measure at a1 and a2 . Positive probe to a1 and negative probe to a2 ? Also do you connect positive ac to f1 and negative ac to f2 ? sorry for the old thread.
 
Perky
On my phone at the moment but depending on where in the country you are (location does not show on tapa talk) - I've got a 3hp 10ee reliance motor that appears to be in v good condition. Free if u pick it up - I'm in MA.
May put it on eBay in a week or two, it's been in the way to long (actually have 2 of them).
Paul
paul, thank you very much for the offer. I live around buffalo ny. I think i will try to deal with what i have . Bill Tesla, thanks for the way over my head explanation, maybe you impressed somebody but nevermind i will figure it out . Good bye
 
...

The method Dave outlined uses the Field coils as the primary of a transformer, the armature coils acting as its secondary.

...
I'm pretty sure that Dave's NOT suggesting connecting the field directly to AC. He said:
... I prefer the method of applying low AC voltage to the field ...
This is usually done with a common household doorbell transformer, so that you're only applying 16 to 24 Volts AC to the field.

Cal
 
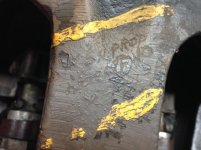
This is a 1944 round dial. Could somebody explain these markings ? I believe it is US navy production. NORD is navy ordnance i think and i cant make out the rest. These markings with yellow paint around them is on my 3hp dc motor, motor generator and coolant pumpIMG_0519.jpgIMG_0484.jpg. Thanks
 
i am having timing problems on the dc motor. When i get it to run the same in forwards and reverse the screw on the phenolic ring is at aprox 10 oclock but my headstock switch is backwards. If i move the brush ring to 1 oclock my headstock switch is correct but i have no reverse but forward is pretty decent. Reverse turns very slow and if i try to increase speed it draws down the motor generator. So what do i have to do? thanks
 
i am having timing problems on the dc motor. When i get it to run the same in forwards and reverse the screw on the phenolic ring is at aprox 10 oclock but my headstock switch is backwards. If i move the brush ring to 1 oclock my headstock switch is correct but i have no reverse but forward is pretty decent. Reverse turns very slow and if i try to increase speed it draws down the motor generator. So what do i have to do? thanks
What do you mean by "my headstock switch is backwards"? They are normally wired so that leaning to the left is forward (CCW rotation as viewed from the tailstock); leaning to the right (tailstock) is reverse.

Set the brush timing so that the motor runs at the about the same speed in forward and reverse with no sparking (a single pin-point spark on each brush is normal). Then if the headstock switch is backwards, swap the wires on terminals C1 and C2 at the bottom of the DC control panal. Note: make sure you correctly identify the wires by the metal tags on the wires. It's a common mistake to get off a row and very bad things can happen if you swap the wrong pair of wires!

Cal

when i set the brush timing so i have equal speed forward and reverse my headstock switch is towards the the tailstock for forward .This is not correct but the motor runs pretty decent . If i turn the brush ring to approx the 1 oclock position my headstock switch is ccw for forward which is correct i believe . Forward is pretty decent in this position but reverse is unusable with lots of brush fireworks.
 
Before delving into the (complex) switch...) - which as far as I know has not YET been touched - are 'we' absolutely certain the Armature (or field..) lead polarity - as in at the motor peckerhead, or close to it, including motor-side of that - isn't simply connected bass-ackwards?

This motor WAS dis-assembled, was it not?

Bill

Bill , first off i must apologize for my smart remark in the other post. I have a complete lack of knowledge when it comes to electrical things so when i ask for help you have to pretend you are talking to a 2nd grade school child. I am however very good with wrenches. Yes , I did take the motor apart to insulate the field coils but i did them 1 at a time so i did not cross any wires or swap things around. I do not believe i got any wires switched but would there be a way to double check ? thank you
 
when i set the brush timing so i have equal speed forward and reverse my headstock switch is towards the the tailstock for forward .This is not correct but the motor runs pretty decent . If i turn the brush ring to approx the 1 oclock position my headstock switch is ccw for forward which is correct i believe . Forward is pretty decent in this position but reverse is unusable with lots of brush fireworks.
Brush timing is not the way to correct a motor direction problem; you had it right when you had the same speed in forward and reverse. If you want the direction control to work in the original manner, tip the headstock switch to the left and see which contactor is closed. The left contactor is the forward contactor. If the wrong contactor is closing, swap C1 and C2, as I outlined above. If the forward contactor is closing when the switch is to the left, swap the armature leads A1 and A2 to change the direction.

It's not unheard for an electrician to rewire the machine so that right contactor functions for forward by swapping A1 with A2 and C1 with C2. This might be done if the reverse contactor was in better condition. The metal tags on the wires should show how they were originally connected.

Cal
 
Bill, I was not pissed off, just did not understand it. cal , it does not bother me about the headstock switch direction. I just did not know if it would damage anything running it that way. I took my motor generator apart this week . It worked fine but it was an oily greasy mess inside. I turned the commutator and cleaned it up, should be back together next week. thanks for the replies
 
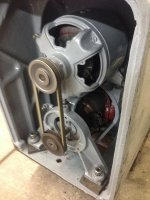
IMG_0580.jpgIMG_0583.jpgI got my motor generator back together, turned the commutator and runs perfect but i think i put the fan on backwards. It looked to me like somebody else put it on backwards so i turned it around but i found a post by cal that said it was supposed to have the fins towards the dc motor. This would make the fan draw air in through the back and put the solid piece of the fan towards the motor generator which does not look like it would work too well. I turned it around so it is blowing air out the back of the machine. It moves a lot of air this way, which way is correct?
 
Last edited:
I got my motor generator back together, turned the commutator and runs perfect but i think i put the fan on backwards. It looked to me like somebody else put it on backwards so i turned it around but i found a post by cal that said it was supposed to have the fins towards the dc motor. This would make the fan draw air in through the back and put the solid piece of the fan towards the motor generator which does not look like it would work too well. I turned it around so it is blowing air out the back of the machine. It moves a lot of air this way, which way is correct?
I remember posting something about the MG fan, but I can't find the post. Anyway, the only one that I've had open was from a square-dial MG. It has the fins towards the MG and the solid plate facing away. I think that's the correct orientation.

Cal
 
Ok, thanks cal. I took my apron apart. My feed lever thrust bearing is shot. The bearings are there but the cage is destroyed. Has anybody found a replacement for those besides monarch? thanks
 
IIRC, there's nothing special about the apron bearings. The ID, OD and thickness should be even mm values. I get most of my bearings from VBX.com. Try this link for their thrust bearings:
http://www.vxb.com/page/bearing/CTGY/ThrustBallBearings

The ID of one of the races is usually smaller than the other (the smaller one is intended to rotate with the shaft). Pay attention to which side is which is when you take it apart.

Cal
 
Does this nord stand for navy ordnance department? it is scratched in the coolant pump,drive motor,motor generator and looks like a factory stamp on the taper attachment. Got it back togetherIMG_0670.jpgFIG]124121[/ATTACH]IMG_0665.jpgIMG_0667.jpg and seems to function well. Got a little oil seeping around spindle nose.


Back
Top