Vladymere gr
Hot Rolled
- Joined
- Dec 10, 2008
- Location
- Charlotte, NC
Fellows,
This is a lathe question but not a Southbend lathe question. I feel more comfortable asking in this forum as I'm not a professional machinist.
The lathe is a Cincinnati Tray-top 12 1/2 x 48".
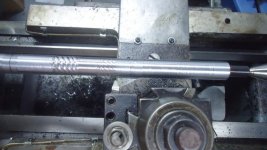
I have attached photos of the markings I'm getting.
I have not seen these on this lathe before but I have never turned anything this long before. I'm turning between centers using a drive dog and face plate. The bar is about 15" long. I have used three different live centers thinking this was the problem but it was not. I've tried twisting, lifting, pulling and pushing on the saddle and compound rest without effect. I have tried tightening the saddle lock some with no effect. The lead screw has some slop at the quick change gearbox bushing but putting a pry bar against the lead screw at that junction while running at a slow speed has had no effect. The lead screw is eight thread per inch but I cannot correlate the cutter pattern to the eight thread per inch or a multiple of eight. If I feel the end of the bar at the headstock it is vibration free. If I feel the bar at the tailstock end the cut is vibration free for about an inch and then starts vibrating as the cut progresses towards the headstock. This pattern will occur at all headstock speeds and leadscrew feed speeds. The striation spacing will change with speed changes. The striations will also occur if hand cranking the saddle or using the half nuts. I have also tried multiple tool bits with different grinds to them.
Do you fellows have any thoughts about the cause?
Thank you,
Vlad
This is a lathe question but not a Southbend lathe question. I feel more comfortable asking in this forum as I'm not a professional machinist.
The lathe is a Cincinnati Tray-top 12 1/2 x 48".
I have attached photos of the markings I'm getting.
I have not seen these on this lathe before but I have never turned anything this long before. I'm turning between centers using a drive dog and face plate. The bar is about 15" long. I have used three different live centers thinking this was the problem but it was not. I've tried twisting, lifting, pulling and pushing on the saddle and compound rest without effect. I have tried tightening the saddle lock some with no effect. The lead screw has some slop at the quick change gearbox bushing but putting a pry bar against the lead screw at that junction while running at a slow speed has had no effect. The lead screw is eight thread per inch but I cannot correlate the cutter pattern to the eight thread per inch or a multiple of eight. If I feel the end of the bar at the headstock it is vibration free. If I feel the bar at the tailstock end the cut is vibration free for about an inch and then starts vibrating as the cut progresses towards the headstock. This pattern will occur at all headstock speeds and leadscrew feed speeds. The striation spacing will change with speed changes. The striations will also occur if hand cranking the saddle or using the half nuts. I have also tried multiple tool bits with different grinds to them.
Do you fellows have any thoughts about the cause?
Thank you,
Vlad