What's new
What's new

Drum switch help

balibalistic

Aluminum
Joined
Feb 23, 2008
Location
on/CA
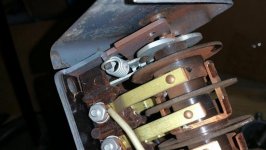
OK so I just picked up a new 9a.i want to throw the motor I pulled off my Rockwell mill on the lathe. It was fully operational with a drum switch for forward and reverse. I just tested it before putting it on and it was sketchy.. It turned on but was not continuous.. Now it isn't working at all. I pulled the switch open and there's a spring floating around. Can anyone identify the problem?
54475f77acdfbf0443e69fe65d1318c2.jpg
 
The fellows above are right, cam like action. I just happen to have a drum switch out, a bit different, but might give a clue. Should snap clearly in three positions. Some drum swithes might have a nut on through shaft, or top and bottom nuts to hold levers for such things, might want to make sure its not loose.

72.jpg73.jpg74.jpg
 
I see where it initially connects, but I can't find where else it attaches on there right that will cause any sort of detent
1464e7b951d81f22eccdba86e5da4f49.jpg
b4b65cbb7a64e001627013e463fbb500.jpg
 
It looks to me like a piece is missing. One end of spring attaches to missing piece. I think your style should have something that is captured to that dowel with flange, it rotates on that dowel, and will have a wheel or something that rolls into the notches of that bronze looking lever that through shaft goes through.
 
I appear to have the same switch that you do. If the detent was working before you took it apart, even if it wasn't working right, the piece had to be there. Otherwise the handle would have just moved back and forth and not clicked in place. Are you sure it didn't fall out when you took the cover off? It just kinda clicks in place on that post, so if it was hanging off but still hooked on the spring, it could have gone flying when you pulled the cover off. That's my guess, anyways. It didn't just de-materialize.
If you need a close up pic, let me know.
 
OK more questions... When I connect there leads and plug it in I'm getting nothing still. Shouldn't it still run when everything is in correct position.

Now, when I added the mount I had to drill four holes in the motor casing, I pilot drilled them with a 3/32" drill bit one did break through and touch the windings. Could this have fried the motor? It did work after this a couple times then began fading. I only touched the windings,i don't believed I did any damage...
 
I was curious what else was wrong, when you said it didn't work at all anymore in your initial posting, but I forgot. As long as the contacts meet, switch should work, even if not locking into position.

First check your supply voltage, make sure you didnt trip a breaker or fuse along the way.

If no, you could wire motor to the socket directly with breaker off, then bump breaker on to see if motor spins.

Looking at the wiring on switch, I was thinking single phase, but not 100%.

For me, 3 phase motors are easier to check. You could separate all the wires at motor and check resistance from 1 wire through all the rest, and to motor case. Do that to each motor wire, not the 3 phase leads, but the 9 or so motor wires. It should never be 0.0 ohms or a good connection, that would be a short. Though when you check across a mating coil wire you will read a higher resistance reading like 15 or 20 ohms.

Single phase can be a little different. Might have what I think is a capacitor, or some kind of can that looks like a hump or cylinder on motor case. I know they can pop, but haven't troubleshot them much, or single phase motors themselves.
 
I hate this thing. So you were right, it did pop my breaker. I flipped it and it started right up. Once. Now it won’t turn on again??
 
What size is the breaker ? Does breaker keep tripping ? And some motor details, phase, volts, hz, and hp. Maybe a pic of data tag motor.

I'm assuming you got the broken drill bit out, and hardware used in holes is not too deep.

Pics of power source connection, the connections on both sides of drum switch if youre still using it, and the connections at motor may answer something, not sure yet.

Also what is your source voltage, single phase 110, single phase 220, or 3 phase ?
 
Ok it’s a single phase 110v motor. The breaker did not trip again, just nothing happening now. It’s a 3/4 hp motor. All is original to the 6x26 Rockwell knee mill. Which I own. But immediately put a dc motor and drive on. I’ll get a photo of the plate in the morning. I have a bad feeling I’ve fried it.

I used 1/4” self tappers on it so there’s on .050 sticking through which is not contacting the windings. The drill didn’t break off, it just touched the windings ever so soft.

I mis-read when I read drill and break in the same sentence, lol.

Not to say the motor is fried or not, but I would doubt just kissing the windings would have done it. Metal filings from drilling getting on magnets might be more likely, but I'm just speculating without seeing or knowing.
 
I wonder, could anyone help walk me through wiring this motor up to the existing switch for forward and reverse? It's currently wired for forward only.

It's on my lorch, which will soon have the missing part to thread so I'll need forward and reverse. I can supply pictures of whatever.

e98af75a8372ef7e10ce291a40f4def3.jpg

If it is wired and is/was running, first, "do no harm".

Do not disconnect any wires until you have been able to fill in the blanks as to what was on the dataplate before it was obliterated by to those two big scars.

The klew is that wherever they are NOW, "red and black" simply need interchanged to change direction.

Once you have notes as to both and have made yourself a new reference for future use, next step is to test it by switching red and black to insure it works in reverse and you have it right for both directions.

Sorting a switch to do that comes later - after the rest has been confirmed and recorded.
 
Ok, solid advice. I'll peel open the switch shortly, as last time I recall seeing a lot of writing bundled and taped off to the side. In fact I think I have some photos, hang on


Back
Top