What's new
What's new

Fohmans Southbend Thread

Fohman

Plastic
Joined
Dec 30, 2014
Location
Toledo
Hi! Im Fohman and this is my thread!

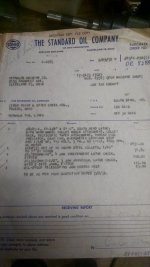
I have a 16" Southbend and I use it hard every day. I think its a 1952. Not sure. But I have a lot of info that suggests it is, perhaps a Southbend history fellow can help identify it. Here is the receiving order for it from Standard Oil back in 1953.
IMG_20150111_203308676.jpg


The problem is the description doesn't match the machine. The machine is not 14 1/2" its a 16". And its not 8'-0 long its more like 6 1/2 feet long.
IMG_20150111_204647196.jpg
But the Plant Record number matches at 8388 on the receiving documents and on the back of the lathe. So I am thinking its a 1952 16" Southbend.
IMG_20150111_202152300.jpg
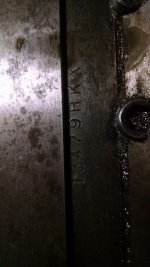
Here is what I think the serial number is from the machine if you can help with identification that would be cool.
IMG_20150111_203141457.jpg
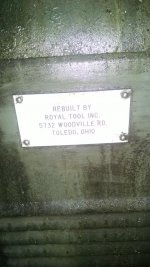
I bought this machine in 1984 for $2,500 and I was told it was rebuilt in 1982 by this outfit.
IMG_20150111_203203920.jpg
I don't have documentation supporting that outside their nameplate on the side of the machine.

I used this machine for about 4 months back in 1984, then it sat in a barn for 30 years. I just pulled it out a couple years ago, and now I run it hard every day!

Looking at the original PO it cost $2,431 brand new! So at $2,500 when I bought it I think I overpaid! I got everything listed on the PO when I bought it except for the CL-2400 telescoping center rest for $23.00. So if anyone out there has one of these I would gladly pay 3 times original price for it plus shipping!

While the history of this old Southbend lathe is interesting, that's not what my thread is about, you'll see that as I add to.."my" thread. I use this machine every day! I would like to show you how I use it. We think we run it as effectively as possible. We think we are creative and innovative in what we do! And I would love to hear your input on what we do with this old machine, and how we could do it better or more efficiently!

We run this old Southbend hard! We make thousands and thousands of parts on it. Its all we got. What I really love about this old Southbend is it is just so so so simple! I can train a person to run this machine and make perfect parts in 20 minutes! We break the machining operations down into simple tasks that are quick and efficient, anybody can run this thing!

Most of the information I'll post on operation of this machine will be in video format. Take a minute and check it out! Definatly interested in your comments on what we do with this old Southbend!

Everything we do has been done hundreds of times before but sometimes something old all of a sudden becomes something new!
 
the document you referred to indicates a inventory number of 8185, not 8388. That with the other discrepancies leads me to believe you receive the wrong document. The Lathe serial number should be on the right-hand side front top of your Lathe bed. Unless this number was ground away when it was rebuilt, This is the number that I would go by.

I am looking forward to seeing your videos and how you use the machine.
 
Fohman,
Do you have any other pics of your lathe? Either on the quick change plate or on the front of the side cover there is usually a model number stamped in the brass plate. That should tell you what the lathe is. If all is correct it should probably be stamped 8185-E

promacjoe,
I think the plant record number he is referring to is the number that is hand written in the top right corner of the paper. The 8185 in the description on the sheet is the model number of the lathe, correct?


Mitch
 
Yep, found the Southbend serial number right where you said to look promacjoe, turns out its the same as the one that's stamped into the "flame hardened ways" plate attached to the machine.

Its 13479HKX

IMG_20150112_081117237.jpg

And yes Mitch I was talking about the PR 8388 number handwritten on the receiving invoice in the upper right corner as it matches the Standard Oil identification plate affixed to the lathe. But the information just doesn't add up because the lathe is not 8'-0 long, and its a 16 not a 14 1/2. So I sort of think someone maybe put the wrong PR number on this paperwork. The Southbend nameplate does have a Cat No: CL 117C on it and it say 6' bed.

Regards!
 
So maybe we will figure the history of this old Southbend lathe out someday...but in the meantime its here to work.

I make about 30 different parts on the old Southbend. And I break those parts down to over 100 different operations. I break them down to multiple operations to make them easy, simple and efficiently produced on an over 60 year old machine. Cause like I said, the Southbend is all I got. The typical run size is a couple hundred pieces and the maximum run size is 1,000.

All my parts are machined from either C360 brass or 303SS, the brass parts are the easiest. and the part in this reply is one of the easiest.

Here is a picture of the part I'm making in this reply, its a custom engineered brass check valve and I'm are running 400 of them +-.
IMG_20150114_175832942.jpg

I machine these from four foot bars of 7/16 C360 brass hex stock and in this first operation I turn the 7/16-20 thread and thread relief, cut the 45 degree seat, and clean up the edges. When done it looks like this.
IMG_20150104_130953013_HDR.jpg
That's the picture but the real info on how this is made on a 60 year old Southbend is in this video. I loaded these videos onto Youtube as opposed to PM because I'm not sure how much storage space I have here and I don't want to run out by loading lots and lots of videos. So do check these videos out cause that's wher ethe cool stuff is!
http://youtu.be/BWatEDCcY0w

After machining Operation 1, I chuck a little jig in the old Southbend and turn the part over and machine the other end. All I'm doing is turning it down and running some 1/8" pipe thread to a shoulder. When that's done it looks like this.
IMG_20150104_131021073_HDR.jpg
Again all the good info is in this video, check out my home made die runner in the video!
http://youtu.be/khbtqHsCHpI

After Operation 2, I drill the holes that provide the check valve ball seat and through hole. Check it out in this video along with the homemade gang drill! I made this gang drill up one afternoon cause I got tired of changing tools and now I use the thing for everything!
http://youtu.be/NFv_JTXenGQ

After all the machining, I put the whole thing together, it goes together like this picture.
IMG_20150104_131134592_HDR.jpg
See how its put together in this video.
http://youtu.be/SC0M5qrzPnw

And that's all there is to making a custom engineered brass check valve.

We use the old Southbend hard! And do check out the videos cause that's were the cool info is! Got a lot more to show and I'm sure its all been done before, but sometimes something old is new!

Very interested in any comments on how these operations can be made more efficient!

Regards!
 
Good post, pretty efficient set-up

I have a 1952 southbend 16" too and it is a joy to run.

Thanks for the post and ideas
 
this stuff is all a hobby to me, so i'm constantly learning new tricks and that gang drill is pretty neat - not like i will probably ever do a large enough run of something to have the setup time worth the effort, but i'm certainly filing that one away in the memory banks. i do have one questionn though:

my mind always tells me to do my drilling operations from smallest hole to largest hole. you drilled the larger hole first and then finished with the smaller through hole. what's the benefit of this order? is there more of a chance for the small bit to wander off center if you drilled the small long hole first?
 
Hi Lost, yea that gang drill comes in handy! I use if for just about everything now. Your mind is right! But I was just drilling a .250 hole first and that size needs no pilot. And yes if I drilled first with the 3/32 hole I would have to worry about it wandering off and it would have taken longer cause I would of had to drill more material. I only machine stainless and brass, and nothing over 1 3/8 diameter, so with the brass I never use a pilot drill and with stainless I don't use one unless the hole is larger than 7/8 which I don't do many of. I only drill with drills in the tool post using the power feed. I cant remember the last time I drilled a hole using the tailstock. I watch the table when I disengage the feed, I look for no kickback, if I see it kicking back I'll regrind the drill till it stops.
Thanks for checking out the post!
 
According to my _Serial Number Reference Book_, serial number 13479H would have been built in 1972 (the "H" immediately following the numeric portion of the serial number indicates it is a 16" lathe). Sounds like a nice machine. Is the spindle nose threaded or cam lock?
David
 
Wow, 1972. That's interesting. I thought it was much older. The spindle is threaded. Thanks for the info and for taking the time to look it up David!
 
You are very welcome. Judging from my South Bend literature it looks like the D1-4" cam lock spindle nose replaced the threaded spindle nose as the standard on the heavy 10, 13 and 16 (and 16/24) inch South Bends somewhere between 1972 and 1977. Earlier the cam lock spindle nose, as well as the L-00 long taper, was available as an option.
David
 
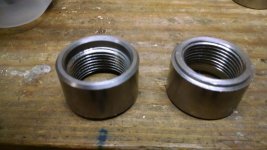
So here is a 1 3/8 diameter 303 SS coupling getting made in the old Southbend. In the first operation we drill it, counterbore it, and notch it.
IMG_20150114_174043831.jpg
Here's a videos of op 1
http://youtu.be/iETRvDAK8wQ

After that we thread them up in op 2. Here is the video of that.
http://youtu.be/HhjznIf5Wos

When that's all done we chuck the part in the southbend and do some stainless steel MIG welding on it.
IMG_20150114_173911939.jpgIMG_20150114_173858603.jpg
The old southbend makes this welding operation an easy thing! Check it out in this video.
http://youtu.be/flzG9Mt4G2U
 
Fohman,

Not at all to detract from from the majority of threads here, but damn it's nice to see someone actually making stuff!

Not a thing I would change in your process, looks like you got it figured to me, just in this one thread we have seen that SB pay for itself.

Thank you!
 
i think we need to take note and see who stops posting onthe forums and then send an emergency crew to their house cause i'm betting someone has had a heart attack watching this. the thought of using my lathe as a welding positioner has never occurred to me, but it obviously works great for you. i admit that i currently wouldn't have the stones to do it myself, and if i did i'd have every manner of fire retardent and protective material over all non-moving surfaces as i did it for fear of an odd piece of slag contacting something i didn't want it to. i suppose it's a lot easier on the machine than grinding would be. i don't do anything but hobby work, and i'm confident that my shop is way too dirty for the likes of most people - i do my (minimal) precision machine work, welding cutting, and automotive projects all in the same spot. the occasional wood project that needs to be under cover gets brought in too. this is certainly an eye opener. at the very least it would make sense to keep a damaged/worn lathe for this purpose because a damaged lathe is a lot cheaper than a welding positioner.
 
Hi,

Videos are very slow to load here for some reason so if you mentioned it sorry.

Just wondering how the welding current gets back to the welder. Where is the ground lead connected? Is the welding current flowing through the spindle bearings? Hope not...

Interesting thread. Thanks for posting.

Bill
 
Thanks for checking out the tread Iwananew10k!

We spray everything down with anti spatter and do have a fire extinguisher nearby lost cause. The weld process is quite easy on the old southbend. We once had to cut out 100 or so bad welds and that is a whole lot harder on the old machine than putting the welds in! Those interrupted cuts really stresses things! I once caught my pants on fire, but outside that we just do the 2 hour fire watch after a weld job and haven't had any issues.

I re-shimmed the spindle about a year ago Bill and since then I have probably done a thousand welds or so. We put the ground clamp on the unused portion of way that is behind the drive pulleys. The current can flow however it gets there but it is a good ground. It could go up through the tailstock but I doubt that the electrical current really cares how it gets there. With those big old brass spindle bearings I am sure it loves that path to the work. Next time I shim the spindle I'll look and see if there is any pitting that could be caused by the electrical current flowing through the bearing. However it wont change a thing in what we do because that lathe is in my shop to work! I put the videos on YouTube cause I doubt that I would get enough space to load them up on PM. PM has a nice photo set up, but then again I am not sure how much space I'll have here for the future photos.

Thanks for checking things out and I do appreciate your input!

Regards,
 
Hi,

It may be likely that the current does return via the tail stock due to the oil film that exists in the headstock bearings.

If it were me I would still be concerned and probably set something up to rotate with the work piece when welding, since it would only be needed for one revolution.

Absolutely may not matter if your tolerances are in the .01" range even if there is damage to the spindle bearings.

I need to check out you videos again. Not sure why they were so slow loading here as I have a 75/75 fiber optic speed...

Heck... If you are making money with the lathe you can probably buy another in the future with a small percent of your profits.

Looks good to me!
 
Just one more Southbend welding video before returning to machining only on the old Southbend. This video shows what happens to the caps that were welded up in the previous video. Take a look at it here: http://youtu.be/Usc8Y5LSgYs

Thanks for looking and your comments are appreciated!
 
If anybody did electric arc welding on one of my lathes, I'd shoot 'em on the spot!! Not only are you risking damage to the spindle and other moving parts due to high current passage, you're also splashing molten metal against the ways and the carriage. You may have the lathe to "work" but it's not gonna work for long if you continue to do that. You need to find a "throw away" lathe for welding or build a fixture yourself for that purpose. What you're doing is not going to end well.


Back
Top