What's new
What's new

Lineboring 10L tailstock in-situ

jockofthelowveld

Hot Rolled
Joined
Jan 25, 2008
Location
Blythewood, S.C.
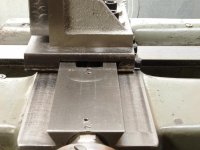
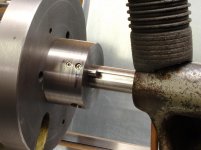
lineboring sbl 4.jpglineboring sbl 3.jpglineboring sbl 2.jpglineboring sbl 1.jpgAttached are photos of lineboring a 10L tailstock in preparation of sleeving it with 1144 stressproof alloy steel liner. This is the first phase of building a better tailstock for the 10L.
 
Last edited:
I am very interested in this as I have 2 tailstocks that need a lot of attention. I have been pondering how to go about tackling them.
 
Note: Building a line boring attachment that will line bore accurately (+/-) a couple of ten thousands in diameter the full length of the tailstock is not for the faint of heart or under experienced.
It is a challenge to a machinist, much less the computer programers.

The last photo above shows the lineboring shaft/bearing alignment prior to starting the work. In this case the shaft is 15/16" 0-1 drill rod with .001" runout from steel supplier to me. The shaft is then machined with a .275" wide by .175" deep slot 25" inches long as well as machined for the cutter hole and the four holes for attaching the cutter precision adjustment mechanism. Then the shaft must be straightened as it will have a curve to it after it is machined for the slot. A lead pad laying on the wooden work bench is used for correcting the straightness of the bar to where it is aligned with all three points (rear of headstock, front of headstock, and the adjustable fixture situated on the carriage) to where the runout of the boring bar is within a few ten thousands at the front of the headstock and at the carriage fixture.
 
So for making the support that is riding on the carriage, did you machine that bore for the bearing in place, using the lathe as a HBM, or take it to a different machine?
 
I started reading the first entry of this thread and then looked to see who posted it. The poster was whom I suspected. Very intersting and impressive work. All of your postings have been.

Vlad
 
That's some sweet stuff.

I do recall reading that if you had made the
bar out of, say, hot rolled steel then it would
not move when the slot was cut along its length.

I'm interested to see how the liner will be finished on the
inside to accept the tailstock quill. Will you be using
the original quill or making a new one?

This is a very challenging job - after you iron out all the
details I bet you could get a long line of customers who
want it done for their machine!
 
in-situ maching of bearing bore.

So for making the support that is riding on the carriage, did you machine that bore for the bearing in place, using the lathe as a HBM, or take it to a different machine?

In place --in-situ, up against the headstock with ER-40 collet chuck with a boring head installed in the collet. This bearing hole gives me the center line to adjust the carriage mounted bearing holder for all future times via its socket head machine bolts. See the last photo which shows the adjustment up against the headstock prior to me starting the line boring. By-the-way, the bore of the tailstock is now 1.3865", and am turning the sleeve for push fit into that diameter. The sleeve will be locktite held in addition to the push fit. The cast iron or grey iron--whatever it is will not take the abuse of a interference fit.

This bearing hole precision is is of great importance for the precision of the final job. When I built my prototype I drilled and reamed 3 holes in the bearing plate to hold it in place. That is not necessary if you adjust it to a couple of ten thousands runout as in the last photo mentioned above.
 
Why not hold the bar, and move the tailstock?

allan

Because the goal is precision. The tailstock is locked down againt the lathe ways throughout the entire line boring, just the same alignment that it is going to be when it is in use. It is impossible to duplicate the correctness of the tailstock alignment fitted to the lathe ways, by mounting the tailstock on a moving carriage. However, if you do not have a precision lathe, it is not possible to end up with a precision hole through the tailstock, in either method.

I have had both of my South Bend lathes bed reground and I fitted the carriages to these reground beds.
 
I suspect rigidity. The apron is meant to be slid/driven under load, unlike the tail stock.

Very nice work, OP.

But, why not hone the TS bore?


Honing is the final step in boring a tailstock bore. Honing is meant to cut away a few thousands of an inch of diameter. Hones must have the bore perfectly round, not egg shaped to be effective--see the video.

However, I increased the bore of the tailstock that I am using from 1.0625" to 1.3865". One would wear out numerous hones to get to that diameter.
 
Workshop1.jpgWorkshop2.jpgS Grant re-engrave 4.jpgJim;

Good to hear from you.

I started thinking about this project a couple of years ago and I began to fiddle with some work on the lineboring attachment nearly a year ago. I made a couple of bar and finally settled on the15/16" diameter x 36" long 0-1 pre-machined and ground bar that I purchased from others. After machining and straightening this bar will not flex as much as cold rolled 1018 while in use.

The liner will be 8 inches long extending back beyond the end of the tailstock by nearly 3 inches, and this extension part will be .725" in diameter. The threads for the tailstock rear end cap will be on the outside of the tailstock rear extension instead of inside as the factory unit. The tailstock spindle will be 1.125" in diameter instead of the factory 1.062", and will be made of 0-1. The sleeve is made of 1144 alloy ( commonly called stressproof steel). The two different steels will slide and move better than steel inside of cast iron.--just costs a lot more. The spindle will be 7.5 inches long. At the rearmost end of the sleeve a ball bearing will be fitted internally to serve as one of the bearing for smooth rotation of the tailstock feed screw. Inside of the new rear end cap will be a ball and thrust bearing providing further stability and smoothness of operation of the feed screw and its driving wheel.

As to the finish of the inside of the 1144 liner and I am searching for a long 1 1/8" reamer as a good price. I will line bore the liner with it inserted into the tailstock casting and mounted on the lathe ways. It will line bored to .004" smaller to final internal diameter and the reamer will finish it. I am considering building a hone or buying one in lieu of the reamer for better internal finish. Of course building and using a lead lap for final finishing (as the English finish their handmade shotgun barrels) is an option to fall back on.

I do not plan to do this for others as it is a labor of love to make my 10L the most accurate 10L in existence. Anyway most of us hobbyist machinist's talk about accuracy but we don't ever spend the money to have our South Bend's bed's reground and rebuild the headstock and carriage. I put this post on the forum to offer as a guide to anyone who wants to rebuild or repair their tailstock.

You do not have to line bore your tailstock to increase its bore size to fit a larger spindle. Just run a larger reamer through it and hone after that. Then make a new larger spindle. I have made several larger spindle in my time.

I have not been on the forum in quite some time as I have been learning to engrave firearms, and I do little machining now. I am 72 years old now and it will not be many years before I sell all my shop as I do not have a son to move it to. I do not remember if I ever posted a photo of my "worlds smallest machine shop" on this forum, but I will now. I really love to get out of the house and down to my shop. Jim, you will notice that in addition to my South Bend 9 & 10 inch lathes, I have two like new Burke vertical and horizontal milling machines, a large mill/drill, a smaller mill/drill, a metal cutting saw, two or three grinders and sanders and a six foot work bench all crammed into a 12 x 20 foot basement shop. I believe I recall that you shop is in your basement as well.

Regards;
Steve


That's some sweet stuff.

I do recall reading that if you had made the
bar out of, say, hot rolled steel then it would
not move when the slot was cut along its length.

I'm interested to see how the liner will be finished on the
inside to accept the tailstock quill. Will you be using
the original quill or making a new one?

This is a very challenging job - after you iron out all the
details I bet you could get a long line of customers who
want it done for their machine!
 
I am very interested in this as I have 2 tailstocks that need a lot of attention. I have been pondering how to go about tackling them.

It depends on what sort of work they need. Typically they droop at the front but the bore is still serviceable, in which case the typical fix is to shim them up and scrape to alignment.

Very nice work Steve, and thank you for taking the time to share and preserve this. If you're doing work like this I suspect you'll be hanging out in your workshop for a fair while longer, so I wouldn't be too worried about pulling in the shingle hanging out front just yet! Once again, nicely done.

Pete
 
Brilliant solution, beautiful work. Separately from the lathe, the lock is over the top!

I do question the use of 1144 for this app, though. I used to use it to make collets for obsolete (woodworking) mortise machines. I thought it would be ideal, but it seems to have more stress in it than HR, such as even 4140. The collets are more than adequate, but I might not use it in future, and the experience would not suggest to me using it for a liner; including for the wear characteristics. The steel on steel bothers me for long term with an unhardened barell. Or will the replacement be hardened? I'd personally strongly consider continuous cast G2, or maybe Al bronze if the barrel was hardened.

Again, this is more a question in case I missed something: how did you settle on 1144?

I love the work, and now have at least one more project to add to the que that is unlikely to get finished in the next decade. :)

smt
 
Wow. That's about all I can say. And great photos. I have a similar problem on the tailstock on my Clausing 5914, and the elegance of this solution is very attractive - but when I think about the effort involved, it just makes me want to take a nap. ;-)
I am curious about why so much stock removal was performed on the tailstock casting. Was this done simply to allow the sleeve to be somewhat more robust, and maybe easier to make? I note that you have increased the TS spindle diameter, which goes with the other feature changes, but just wondering what drove the decisions.
 
Very nice shop. Interesting microscope setup, is that a zeiss?

Of course the other problem with HRS as the bar, is it won't slide in the collet because
of the poor finish - which is why the stock you chose does well. But I suspect if you
look at the young's modulus on the your stock vs others. they will be nearly the same.
Obviously CRS would still have the spring problem so that's not better.

The reason I ask about the finish of the final bore, is you are doing so much work on
everything else, and the fit of the quill in the final bore really means a difference in
how the tailstock functions in the end. I do own a number of lathes with varying
degrees of slop in the tailstock and it seems like the better the fit, the better the
behavior when drilling. On my 10L I know that when I'm trying to do better than the
average job, I tend to partially lock down the clamp bolt to keep things under control.
But the fit there has over a thou of slop up and down.

The split bed hardinge I've got, much better as the TS is nearly brand new - and
for the life of me I cannot figure out *how* hardinge made that thing in the first
place. I guess that's one reason I'm raising the issue, as I would like to figure out
it's done from first principles! I suspect honing has to be the final step.
 
Beautiful work Steve asi si your engraving.

This is another one of your threads that I will be copying, with the photos, and archivine on my hard rive for future reference.

I still have the "silent leadscrew drive" thread archived and plan to implement it at some point in the future.

Thanks for another great thread Steve,

Vlad
 
Wow. That's about all I can say. And great photos. I have a similar problem on the tailstock on my Clausing 5914, and the elegance of this solution is very attractive - but when I think about the effort involved, it just makes me want to take a nap. ;-)
I am curious about why so much stock removal was performed on the tailstock casting. Was this done simply to allow the sleeve to be somewhat more robust, and maybe easier to make? I note that you have increased the TS spindle diameter, which goes with the other feature changes, but just wondering what drove the decisions.

Spec;

Read the reply to Jim Rozen's e-mail as it describes briefly that I am using the sleeve to act as a proxy casting extension to the back of the tailstock in order to update the SBL design to more modern bearings as well as longer spindle. The sleeve is approx 1 3/8" diameter for the length of the tailstock casting but it increasing in diameter to approx. 1.725" in diameter as the sleeve exits the rear of the casting. Once can sleeve a tailstock casting and bore the sleeve in order to use a stock SBL diameter tailstock spindle (or make one yourself to stock diameter), however that is not what I am aiming towards in the sleeving process, but a whole new departure. As I finish the second phase of the work, I will post more photos.


Back
Top