What's new
What's new

My "I took my lathe apart and all the pieces are in a box - what do I do now" thread

lost_cause

Plastic
Joined
May 18, 2010
Location
Maine, USA
My "I took my lathe apart and all the pieces are in a box - what do I do now" thread

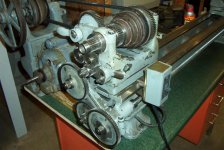
no, it's not as bad as it sounds - nowhere near it really. over the last week or i've been debating what to do with my south bend 9b that i'm not using. i figure no matter whether i sell or keep it, it wouldn't hurt to to tear it apart & clean & inspect it. if i keep it i know where things stand, and if i sell it it will let me think about how much i am willing to bend on the price.

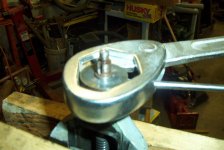
i have a 4-pulley v-belt setup and a v to flat motor drive belt, and both belts were pretty well ripped and cut through in spots. the original belt from the lathe to countershaft had a fixture crimped on the ends so it could be unpinned and taken off. i'm replacing it with a one piece belt since i wanted to pull the shafts and check the bearing anyways. i took the countershaft out & it had some galling present on the shaft & in the races, but nothing more than many of the pictures & videos i've seen on the internet. when i took the spindle out i actually got a surprise.

http://i908.photobucket.com/albums/ac286/lost_cause_photos/lathe/IM001714_zps072d919e.jpg

http://i908.photobucket.com/albums/ac286/lost_cause_photos/lathe/IM001715_zpseb12f0f1.jpg

the lathe had seen a lot of neglect somewhere prior to my getting it five years ago. the ways had multiple things dropped on them resulting in dents and there was some galling along the length of the ways from lack of oil ann failing to remove foreign material. lots of surface rust. bush-league motor and countershaft alignment and mounting system... i wasn't expecting much when i pulled the spindle, but what i got is as clean as i could imagine. the spindle & bearing journals in the headstock are as close to perfcet as i could imagine.

at this point my only question so far is what's the best way to clean the remaining baked on oil & crud from the polished surfaces of the spindle? it doesn't want to come off with a rag & wd-40, and i tried scraping with a piece of plastic but that isn't working either. i really don't want to use any sort of abrasive, but i don't know what to try next. any suggestions?
 
never mind - crisis averted. a little acetone & elbow grease got it pretty clean. i'll see what i can get stuck on tomorrow night... with any luck i'll have the back gear out & back in, the spindle back in, and the belts on.
 
i think i'm spending too much time in the shop because i must be going brain dead from sniffing too many chemicals.

last night i watched a video of a spindle replacement just to make sure there wasn't anything i would miss. i was watching the guy put it in, and as i sat there i said: " hey, he forgot to put the belt on before he put the spindle back in." he noticed a few minutes later to the tune of a few bleeped out obsceneties. fast forward to this afternoon when i started putting mine back together... i got the countershaft back in and was just about to tighten the set screws when i realized that i had also forgotten to put the belt on. after fixing the problem and telling myself that i was a dumbass i got to the spindle. i had that all lined up with the thrust bearing, pulley & gear installed and was just about to tap it in when i realized that i had yet again forgot to install the belt. if my shop had a censor the bleeping would have been as prolific as the swearing was. thankfully it wasn't possible to install the backgear without the belt at this point or i would have surely hit the trifecta.

so, the belt is on, and the spindle, back gear, and countershaft are all assembled. of course now i've realized that i wanted to remove the headstock so i could clean under it, which means i've got to remove the belt from the countershaft again... i'd like to blame at least some of this on murphy, but i don't know if any of this qualifies as more than my own dumbassery.

after all of this i decided i didn't want to pull the countershaft again this soon, so instead i disassembled the carraige, apron, rack, lead screw, and the rest of the side gears. we'll see if maybe tomorrow has more forward progression that backwards...
 
in between every other crisis that popped up this weekend i did put a little time to the lathe. i cleaned and reinstalled the rack and leadscrew and put the entire gear train back together. i think the reversing tumbler took more time to disassemble, clean and reassemble than anything else i've done to date. i haven't made a new rod for the piece that locks the countershaft back, so i shimmed it up with wood blocks to give it a trial run and everything sounds pretty decent. getting rid of the old delaminated v-belt and the v-belt with the metal splice clip in it eliminated a lot of the flapping and clunking that was there previously. there is a little noise still in the change gear system, mostly at high speed. my 72/18 gear came to me with two chipped teeth, and that gear and the 80 both have some roughness to all the teeth. the gear train was a little quieter before i cleaned all the years of sludge from them, but that sludge is likely what took the teeth off the 72/18 in the first place.

i still have the apron, tailstock, saddle, and compound to go through, but when i first got the lathe i did most of the compound, saddle, and tailstock, so those won't be too much work. i never went as fas as removing the screws before, so i'm sure there is a little crud packed in them to deal with. the apron however, has probably never been apart, so that will be my project for this week. i've got to do a little research to figure out how to dismantle the apron, so if anyone has a link to a good writeup or video, let me know.
 
Lol, I watched the same video with the spindle, I'm doing a 9A right now "south bend 9" lathe $300" thankfully I'll be using a laced belt so no worries there for me. Here's a link to an article on Tony's site, I used it my self and will likely need it again to get it all back together without throwing a cursing fit my self, I've got a broken part in mine that will need repair (apron casting)
hercus page 5

The man in the article was working on a hercus, which is an Australian SB 9 clone, identicle.

i haven't done much to the lathe lately as plenty of other things have needed attention and taken priority. i am glad you posted this though. with the pictures i managed to get everything disassembled and started to soak in the washer. the only thing i didn't take apart was the spring loaded idler gear shifter lever. i tossed it in the tank complete - hopefully that wasn't a bad idea. i'll clean it and dry it out and figure out how to lubricate it lightly and hope it works fine. before i looked at the article you linked i hit a snag and had to look at the pictures to figure out how to take apart the pin, key, and nut on the worm gear, but the article solved it.

the one thing i noticed was that there was no gasket under the plate in the apron that makes up the oil pan. whatever oil it got always went right out, but nothing in there looks any worse for the wear. i guess everything in there is slow moving so the lack of lubrication isn't as critical there. i'll make a paper gasket when i put it back together so it will hold some oil. with any luck i can get the apron back together and get a start on the cross slide and compound this weekend.

here's a couple pics of where things stand now. you can see the risers under the headstock & tailstock in these too:
 

Attachments

  • IM001714.jpg
    IM001714.jpg
    98.1 KB · Views: 253
  • IM001715.jpg
    IM001715.jpg
    97 KB · Views: 173
  • IM001717.jpg
    IM001717.jpg
    97 KB · Views: 176
well, the apron went back together without a hitch. i did reference that post to figure out what piece to start with, but after that it was pretty intuitive as far as reassembly went. i finally got to use my whitney #5 jr punch for the holes in the gasket i made for the oil reservoir.

i started disassembling the saddle and compound and got most of the way through. i made a spanner to remove the nuts for the handwheels and managed to get the cross slide apart, but i can't get the compound nut off. it looks like the end of the compound screw was peened over pretty well and it twisted my spanner like a pretzel.

i've got to build a new spanner, but how to make one stronger? my first one was a piece of flat steel and it didn't hold up. if i took a very large bladed screwdriver and notched the tip to make a spanner maybe? are there any other good ways to make a strong spanner? any suggestions?

for now, a picture of the reassembled apron:
 

Attachments

  • IM001729.jpg
    IM001729.jpg
    95.7 KB · Views: 196
so, i didn't want to wait any longer to take the saddle & compound apart. i decided to find a screwdriver large enough to notch out to remove the nuts on the end of the crank handles, but the only ones i had large enough were snap on screwdrivers, and using those screwdrivers is not exactly a cost effective way to go, so i took a drive to my favorite local used tool shop.

i found a suitable screwdriver and while i was there i decided to find a dedicated wrench for the tailstock rather than grabbing one out of the toolbox each time. after 10 minutes i found a 25/32 box end wrench to work with. i knew i still needed a pin spanner to finish taking the saddle & compound totally apart, so i started looking for any spanner to modify.

after i was convinced i wasn't going to find a spanner i got an idea. i remembered seeing some spanners for sale on ebay that pivoted to bear against the body of the hub that screws into the saddle & compound. i came across one of those cheap one-size-fits-many wrenches that any self respecting mechanic wouldn't be seen dead with, so i bought it. i figured i could cut it to a half-circle & add a pin and have a working tool. it turned out better than i thought: i was able to put the wrench over the hub and insert a piece of 5/32 drill rod through the wrench and into the hub and had a perfect spanner with no extra work required. here is a poor quality image of it:
 

Attachments

  • IM001734.jpg
    IM001734.jpg
    94.2 KB · Views: 169


Back
Top