What's new
What's new

Tailstock points to the right (back of machine). Solutions?

xplodee

Hot Rolled
Joined
Oct 14, 2013
Location
Allentown, PA
Hi All-

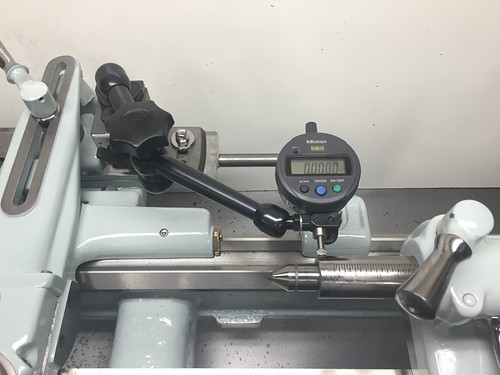
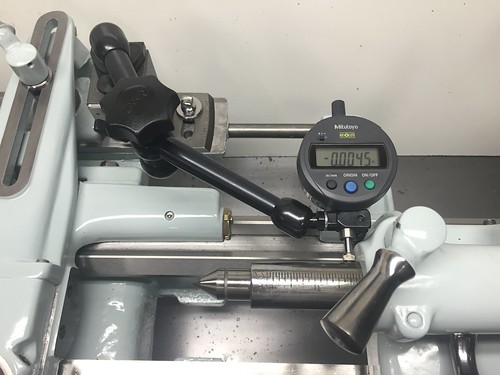
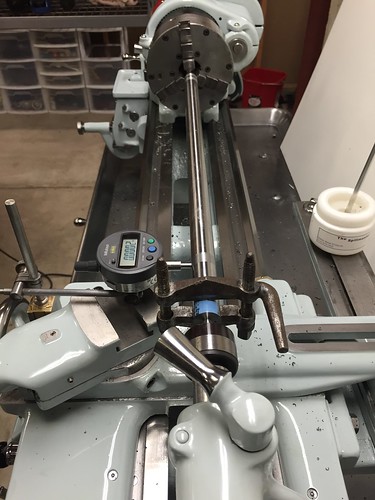
My tailstock is out of alignment side to side, as in it points to the right as you extend it out of the quill. The total runout over the 2" of travel is 0.006, so quite a bit in my opinion.

Scraping it into alignment should solve this, right? Is there a way to shim it instead of scraping it? I do not have the tools to scrape it and would have to rely on a kind soul to come to my house and do it for me.

The tailstock has no droop and it is raised to the correct height. The only issue is that it points to the side. I aligned everything with the tailstock at 1" of travel (exactly in the middle) so the good news is that I can turn between centers with no taper (0.0002 over 18") so long as I lock the quill down at 1". But drilling could be an issue...
 
Thank you, Richard-

I measured using a tenths indicator (digi mitu) with a flat tip touching the side of the quill while fully extended. Indicator is mounted to the carriage. Then I moved the carriage forward and back.

The tailstock base was scraped into the bed without the tailstock on top of it (my request). I think this is the source of my problem. Now i need to fix it.
 
I seriously doubt you're dumb. We've all done things we've come to regret, but usually we made the decision
for what seemed at the time to be a good reason. I was just curious is all. I have done many things that
seemed right at the time but caused a lot of work later.

BAD decision = Best Available Data

Pete

Thanks, Pete. When I was painting parts I assumed that scraper would only need the tailstock base to scrape it in. Didn't know as much about scraping/alignment then (barely know more now but I get by). I just kept my fingers crossed that everything would be ok and now must learn from the mistake.

So, what do I get to learn? Can I shim it or must I scrape it? I can deal with it in the meantime bc I can always bore critical holes.
 
I would use some plastic shim stock or 2 sets of feeler gages and put one in front and one in back of the V under the tail-stock opposite sides. This way you will know how much to scrape off as it. You have to think about the multiplication of error. I would also double check for burr's and also try to slide in feeler gages between the 2 halfs. Seems odd you scraped off that much. Take it apart and blue up the TS slide Na then hit the 4 corners of the TS bottom to see if it hits solid. I would also scrape the middle 40% low approx .0005 to .001" low. Once you have it setting solid put you mag base on the cross-slide again and indicate the TS right angle key. It should be parallel to the the cross-slide travel. Check that and we can talk about the next step.
Rich PS: You can also ask the guy I told you about for help as he was a student of mine.

Richard-

I am definitely not necessarily sure that all of the misalignment is from the scraping operation, it's possible that it's from elsewhere. I'll take photos tonight and post them onto this thread.
 
Have you done turning( no tailstock) and facing tests yet?

Just curious what you mean specifically (so I can make sure I understand) but I have turned larger diameter stock and turn straight for at least an inch. I can do some really large diameter stock (1" or more) and see how I do over a longer distance. What would be a reasonable test?

That said, the description I posted above is definitely a problem with the tail stock as it relates to the axis of the quill and the bed ways because I am measuring the quill's side-to-side deflection by moving the carriage forward and back along the Z axis.
 
my thought is you might be seeing at least in part an issue of bed twist.

You may have already but first test I would do is chucking up a 2"-3" bar of easy cutting material such as aluminum or 12L14 steel with approx 3x the diameter sticking out of the chuck and seeing how it cuts unsupported(sharp tool,light cut)

If there is taper adjust until it cuts straight.
then move to how it faces.

only after everything else checks move to tailstock.

Ok, will do.
 
I have stated the following many, many times. Without the use of precision test bars in both the spindle taper and the tail stock quill as well as a straight bed, you know nothing, you need a reference to measure against.
 
WE have discussed the 2 collar test hundreds of times and facing an aluminum round in the chuck. Plus turning a plug the same size as the tailstock quill umteen times and checking the side as X is using. X how about signing you first name ..it's a pain calling you X
 
One needs two test bars: one to use between centers and one that goes in the spindle taper. Few know about
the one for the spindle but it's the one that checks spindle alignment with the bed.

One can use the spindle bar in the tail stock quill. I actually recommend that the spindle bar have a taper
to fit the tail stock quill and then use a good, precision, sleeve to fit it to the head stock spindle. But the
sleeve(s) must be near perfect otherwise forget it!

Pete
 
1) Bed was re-ground
2) saddle was turcited and scraped in
3) cross slide and compound were ground and scraped into their mating parts.
4) tailstock base was ground and scraped into bed but no tail stock or head stock was provided for this service.

The machine was leveled with a precision level as the last part of assembly. First the feet were adjusted and then the bed was twisted ever so slightly to complete the process.

Test 1: I did a 2-collar test first in order to get the tailstock to the appropriate height and center. I used 0.625" 12L14 for the two-collar test and dialed the center in left to right. Then measured 0.012" of drop below the center point. I shimmed it exactly that amount or 0.0005" above and measured after shimming. Got it on the first shot. All testing was done with tailstock locked at 1" quill extension.


Untitled by Tim Marks, on Flickr

Test 2: Measured droop of tail stock quill at 0.001 over the length of it's travel.

Test 3: Measured left/right deviation of tail stock at 0.0045 total. My title is wrong, the tailstock actually points left.


Untitled by Tim Marks, on Flickr


Test 4:

a) I took a 7/8" diameter, 18" length of 12L14 then faced and center drilled it with only 1" extending from the collet. I then used a ground piece of HSS and the compound at 60deg (or 30deg, whichever it was to produce a proper 60deg center) to true up the center. The piece was then flipped within the spindle and the same operation performed to the other side.

b) A chuck was mounted to the spindle and a piece of steel mounted within the chuck. This was turned to a 60deg center in-situ so as to produce a perfect dead center. The piece and chuck remained in place, never removed or re-installed.

c) The rod from (a) was now mounted between centers using a drive dog. On the headstock side I turned down the rod to some arbitrary diameter. Without moving the cross feed, I pulled the part out from centers, moved the carriage to the tailstock, replaced the rod, and then turned the opposite end of the rod to the same diameter as the headstock side.

d) I then measured alignment of the spindle/tailstock center line using my digital tenths mitutoyo indicator at 0.0002". This was done by mounting the indicator to the tool post, zeroing it on one side of the cut test piece at the headstock side and then moving the carriage to the tail stock side and reading the indicator . I am describing this test to the best of my ability but I may have forgotten exactly what I did or the way I did it. I know that while I was doing it, it seemed right. But I could have done it wrong or remembered it wrong. I'm happy to repeat a test.

Untitled by Tim Marks, on Flickr
 
Ok, the fact that it is pointing toward you is good, an indication the scraper knew what he was doing.

As much as I hate to go down this road, I very strongly recommend re doing your two collar test with at least a 2" bar held in a chuck(3x diameter sticking out

You can side step dickering around some by first making the collars to the exact same diameter, THEN running your indicator along the collars and adjust bed foot until you get the same indicator reading.


i am betting you have a slight twist that needs addressed and once you have you will find the quill to be better than you think, and some of the pointing toward you is actually wear to the quill and bore( maybe most)
if you extend your quill with an indicator against the side with it unlocked it will move toward you as you tighten the lock.
I know you are shimming to height and I would recommend setting it about .002" high.
This along with the quill pointing slightly toward you will double the service life as the tendency is for them to wear pointing down and away.

ie- it will wear in before it wears out.

Since I have only actually rebuilt 2 lathes I will of course defer to what Richard says.
 
Ok, the fact that it is pointing toward you is good, an indication the scraper knew what he was doing.

As much as I hate to go down this road, I very strongly recommend re doing your two collar test with at least a 2" bar held in a chuck(3x diameter sticking out

You can side step dickering around some by first making the collars to the exact same diameter, THEN running your indicator along the collars and adjust bed foot until you get the same indicator reading.


i am betting you have a slight twist that needs addressed and once you have you will find the quill to be better than you think, and some of the pointing toward you is actually wear to the quill and bore( maybe most)
if you extend your quill with an indicator against the side with it unlocked it will move toward you as you tighten the lock.
I know you are shimming to height and I would recommend setting it about .002" high.
This along with the quill pointing slightly toward you will double the service life as the tendency is for them to wear pointing down and away.

ie- it will wear in before it wears out.

Since I have only completely rebuilt 2 lathes I will of course defer to what Richard says.

This is starting to make a lot more sense to me, especially what you said about the tailstock bore being worn, thus when I clamp it it will come toward me. Makes total sense. Ok, I'll study what you wrote and wait for Richard to reply.

fwiw, I just bought some 2.125" 12L14 to do some more inspection with.


Back
Top