dgfoster
Diamond
- Joined
- Jun 14, 2008
- Location
- Bellingham, WA
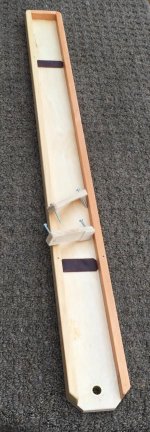
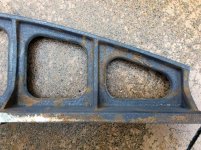
FS 19 to 23# Featherweight 36" Camelback Straight Edge. Rough casting or machined.
I have sold 5 of these to PMers (some pros and some neophytes) all by word of mouth and have one of a run of 6 left to sell. As cast it weighs 25#. But to get it flat and cleaned up, it machines to 23#. From there it is a matter of personal preference. I machined mine to 19 pounds which is probably the lower end of what most folks would want.
The sole measures 2 7/8" wide and 1/2" thick.
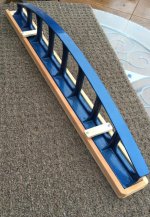
This is a camelback SE of my own design and commercially cast in 40 Grey Cast Iron.
It was allowed to cool slowly in the sand mold to reduce retained stress and then formally stress relieved by a heat treat firm per standard cast iron recommendations. They have had no hard spots and have reportedly scraped very nicely.
Though it is very light in weight compared to comparable broad-based 36" SE's, it is very rigid. I tested it to have less than .0001" deflection when supported at its ends and loaded with 30 pounds at its midpoint.
I can supply it as a rough casting or with the sole machined to +/- .001 flatness and the sides machined as well.
Local pickup would be ideal, though I have boxed and shipped one.
If interested, please PM or email me. I am considering doing another run if that seems indicated.
The pictures show a plywood, plastic pad, and brass grommet storage shoe I made for mine---not supplied but for illustration.
Price is 450 USD as cast and 625 USD machined. Shipping, obviously would have to be worked out depending on buyer needs.
Denis
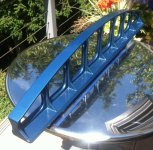
I added a photo of the profile of the end of the SE and then posted again some photos of the casting.
I have sold 5 of these to PMers (some pros and some neophytes) all by word of mouth and have one of a run of 6 left to sell. As cast it weighs 25#. But to get it flat and cleaned up, it machines to 23#. From there it is a matter of personal preference. I machined mine to 19 pounds which is probably the lower end of what most folks would want.
The sole measures 2 7/8" wide and 1/2" thick.
This is a camelback SE of my own design and commercially cast in 40 Grey Cast Iron.
It was allowed to cool slowly in the sand mold to reduce retained stress and then formally stress relieved by a heat treat firm per standard cast iron recommendations. They have had no hard spots and have reportedly scraped very nicely.
Though it is very light in weight compared to comparable broad-based 36" SE's, it is very rigid. I tested it to have less than .0001" deflection when supported at its ends and loaded with 30 pounds at its midpoint.
I can supply it as a rough casting or with the sole machined to +/- .001 flatness and the sides machined as well.
Local pickup would be ideal, though I have boxed and shipped one.
If interested, please PM or email me. I am considering doing another run if that seems indicated.
The pictures show a plywood, plastic pad, and brass grommet storage shoe I made for mine---not supplied but for illustration.
Price is 450 USD as cast and 625 USD machined. Shipping, obviously would have to be worked out depending on buyer needs.
Denis
I added a photo of the profile of the end of the SE and then posted again some photos of the casting.


") " like cast ones would be. I actually made wood ones for mine, but found I liked the simple wood u-frame solution a ton (or maybe a pound and a half) better.
" like cast ones would be. I actually made wood ones for mine, but found I liked the simple wood u-frame solution a ton (or maybe a pound and a half) better.