What's new
What's new

Help with rebuilding a Parks No 2 18" bandsaw

AnderewM

Plastic
Joined
Jun 11, 2013
Location
Baltimore, MD
I am rebuilding a Parks No 2 bandsaw. Currently I am replacing the bearings on the top wheel spindle. Should have the new bearings in a couple of days and I am trying to determine what type of grease to use on them. And how to grease them. The spindle had two bearings set about 3" apart. The casting that supports the bearings has a grease fitting in it and there was a greenish blue grease on the spindle between the bearings. The lower wheel also has a grease fitting set into the casting but I haven't opened that one up yet. My assumption is you pump some grease into the space between the bearings every now and then to lubricate them. But lots of reading on this site makes it sound like spindle bearings are lubricated with grease when they are installed, being careful not to over grease them because that causes overheating. Every few years they are re-greased. Pumping grease into the fitting would make it very easy to over grease the bearings, almost makes it a requirement. You wouldn't know the grease had reached the bearings until it starts to squeeze out between the races.

Anyone have any ideas? Should I pump the spindle full of grease or should I grease the bearings individually?

And what type of grease should I use each way.

Thanks,
Andrew
 
Did the old bearings have seals on one side only or no seals at all and the shaft has lip seals out side the bearings. Put in sealed bearings and be done with it for ever. If you must
Pack the bearing with grease by pushing it in around the balls with your fingers. And yes do not over fill the housing, 1/3 full
Type of grease EP-2
 
Those bearings are not quite as critical as bearings in, say, a machine or even an electric motor. Relatively low speeds. So if they don't have seals, pack them when installing, and then pretty much forget about them. If sealed, install and forget.

The greenish stuff is usually a lithium base. Good high pressure grease. As Sequim notes, no need for anything thicker than EP-2 Other than that, not critical for that application.

smt

smt
 
Thanks for the replies.

On the old bearings the outside bearing was sealed both sides, the inside bearing was shielded both sides. I bought shielded bearings because they have less friction and this saw will only see light use, so I am not real worried about dust. No seals on the shaft, just a small shoulder for the inside bearing to seat against.

Bearings came today. Not much room to pack in grease with the shield in place. Should I try to push it in through the shields or do shielded bearings come pregreased?

I don't have a bearing heater, but I do have a very precise PID temperature controller with a probe. I was going to heat the bearings up to 250 degrees F. so they slip on the shaft easier . Any issues with this? I read about doing this in another post on this site.

Andrew
 
I suppose it does not hurt to check with the manufacturer or supplier, but all the shielded bearings that I've used were pre-greased.

The heating is a good idea. You can heat them in the kitchen oven (when SWMBO is not paying attention)
Temperature is not critical except it has to be hot enough to be effective, but not so hot is leaks all the grease out. I'm of course assuming nowhere near charring temperature. But 275 wont hurt, and 212 is still going to be helpful. Put aluminum foil under to catch any drips.

Steel expands aprox 6 millionths of an inch per degreeF per inch. Assuming shaft at ~70F; the differential from 250F is only 180°F. A 1" hole would expand 1.08 thousandths. So if the shaft hole is 3/4" dia, the hole will expand just a teeny bit over over 3/4 x.001" (.00075)

If you've never done it before, make it easy on yourself. Have the shaft _securely_ supported vertically in a manner that you can't knock it over in the (ahem) heat of the moment. Drilling a snug hole in an adequately sized supporting piece of thick wood can be useful, assuming you are not working near a vise with padded jaws. Use welding gloves or other insulating gloves unless you have practiced with tongs or channel locks (which I don't think are a good idea, but someone who has never done it may :D. IMO for the low temps involved, the gloves will be best so long as they are relatively clean, certainly dry, & don't shed.
If the bearing has to stop somewhere on the shaft that is not a shoulder, make something for a hard stop, to stop it against.

Pick the bearing straight out of the oven. Take a breath and visually align it. Then place it on the shaft without stopping and slide it straight down to the stop or shoulder. Then just wait. If you hesitate and it is a tight fit, the bearing will heat the shaft and the shaft will cool the bearing and they will lock up. (If they don't lock up, you probably didn't need to heat it). It's not "immediate", but don't make any false moves or hesitate more than good practice to get good alignment.

If the bearing seems to have leaked "copious" amounts of grease, then you better pump some in after assembly, or spend some effort to work some through the shields.

I'm not picturing your particular assembly, so not intending to offer advice on whether to put the bearing in the wheel first or on the shaft. If the wheel goes on second, wait until the bearing is really cold before that step.

smt
 
The wheel is cast aluminum and has shoulders for the bearings. So heat the wheel, drop in the bearings. Heat the wheel/bearing assembly ( being careful not to drop the bearings back out), freeze the shaft and drop the hot wheel assembly over the cold shaft. Easy as Key Lime Pie. I will make a wooden jig to hold the shaft and wear welding gloves.

Thanks for the help. I will let you know how it goes.

Andrew
 
After I put everything together I could feel a slight catch when I spun the wheel. Must have damaged one of the bearings, probably when I put the shaft in. The bearings pushed into the wheel with little resistance. The shaft went through the first bearing with more resistance but had the most resistance going through the final bearing, that's likely when the damage happened. Or maybe it happened when I pushed the shaft through the first bearing because there was no way to support the back side of that bearing with the other bearing installed.

I am going to mount the inside bearing on the shaft, pushing it down to the shoulder. Then push the shaft mounted bearing into the wheel, then push the final bearing onto the shaft and wheel at the same time. Should have a little more control this way and I will be able to fully support both bearings as I push them in. New bearings should be here in two days or so.

Andrew
 
When you took them apart again, did one of the bearings still feel rough?

If you really just pushed the parts together, I doubt you damaged them.
Now if you were actually wailing on something with a 5# drilling hammer, well all bets are off :)

It is not easy to get 2 bearings like that on and not have a small mis-alignment. But run the wheel a while, and the bearings will shift and bit and smooth out. Trust we are not talking high$$$ precision ABEC7 bearings here? Misapplication if so.

There should be a spacer between the bearing center races in the wheel, is there not?

smt
 
When you took them apart again, did one of the bearings still feel rough?

If you really just pushed the parts together, I doubt you damaged them.

smt

I agree with Stephen here. Probably what's happening is that the balls in both bearings are axially loaded against their races and just need to change position a bit to roll freer. Sometimes all it takes is a whack with a deadblow hammer on the shaft or housing to get each race in the proper relation to its mate, that is, if the fits are not too tight. (Stephen, what were you saying about not using a hammer? :) )

Andrew, from your description, each bearing race is a press fit. If one of the 4 bearing races is a slip fit, it makes for easier assembly, longer bearing life and I think would fix your problem. One sliding race allows for changing relationships between the lengths of the housing and spindle, which is due to temperature differentials. If the slip fit is between an outer race and seat, a bearing preload spring (like this) can be used. This is preferred practice for electric motors, which have a similar bearing arrangement.

In addition to allowing for thermal expansion, the preload spring provides just enough force to keep the balls in contact with the races, and therefore, rotating at all times. A common ball bearing failure mode is as follows: machine is operating, bearing is rotating, one or more balls not in contact with a race. This is allowed by internal clearance in the bearing. The situation changes, for any number of reasons -the bearing rotates and gravity or thermal expansion or axial load forces a race against a non-rotating ball(s). In any case, the ball skids against the race till it's brought up to speed and the skidding makes a rough spot on the race and ball. Then the rough spot, or spots, damage the bearing in other places as it rotates, etc, etc.

An electric motor operates at much higher speeds and temperatures than your saw, so probably the spring isn't necessary, or even possible for your saw. But a slip fit on one of the races should (IMO) solve your interference problem, if that's what it is, make assembly easier and possibly improve bearing service life.

Neil
 
I've pulled the bearings back out and ordered new ones, $6 each so we aren't talking much money. No hammers involved! I will try again with the new bearings. If I feel the catch again, I will spin it up with the motor and see if it settles in.

Both bearings are a press fit, I can see how a slip fit on one would make this much easier. The bearings pressed into the hot wheel pretty easy, a slip fit for the shaft on the inside bearing would work well. Easy to fully support the outside bearing as the shaft is pressed into it after sliding through the inside bearing.

There is a spacer in the wheel, the bearings seat against it from either side.

Andrew
 
I'm probably overthinking this, but my interest is piqued...

Just to be sure I'm picturing this correctly: The outer races of both bearings are pressed into the wheel and located there by the spacer. The inner races are also press fit onto the axle, one located by a shoulder at the big end of the axle and the bearing at the outer end by a nut?

Neil
 
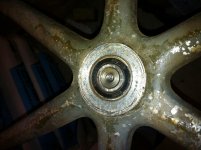
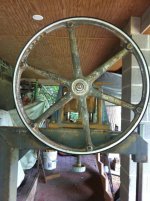
I've attached, hopefully, two pictures. One shows the front of the wheel,before I dismounted it from the bandsaw. The other shows the back of the wheel with the shaft sticking up.

You are correct about how it's put together. The spacer inside the wheel is part of the wheel casting. When the shaft is pressed home with the shoulder against the inside bearing, the other end of the shaft is flush with the outside of the outside bearing. The center of the outside end of the shaft is drilled and tapped for a safety bolt to be installed. You can see the screw and offsized washer that was on the bandsaw when I picked it up. I will be replacing that with something a bit more correct.

Wheel on bandsaw.jpgBackside of wheel.jpg
 
This discussion about press vs. slip bearing fittings sent me off into other parts of this forum. The load is always in one location and the shaft is fixed. I'm starting to think that the saw was originally fitted with bearings that had a press fit into the aluminum wheel and a slip fit on the shaft. With a retaining nut and washer on the tapped end of the shaft to hold everything in place. Would make replacement of the bearings very easy. The bearings may have been incorrectly replaced sometime in the past. The saw is easily 40 or 50 years old, did they make sealed bearings with rubber/plastic coverings back then? That's what the outer bearing was. Picture below.Outer bearing.jpg

Andrew
 
Cheep little ball bearings.
this is not rocket science.
The trick to installing bearings is not to press through the balls- push on the outer race when setting the outer race in its bore.
Press on the inner race when installing over a shaft.

If you don't have a lathe to turn a proper driver with, check your deep well socket wrenches. Bet you find one that's close enough.

Its unusual for both the shaft and hub to be true press fits. That can take up the clearance in the bearing. One is probably a line to line fit (light press) and the other is a press fit.

If you can get sealed bearings for the same price as shielded, go sealed (assuming the inner race is the right thickness)

Typical installation would be to drive the bearings into the hub, pushing the outer race only and with a shaft spacer between inner races.
Then it would be driven on to the shaft with some kind of guide tool that kept everything aligned and transferred all the pressing load through the inner race and spacers.
Sometimes the process is reversed with the spacer between the outer races.

The point is, don't apply a thrust load through the balls.

Grease - go with sealed bearings and avoid the issue all together.
If you cant do that, pick a good general purpose grease and stick with it. Don't mix greases with different bases.

Over greasing - not good at high speeds - too much churning generates heat and breaks down the lubrication.
With a simple shielded bearing at moderate speed and in this environment, you grease to purge junk from the bearing.
If there is too much grease in the bearing it will pump out (and make a nice dust magnet)

Once again - just get sealed bearings. Parks would have used them if they were available back in the day.

As to the tick you feel - it could be a damaged race. Simply dropping a bearing onto a hard surface from a moderate height can damage it.
Don't believe me, find something good bearing in the scrap pile, pull the bearing and drop it on your work bench once a day for a year, and spin it each day.
Its stunning how bad it gets.

A tiny bit of dust or grit is another possibility. Back when I was in school, we had a kid show up in the machine shop with a new high dollar bearing that had a tight spot.
Examination under the stereoscope revealed a single strand of lint in the oil on one of the balls. Picked it out and everything ran fine.
 
I'm starting to think that the saw was originally fitted with bearings that had a press fit into the aluminum wheel and a slip fit on the shaft. With a retaining nut and washer on the tapped end of the shaft to hold everything in place. Would make replacement of the bearings very easy.
Andrew

Sure seems that way. I'm no expert on bandsaws, but the 3 whose bearings I've changed were exactly like that. If I'm understanding your pix correctly, the shaft would be easy to chuck up and sand a couple thousandths off. Then the bearing preload could be adjusted by feel.

It seems unlikely that someone has substituted the wrong bearings. The differences in bore diameters and ODs from one size bearing to another, or even fractional vs metric are much more than the difference between a press and slip fit. Maybe there was a shaft substitution along the way?

ahall has got the pressing in considerations exactly right. Good clarification.

Neil
 
The bearings pressed into the heated wheel fairly easily, the shaft is the tight one. The only way I can press the bearings in with proper support would be to press the inside bearing onto the shaft, press the shaft/bearing assembly into the wheel, then press the outside bearing into the wheel and on the shaft at the same time. Seems like that last move is going to be an easy one to mess up.

An alternate is to chuck the shaft into my drill press and sand it down to a slip fit. I don't have a lathe and worry about getting the shaft out of round with the drill press. Should I be concerned?

Another possibility is to find a local machine shop, give them the bearings and the shaft and ask to have the shaft turned down to a slip fit. Class Three medium fit sound right?

Andrew
 
An alternate is to chuck the shaft into my drill press and sand it down to a slip fit. I don't have a lathe and worry about getting the shaft out of round with the drill press. Should I be concerned?

I wouldn't be. Shaft roundness isn't that important. At worst it could be out of round by the 1 or 2 thou in diameter you need to take off. Run the drill press as fast as possible and use 80-120 grit paper, checking diameter with the bearing till it slides on. Pressing the sandpaper against the shaft evenly from both sides while sanding is important- pulling to one side can unseat the chuck from its taper.

Neil


Back
Top