What's new
What's new

1978 Mori Seiki MS-850 brake caliper and master cylinder equivalents?

Is the caliper designed with the seals on the pistons (groove in piston), or in the caliper (groove in caliper)?

Groove on piston will tend to drag due to the seal adding to the area of the piston, and deflecting under load such that it deforms to create a continual drag force.

When a groove in caliper seal is deformed, it tends to stretch down the piston under load, but this drag deformation usually helps draw the piston back into the caliper when the load (the hydraulic pressure) is released.

Regardless, this might be a situation (non-life critical) where you can try to find a O-ring the right size to replace the square ring seal in the calipers (whatever groove method is used). That should allow easier pushback of the piston, perhaps with a small added wobble (last resort).

Make sure the O-ring is EPDM rubber, which is compatible with brake fluid.
 
Well. That didn't work.

I tried adding a bit of air. No dice. The dragging got a smidge worse.
(I think. Hard to hear with the compressors and CNC's going.)

So I pulled the pushrod, and used the comparator to figure the profile differences between the old (short) pushrod, and the one that came with the MS.
It's hard to tell for sure, but it looks like the new (too long) one only sat about .006" farther back, when measured against its washer.
The profile was a little different, but the overall change in depth appears to only be .006".

So I took .030" off the front of the old (short) pushrod, and reprofiled it a bit, to make it closer to the profile of the issue pushrod.
Put it all back together, bled the brakes, and.....
Nada.
Still dragging after one clamp.

As long as I was down there, I fiddled with the pushrod a bit, once everything was installed, to see if there was any slack in the positioning between where the MS spring stops pushing, and where the pushrod ends up when the pedal returns to full 'up'. There seems to be, so as far as I can tell. It feels like I've got plenty of clearance so that the MS returns to full stroke before the pushrod stops moving back to rest position.

Now that I think of it, milling the pads won't help. The system will see that as wear, and just pull a bit more fluid out of the reservoir to compensate for it. So no joy on that idea.

So.... next idea was to unhitch the pushrod from the pedal, and yank it forward, to as far out as it'll come without ripping the end out of the MS, and see if *that* un-drags the pistons.
Nope. The pedal is actually still pulling 'out' when the pushrod runs out of 'out' travel. So it's actually pulling the thing to full out. Still drags.

Anybody got any other notions about what's going on?

Thanks,
Brian

Sorry about that, it did work for me unless, I just got lucky....
 
Update:
I thought I'd logic'd my way to an answer.
I was wrong.
I thought about it while I was driving home last night, and I came to the conclusion that I'd just been bleeding the brakes wrong.
I'm bleeding into a soda bottle, using the old hose trick.
So I was closing the bleed valve with the pedal 'up'.
My theory was that closing the valve with the pedal up didn't leave any negative pressure in the system to pull the pads back out.
So if I closed the valve with the pedal held down, it should work.
Had one of the guys stand on the brake today while I closed the valve.
Nope.
Still drags.
Gurrrr.......
-Brian
 
Update:

It ain't the pushrod.

I tried bleeding the brakes with a set of .030" shims stuck between the pads and the disk. Yanked them, pumped the brakes, and....
Dragging.
Again.

In a fit of frustration, I yanked the master cylinder (but left the line connected), and pulled the pushrod entirely. Re-clearanced the pads.
Pumped the brakes by way of an allen wrench pressing down on the piston. Let it off completely, so there's no pushrod there at all. The piston is as far forward as it'll come.

Brakes still drag.
Even with the extra .060" gap. Took that slack up instantly.

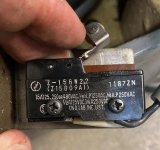
And in all the fussing with the master cylinder, I managed to trash the microswitch that trips the on/off relay when you hit the brakes.
So the machine's dead until I get a new one in. Gurrr......
Just in case anybody needs a reference for that microswitch, here's a picture.
For text searches, it's a Z12GW22, (Z15G09A1) 1187ZN. Whatever that means.

Wish me luck finding one.

Ah joy.
-Brian
 

Attachments

  • Mori switch.jpg
    Mori switch.jpg
    90.7 KB · Views: 28
Are you sure the Master Cylinder is for a disc brake. Drum brake master cylinders usually have a residual pressure valve in them

Really? Please speak more of this.
I know jack about cars.
Give me a 100 year old machine tool I've never *seen* before, and I can have it humming before quitting time.
Cars? Hopeless.

It was sold as the correct master cylinder for that unit, and the unit itself is a disk brake system, so I've been assuming that the guy who makes his living selling weird old datsun parts knew which one was which. God knows I don't.

I'm going to tear the whole system out (again) and work it on the bench, to save fussing around in the guts of the Mori, and breaking any other hard to find parts. I've got another 3/4 trailer master coming in, just to play with, so I'll try putting that one on and see what happens.
Failing that, I'm going to tear the pistons apart, and see what's going on in there.

There is one weirdness with the pistons: when I pulled the originals apart to do a seal job on them, (before I knew the bores were pitted) I yanked the pistons, and there's a little steel spike coming up out of the center of the bore. No idea what it does, but it seems to be *REALLY* hard to to drive the pistons back down onto it. I had to use a mallet to smack the old piston back down into position.
When I was bench testing the new pistons after install, my spacer block slipped out without me noticing, so I pumped the pistons 'in' with no disk in the way. So they got stuck out. I pulled them apart, and put everything back to rights. The new ones have that same spike, and it's just as hard to drive them back home as the original ones were. I had to use a mallet again to get them to go home.
They have the square rubber 'o' rings, but they were hard to drive home well before that made contact. The only thing that was making contact was that center spike.

Anybody know what it does? Or why it's so blinking stiff? I'm pondering lapping it down a smidge, to see if I can't ease the action. Maybe that'll help.

Regards,
Brian
 
Pics, plenty and up close, if you take the calipers apart again. And I'd guess the spike is an "anti-knockback" device, to prevent the pistons from getting pushed too far back into the caliper with automotive use.

Reason being, when you press on the brake pedal you expect the brakes to work RIGHT NOW, and if the pads/pistons are pushed too far in by normal road forces on the suspension and disk, then it may take an extra pedal application to move enough fluid to take up the lost space.

Considering how poor most drivers are, that's a lot to ask. I've done a decent amount of track driving, and I'm not sure I'd react correctly in a panic situation.

Another possibility for the spike is it's to prevent piston cocking and jamming in the bore. But that's just a WAG.
 
Considering how poor most drivers are, that's a lot to ask.
Nah, pumping twice is easy. Letting the brakes off when the wheels and steering lock up and you are skidding, that's a lot to ask :) But you still gotta do it. Or crash, that's the other choice.
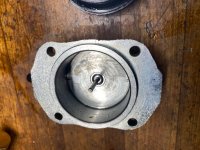
Pull the stupid pin out, those brakes are antiques and have a lot of stuff that is not only unnecessary but actually gets in the way. Also those clampy kinda things on the back of the pads that slide over the pistons, ick. And if you can, spin the pistons around so the flat side is to the inside of the bore, not the big hollow. Probably doesn't matter in a lathe but on a vehicle, works much better.
 
The pin was allegedly designed to return the pistons against seal drag....just a few thou. I'd be wary of using anything too forceful on assembly....usually means you're doing it wrong. Should be something like a thin washer that grasps the pin, deforms with brake actuation, then springs back to relaxed state. Seen it still used on certain calipers.

Microswitch should be able to be sourced for a few bucks from the usual electrical wholesalers, rather than trying to get an original. I'd guess over there digikey or Mouser would be likely candidates?
 
Greetings all,

Yeah, the switch is on order. It'll take a couple of days to get here, but it wasn't any big deal. Just annoyed me.

I'm a strong believer in the school of thought that says that if you need a hammer, you misunderstsood something. So I *really* looked at the pistons before I started bashing them back in. God's truth: nothing contacting but that pin. Looks like there's some sort of *very* tight rubber washer in the matching hole in the piston.
I've got other stuff to deal with this weekend, so it'll be a few days before I get back to those brakes, but I'm going to try carefully sandpapering the pin down a smidge first, so see if I can't ease the motion. (I'm also going to try it with that 3/4 trailer piston first, just to see if it's the master, somehow.)

Anybody got a clue how to spot a master that's got a residual pressure valve on it? This one doen't *look* like it, but I'm no car guy.

Thanks,
Brian
 
Update:
I pulled the brakes again, to work on them on the bench.
Noticed that one piston was less retracted than the other, so I pulled that one apart.
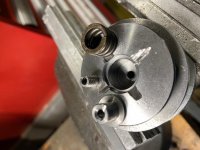
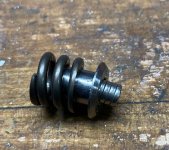
Here are some pictures of it in pieces.
You can see the spike up the middle.
Just to test, I pushed it back together. Or didn't.
It gets difficult the instant that spike goes into the hole. Nothing else touching, and it damn near requires a vise or mallet to drive the piston down onto that spike.

The spike is loose-ish in XY. Feels like a pin with a flat head on it, sitting in a socket. So it can shimmy sideways a bit, but can't back up or come forward.
Inside the hole in the piston is a silver washer. You can see a crescent of it in the vertical shot. If you stick a needle in there, you can push the washer around in XY, so it's loose side to side, but can't come out. Everything's staked in, so I'm not taking anything apart.

Anybody know what the spike is supposed to be doing?

My thought is to sandpaper the spike a bit, to ease the action.
Thoughts?

Regards,
Brian

piston1.jpgpiston2.jpgpiston3.jpg
 
Usually assemble these things with caliper compound used very sparingly to make life easier. Doesn't seem to be any obvious listing by that name and thought it was supplied by PBS last time I bought some, but it's just a clear silicon lubricant, ideal for rubber, etc.....and won't corrode components if left long term.

Assuming there wasn't an external residual pressure valve on the car, I think you'd have to disassemble the master to see if there's one in there.
 
Personally, I'd cut off the stupid pins, 95% of brake calipers don't have anything like that and they do nothing but add parts to fail. Then I'd make new pistons with looser than normal o-rings, and last ditch the dust covers.

Its a lathe, not a car.

betcha fifty cents he won't do this tho :D
 
Update:
Never bet against the house.

In this case, it was a safe bet though.
I didn't cut the pins, I just ground them down a few thou.
(Started out as a jeweler. Had the gear to grind them down in about 30 seconds each. Took longer to clean the crap out of the bore than to actually grind them.)

A few things to note:
A) my air compressor was down when I pulled the second piston apart, so I watched the air pressure coming up. It took almost 100PSI to get that piston to pop out. It didn't want to move, in, or out. Period.
B) now that the pins are ground, it slides easy, with just hand pressure. Haven't had time to go farther, but at least the pins are ground, and the caliper's back together. Now to put fluid in it and bench test.
C) apparently there's a more-or-less identical piston unit made by Dunlop that was used on the Jag XKEs. My original piston pots also said Dunlop on them, so I can believe this. In future, you may have better luck finding replacement pistons for Jags than weird old Datsuns. But it looks like the Jag version may have been 1.5" bore, and these are 2.125". Brake pads look the same though. Probably won't make much difference to a lathe.

Best of luck, now you know as much as I do.
-Brian
 
The whole idea of using square o'rings is for piston retraction. The square ring deforms to a somewhat trapazoid cross section under pressure and when the pressure is relaxed it straightens up thus moving the piston back a few thou. Which is all you need!

On older Vettes rotor run out will actually cause the pistons pump air into the system, kinda hard to diagnose!

The residual pressure valve is the rubber washer at the bottom of the master cyl under the return spring,usually about 10-15 psi(necessary on drum brakes to keep them from bottoming out the pistons and requiring several pumps to apply) . If it is there just take it out. Is the caliper mounted above the master cyl? If so then you may need some residual pressure. Some disc brake cars had an external low pressure residual valve, 5 psi I think to keep air out.

I don't know about your lathe but we have some machines that use ATE Mercedes Benze calipers and they use hydraulic oil.They are labeled for mineral oil.Since your new mc and seals were for automotive use they should use brake fluid. Some older European cars used oil and when some one did a brake job and used brake fluid the brakes worked for a few hours then locked up when the seals swelled.

I have never seen any calipers with that pin but if there is a rubber washer in the hole then my guess it is a seal for a small pressure chamber that supplys some residual pressure. My guess is that they have swelled up(maybe from using the wrong kind of fluid) and you finished them off with the beater. A new seal would probably push in easy.
 
I am late to this party but have some expirence with the Dunlop calipers.....
Used on Jags and early Alfa's....
The pin in the center of the caliper is a re-tractor to pull the piston back from the pads..
In the piston there is a collet that is spring laded pushing it to the back of the caliper....
When the pistons are installed the the pin enters the collet and slides down (takes some effort usually an arbor press job)
When the piston is pressured and moves out the collet grips the pin and moves, compressing the spring...when pressure is released the spring
pulls the piston back with the pad as well (that is why there is a button on the pad side of the piston, to connect the pad to the piston to retract it....

With pad wear, eventually the spring coil binds at compression and that allows the collet to slip a bit and the pad to move a bit further forward...with pressure off the spring again returns the piston and
pad......

Of course this all assumes that they are stock Dumlop calipers...

Oh and if the parts are real Dunlop they recommend their brake fluid....Believe its called GT LMA ....Standard brake fluid is rumored to attack the rubber seals that Dunlop used...

Cheers Ross
 
Well, I wish I'd checked this thread a week ago...

Update:
Ross is right: the center spike is the retractor.
I found what had to have been the very last set of original, 50 year old Sumitomo (Dunlop) Mk 21B pistons that were NOS. Never installed, and in...decent shape.
Slapped those in, re-did the hoses again, and lo-and-behold, the pistons actually retract this time.

Turns out there's a trick to it: After you bench bleed the brakes, do whatever you have to to ram the pistons *ALL* the way back to full retraction.
There's a little spring (Or Collet? Per Ross) in the hole in the piston that takes a tight grip on the pin. (Which is why it's so damned hard to get them back in.) When you pump the brake to clamp, the spring stays gripped on the spike, and that's what pulls it back when the pressure releases.
If the piston doesn't start out all the way back, it'll never retract to full zero, because it didn't start out there.

Wow, that was *WAY* more complicated than it needed to have been. But hopefully this is of some use to the next poor bugger down this road.

Enjoy the trip.
-Brian

PS--> If you do this, plan on replacing the hard metal brake line with a flexible line. Makes fussing with it *SOOOO* much easier. You want about 42" long to the ends of the fittings. I did the piston side of mine with a 90D "L" fitting.
 
Last edited:
Update:

The aftermarket brake pistons where I'd ground down the pins were junked, so before I trashed them, I scavenged the seals.
Then in an exercise in sheer bloody minded curiosity, I cut the piston open to see just what the hell was actually inside that hole, grabbing on to the retractor pin.

Turns out Ross is right again: it really *is* a collet system. Not just the spring I figured, but *two* of them, and a collet to help localise it all.

Once you cut the staking that's holding the cover plate on....it still didn't want to come out, so I cut it in half.
Under that, there's a bronze spring wrapped around a bushing or collet that has a smaller spring inside of it. The smaller spring grabs the pin, and the outer spring and bushing are the retractor.

So now you can actually *see* the enemy within, and have some hope of outsmarting him next time.

Regards,
Brian
IMG_3967.jpgIMG_3968.jpgIMG_3969.jpgIMG_3970.jpgIMG_3971.jpg


Back
Top