What's new
What's new

Monarch Series 61, Rebuilding for Improvement

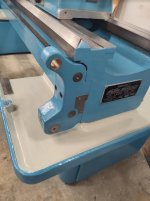
With moving the clutch bevel gears in qcgb 180 degrees out, I cut a new key slot in the through rod for clutch on the rear side, where lever assembly mounts.

Because I'm relatively close to the wall on rear side, I wanted to stick the through rod in now, in case I don't need to remove qcgb again. The through rod can not enter through the front of lathe. You can see it shoved part way in here:

76.jpg

Whether removing or installing qcgb, the through rod need to be pushed at least flush with bed to avoid interference while moving qcgb:

77.jpg

If you have limited room on rear side, and forget to install the rod, you can remove a cover and a bearing for the rod which should give you room. Hard to see, but I drilled an oil hole for the bearing at 12 oclock:

78.jpg

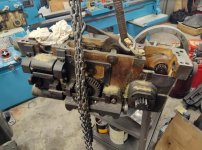
I set qcgb on base, but I'm not totally in position yet. You can see the upper bearing flange on qcgb for lead screw. I need lead screw mounted before going all the way in:

79.jpg
 
The lead screw end bracket has 4 bearing holes, lead screw, lead screw reverse, clutch, and feed rod. The bearings for lead screw and lead screw reverse were fine, I left them alone.

I made new bearings for the clutch rod and feed rod. The clutch rod took a single bearing. The contact surface longer on feed rod, and it took two bearings.

On both feed rod bearings I cut 4 length wise oil relief grooves. The grooves in interior bearing run the total length of bearing, while the outer bearing I did about half way to keep oil from running outside:

80.jpg

Bearings pressed in, I mounted on bed simply to get it out of my way :D:

81.jpg

I had initially planned on drilling through the cast of bed bracket to add gits oilers. Instead a simpler and cleaner solution popped to mind.

The are solid core plugs that get hammered into the far right of bearing bores. Exception is the upper bore for lead screw reverse, which not only rotates, but slides in and out:

82.jpg

Anyway, I decided to drill and tap those plugs 1/8" npt. I'll either hand screw pipe plugs in, or add 90 degree gits oilers to it. But now those 3 bearing bores can be oiled proper:

83.jpg
 
Getting ready to start the apron.

84.jpg

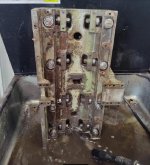
When I removed it I had washed it out over a parts washer. Cursory inspection, all the gear teeth are there, and no wasted roller or ball bearings. Clutches seem to lock by hand.

85.jpg

Like the qcgb and bed end bracket, it seems feed rod and clutch rod portions are what took the most beating. As part of that I'll be addressing the worm gear and feed rod connection.

While here I intend on addressing the oil pump and oil lines.

86.jpg

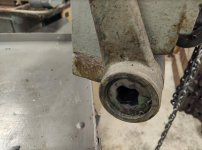
EG called it about a year ago, sight unseen :D. The squares for clutch rod wore out:

87.jpg
 
EG called it about a year ago, sight unseen :D. The squares for clutch rod wore out:


You can mill it out and make a replaceable bushing. Two 90 deg. insert's could be changed without disassembly. They would have captured for sliding the handle back and forth. You will probably never wear them out again.
Maybe you will, your still young
Is the square rod worn out?
People must stand on the handles. Or never oil them so they don't get their pant legs oily.

I'm sure you have a plan.

Edit
I see a snap ring.. Looks like replaceable bushings.
Or that's just for handle removal
 
Last edited:
EG called it about a year ago, sight unseen :D. The squares for clutch rod wore out:


You can mill it out and make a replaceable bushing. Two 90 deg. insert's could be changed without disassembly. They would have captured for sliding the handle back and forth. You will probably never wear them out again.
Maybe you will, your still young
Is the square rod worn out?
People must stand on the handles. Or never oil them so they don't get their pant legs oily.

I'm sure you have a plan.

Edit
I see a snap ring.. Looks like replaceable bushings.
Or that's just for handle removal

The lever on qcgb, the square is a replaceable insert, by the looks of it I think these are too. There are two on the apron.

The one on qcgb is in good shape. It looks to me as a solid insert that was center drilled the size of square then a shaper used to cut the four corners.

My initial plan was to cut and center drill some round stock in the same manner. Then unpowered, use lathe carriage as a shaper to run a lathe tool in to cut the 4 corners out. Its how I cut my length wise oil grooves in bearings in previous posts, btw.

I hadn't considered your plan, that's not a bad idea, and probably faster. Cut the circle in half and mill two 90's. . . I'll better examine the situation once I got it tore down.

The square rod has some wear I can feel in the most traveled area. Still usable though I think. At least thats the current plan :D. The end result I think will be a little bit of play on the wore area, but still very effective. Plus I'm not an employee :D. . .and not running it long shifts every day. I think cleaned, oiled, and new square inserts will carry me to the end.

A couple posts ago I show making round bushings for the bed end bracket. Well one of those is for the square clutch rod. The rod has a similar round stock piece added to it with a taper pin, to be able to spin on the round bushing:

88.jpg

Looking more closely at it, I think they used a drill size larger than the rod, then cut the 4 corners out. I popped this off hoping to use it as a template when I make repair on the apron's square insert holes.
 
Looking at the clutch lever assembly on apron. It is its own assembly block that attaches with two allen head bolts:

92.jpg 93.jpg

And moving over to look at the worm gear and feed rod connection. The bushings are held in by taper pins hammered down at about a 45 degree angle. The small end of taper pins being accessed from the bottom side of apron:

94.jpg 95.jpg
 
Another item I want to address in the apron is the oil pump, and oil system. Dropping the oil pan off the bottom of apron. A bunch of pasty old garbage:

96.jpg

Looking up we see metering tree, plus a decrepit looking oil pump :D:

97.jpg

As a side project to this, with what I want to do in mounting apron, I will need to counter balance the weight on saddle. So I started cleaning and prepping the casting for the taper attachment too. By the time I took this pic I had cleared out a bunch of chips and garbage:

98.jpg
 
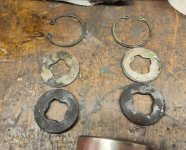
Removing the two allen head bolts, I got the apron's clutch lever assembly up on the bench. The snap ring on each end actually holds a steel plate and a felt behind it:

99.jpg

A closer look at those pieces:

100.jpg

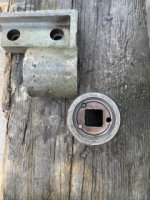
Now with the felts out from each end, we can see the actual inserts for turning the square clutch rod. One pic of each end:

101.jpg 102.jpg
 
To finish disassembly, there are two allen set screws, 180 apart on the end collar. Here we see one:

103.jpg

You need to fully remove set screws to get it apart:

104.jpg

Once apart we can see how to knock the inserts out:

105.jpg

Both inserts knocked out:

106.jpg
 
Interesting! How do you suppose that internal profile was machined?

Cal

Wear mostly :D. My guess is a shaper originally to make it a square hole, or using a lathe unpowered like a shaper. Which is the route I'm going to attempt.

mllud22 had suggested essentially cutting the circle in half, then milling a 90 in each half, but that was before seeing apart.

With it apart, the inserts are press fit in. Plus they (not sure who they are :D) drilled and added locking pins like you might on a gear repair. Due to that, I'm thinking I'll try the shaper route.

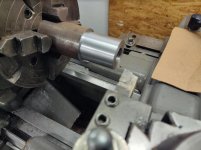
I started making them, not finished yet. Clutch square rod is 3/4". I set up and power fed a 13/16" drill through, always fun :D:

107.jpg 108.jpg

The stock I'm using is some mystery, unknown steel that I had. Trying various feeds and speeds I couldn't get a decent finish with insert tooling. Finally swapped to some brazed carbide, and at a 1000 rpm it came up alright:

109.jpg

Parted my two new inserts off. I'll hopefully get to cutting my four corners for the square out tomorrow. The 5th piece in the pic is what attaches to clutch rod for bed end bearing, its 4 corner intact.

110.jpg

My theory on the wear is poor/no lube, not the actual motion of engaging clutch. With no lube, and apron constantly moving, plus weight of clutch arm pointing out at 90 degrees. . .well after x amount of years you get this.
 
Wear mostly :D. My guess is a shaper originally to make it a square hole, or using a lathe unpowered like a shaper. Which is the route I'm going to attempt.
You can buy bushings with square or hex holes already broached into the bushing. They are mild steel, iirc. And cheap. If they have your size, that'd maybe be easier ? I can't remember who makes them but try asking AlfaGTA, think I saw them in one of his threads.

Also, Pioneer Broach in California has a bazillion broaches, 95% chance he can just pull a couple for you. They work pretty cheap, like the rest of us $2 hos.
 
The clutches on the lathes that I have ran that had a clutch don't really require a lot of force for snapping over center to lock it in. Adjusting the clutch too tight would add to wearing the bushings out.
You want it to snap over center and lock but it doesn't need to be too tight. I like having a clutch to jog the chuck and help in meshing gears.
Like a lot of bushings it must be made soft to sacrifice the bushing and not the shaft. I like E. G.'s broach suggestion. You could make small cuts.

Just a note on your oil pump. That's pretty much the same setup as the 10ee accept where they mounted the distribution manifold.
What I was thinking on the 10ee is to add a one shot oiler and T Into the oil line above the check valve in the apron. Then if it sits for a while between use I wouldn't have too Crank on that wheel for several minute's too get it lubed. Or just give it a shot of oil whenever.
I would run a hard line to a convenient place on the back of the apron to hook to a flexible braded line. Getting a flexible line positioned so it could follow the apron and not rub. Maybe a long weak spring too keep the flex line pulled taunt in one direction . Hidden under the bed. Although you have a lot longer travel between centers than a 10ee. More oil line too deal with.
Just a thought.
Your pump looked pretty nasty. That filter couldn't have let much oil through. If I remember right that's is already cleaned up
 
You can buy bushings with square or hex holes already broached into the bushing. They are mild steel, iirc. And cheap. If they have your size, that'd maybe be easier ? I can't remember who makes them but try asking AlfaGTA, think I saw them in one of his threads.

Also, Pioneer Broach in California has a bazillion broaches, 95% chance he can just pull a couple for you. They work pretty cheap, like the rest of us $2 hos.

Dammit, I wish you would have piped up sooner ! :D

Googling around I did find some offerings, and broach cut stuff. I didn't exhaust my search, but nothing would be a straight up replacement though. . .different OD's, different lengths, and mostly I'd need to order bulk.

As I'm halfway into it, I'll probably continue on and see if I can make something passable. OD on mine are 1.6265" btw, .785" in length.
 
Wear mostly :D. My guess is a shaper originally to make it a square hole, or using a lathe unpowered like a shaper. Which is the route I'm going to attempt.

mllud22 had suggested essentially cutting the circle in half, then milling a 90 in each half, but that was before seeing apart.

With it apart, the inserts are press fit in. Plus they (not sure who they are :D) drilled and added locking pins like you might on a gear repair. Due to that, I'm thinking I'll try the shaper route.

I started making them, not finished yet. Clutch square rod is 3/4". I set up and power fed a 13/16" drill through, always fun :D:

View attachment 332364 View attachment 332365

The stock I'm using is some mystery, unknown steel that I had. Trying various feeds and speeds I couldn't get a decent finish with insert tooling. Finally swapped to some brazed carbide, and at a 1000 rpm it came up alright:

View attachment 332366

Parted my two new inserts off. I'll hopefully get to cutting my four corners for the square out tomorrow. The 5th piece in the pic is what attaches to clutch rod for bed end bearing, its 4 corner intact.

View attachment 332367

My theory on the wear is poor/no lube, not the actual motion of engaging clutch. With no lube, and apron constantly moving, plus weight of clutch arm pointing out at 90 degrees. . .well after x amount of years you get this.

You could do the same thing with the milling machine unpowered. Lock the spindle & use the quill to manually feed a tool into your work.

I’d personally try to build a rotary broach to do it.
 
You could do the same thing with the milling machine unpowered. Lock the spindle & use the quill to manually feed a tool into your work.

.

That's not a terrible idea at all. With the mill you could use a rotary chuck with degree wheel for the 4 points. Little bit better control fine feeding cross and long. . .

I was thinking a little bit better brute force with lathe carriage, but the mill might be the way to go.

I got called in to work, so I'll have a peak when i get back this afternoon.
 
As I'm halfway into it, I'll probably continue on and see if I can make something passable. OD on mine are 1.6265" btw, .785" in length.
Or you could look at this as a good reason to pick up a Pratt & Whitney slotter :D

I wish you would have piped up sooner !
Sorry, was trapped by a show called "Celebrate the Remaining Years". With a title like that, well hell ... Been trying to figure out who are the good guys and who are the bad guys ever since. Devious bastards, all of them.
 
Or you could look at this as a good reason to pick up a Pratt & Whitney slotter :D


Sorry, was trapped by a show called "Celebrate the Remaining Years". With a title like that, well hell ... Been trying to figure out who are the good guys and who are the bad guys ever since. Devious bastards, all of them.


I have four major rebuilds after I finish this machine. I've made a decision, I think :D. No more new machines till I clear some floor space. That plus a bunch of smaller stuff I need to get squared away.

Between work, sleep, and this project I've not watched anything. Need to finish Tiger and Rose and I've been hearing about this "Squid Game", might try to catch that.
 
View attachment 332426

Would this part help?

Mike

I was thinking the clutch lever was gone from yours, it didn't cross my mind you might have the inside collar. Give me a day or two, lets see how I do.

On another note :D, you had pulled the apron pinion for me, but we held off shipping because the gear teeth. If you didn't toss it, I'll take that from you. Looking at Rabler's tail stock crank thread, thinking that might be good for something like that.

Kind of a weird ship item at about 20", but curious if you might have one of those aluminum racing stripes too:

111.jpg

I'll probably shoot you a text in a day or so.


Back
Top