What's new
What's new

A Scraping Newbie Has The First Of Many Questions

You mentioned logistics. Your in Indiana and Will is in British Columbia, Canada. He flew from his city of 12,000people, Prince Rupert. Have you bought one of my DVD's or USB Stick? I sell them on eBay but will give you a deal on here. PM me if you want one.
 
You mentioned logistics. Your in Indiana and Will is in British Columbia, Canada. He flew from his city of 12,000people, Prince Rupert. Have you bought one of my DVD's or USB Stick? I sell them on eBay but will give you a deal on here. PM me if you want one.
I do have it. I should watch it again. It’s been a while. Have you considered making a new version? I’m sure that all of your experience since the original was made would make for a good video! The technology is much better now as well.
 
My new version has been made by my many students who have done You Tube shows: Stefan Gottswinter, Adam Booth and my friend Lance Baltzley, Tom Lipton of Oxtool, John Saunders of NYC CNC, Keith Rucker of Vintage Machinery, PM member "Jan Sverre Haugjord" in Norway, Jon Brooks in California, Rex Waters in CA, Ted my assistant teacher in Taiwan, and a few others. Jan has over 200 shows on rebuilding and scraping. One can spend days watching the new versions.
 
My new version has been made by my many students who have done You Tube shows: Stefan Gottswinter, Adam Booth and my friend Lance Baltzley, Tom Lipton of Oxtool, John Saunders of NYC CNC, Keith Rucker of Vintage Machinery, PM member "Jan Sverre Haugjord" in Norway, Jon Brooks in California, Rex Waters in CA, Ted my assistant teacher in Taiwan, and a few others. Jan has over 200 shows on rebuilding and scraping. One can spend days watching the new versions.
I’ve watched many scraping videos and most of the guys have attended your class. An impressive legacy!
 
It's a lot easier to show someone in person then to do it over the internet and on a DVD. Your doing really good. You just have to learn how to used a 45 degree square and a fine point magic marker sharpy and scrape on the line. One student drew lines every 1/4" and practiced moving and staying inside the 2 lines all the way up the length of the part. Once you do it and it gets into hand eye memory you won't need to draw lines.
I also teach and make the students memorize the Richard King Scraping rules.
We use them after you have roughed in a part to be within .001" flatness and you have 5 PPI.
1. Scrape individual scrape marks X_X_X_X <----- X is the scrape mark
2. Scrape individual scrape lines . Meaning the second, third, forth, etc. lines don't touch they are separated by 1/8"
3. Measure your depth of the scrape mark. Minimum of .0002" max. of .001
4. When you blue up your part - rub it a count of 10 and hinge or pivot the part - it should pivot at 30% from both ends. If you don't do that the part could be high in the middle like a rocking chair.
5. After you have scraped, stoned and cleaned the part wipe it with your hand as you can feel the dirt with your fingers. Wipe through the bluing feeling for dirt. If dirt is found clean up with glass cleaner or a fast dry brake cleaner.
 
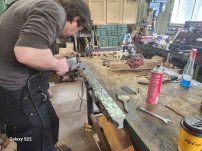
Cleaning Granite plate and cleaners used to clean parts to be blued. I also say to wet stone every 5th time. Use a diamond ground flat stone to wet-stone If you have a few areas with small diameter or percentage wet stone with a diamond flat stone to widen the high points. See the scraper is standing so his body is 45 degree's to the part and scraping 45 deg. diagonal lines across his SE. Also note his eyes are directly over where he is scraping on middle picture.
 

Attachments

  • 20230422_092140.jpg
    20230422_092140.jpg
    3.8 MB · Views: 33
  • 20230422_103341 (1).jpg
    20230422_103341 (1).jpg
    3.8 MB · Views: 33
  • 20230423_124811.jpg
    20230423_124811.jpg
    1.9 MB · Views: 33
I have openings in my June 8 - 12 , July 17 - 21, August 17 - 21, 2023 and the rest of the year classes. I said I was going to retire a few years ago, but people keep asking me to teach, so I still will I guess until I drop dead. My many students are doing what I ask them to do...Pass it on :-)
 
Hi.

Your scraping looks good. My journey was similar to yours. Lots of overthinking and googling lol.

I would suggest going to one of Richard's classes for your own peace of mind. I spent a long time trying to figure it out on my own and pretty much had it, but the small details I didn't get prevented me from being able to consistently and efficiently scrape a fine finish, leading to a lot of time wasting trying to come up with solutions to simple issues with technique.

Some of the big things for me were the following;

I was using a cast iron lap with diamond lapping compound. Regardless of what grade lapping compound i used or what angle i used (-5* to -15*) I would get chatter. Even with a super fine polished cutting edge that felt and looked sharp.
Eventually I figured out that I had too much compound on the lap, which let the compound build up on the cutting edge, rounding it off slightly. After wiping the lap off till it was almost clean I was able to get a keen edge and no chatter.

Not scraping deep enough when finish scraping. This made it really difficult to improve PPI. Richard says same blade pressure (8lb) roughing and finish scraping. This is particularly important with the power scraper, as it's a lot easier to take tiny cuts which do nothing to help you if you're at 10-20 ppi.

Not using a flat stone ~ none of them are flat they are high in the middle and will mess up your bearing if you're not attentive.
Also I was using a fine grit Norton slips, which I found too fine; they polished the high spots, making them difficult to distinguish from the true high spots polished from spotting cycles. The lack of cutting and uneven cutting surface made it difficult to improve bearing quality.

Holding on to what I was scraping with bare hands. Even just for short periods of contact; rubbing/transferring item to plate this caused me a few issues, so I just use a rag to hold item if it's a straight edge etc.

Will.
 
Last edited:
Another thing Will discovered was he stored his SE by hanging it up at night on my A - Frame hook. I never thought of this issue. I had my furnace set on 68 to 70 degrees and when hanging up the temp was higher or at the top of his 36" straight edge. I had a infrared thermometer and testing the temp down 12" it was lower 2 degree's and every 12 " lower it was another .2 degree's. I'm the old dog and I learned a new trick. After that we left it on my Granite SE at night.
 
Hi.

Your scraping looks good. My journey was similar to yours. Lots of overthinking and googling lol.

I would suggest going to one of Richard's classes for your own peace of mind. I spent a long time trying to figure it out on my own and pretty much had it, but the small details I didn't get prevented me from being able to consistently and efficiently scrape a fine finish, leading to a lot of time wasting trying to come up with solutions to simple issues with technique.

Some of the big things for me were the following;

I was using a cast iron lap with diamond lapping compound. Regardless of what grade lapping compound i used or what angle i used (-5* to -15*) I would get chatter. Even with a super fine polished cutting edge that felt and looked sharp.
Eventually I figured out that I had too much compound on the lap, which let the compound build up on the cutting edge, rounding it off slightly. After wiping the lap off till it was almost clean I was able to get a keen edge and no chatter.

Not scraping deep enough when finish scraping. This made it really difficult to improve PPI. Richard says same blade pressure (8lb) roughing and finish scraping. This is particularly important with the power scraper, as it's a lot easier to take tiny cuts which do nothing to help you if you're at 10-20 ppi.

Not using a flat stone ~ none of them are flat they are high in the middle and will mess up your bearing if you're not attentive.
Also I was using a fine grit Norton slips, which I found too fine; they polished the high spots, making them difficult to distinguish from the true high spots polished from spotting cycles. The lack of cutting and uneven cutting surface made it difficult to improve bearing quality.

Holding on to what I was scraping with bare hands. Even just for short periods of contact; rubbing/transferring item to plate this caused me a few issues, so I just use a rag to hold item if it's a straight edge etc.

Will.
Thanks so much for your help. It sounds like you and I have been on a similar path. Lots of over thinking for sure!

For lapping, I am using electroplated discs from China. Hopefully there are no issues like you experienced. They seem to do a good job. I finish with 2000 grit.

Your comment about the finish scraping passes really got my attention. I seem to be spending a lot of time in the 10 to 20 PPI range and I have definitely not been using 8# of pressure. On the other hand, I don't understand how increasing pressure can generate more PPI. To my uninformed view, more pressure = wider grooves = fewer PPI. Are you using a small radius scraper? I was using 40mm and tried the trick of raising the scraper for a more aggressive scrape, but I could only go so far before I saw nasty kickback. Should I make a 30mm scraper?

The stone I am using is very tiny and I am only trying to deburr the scraping. It is however a fine stone. I will try a courser grade next. Good point about telling the difference between points that have been rubbed shiny on the surface plate and points that have been stoned with a fine stone.

I have noticed the incredible sensitivity to temperature changes. So I have added some adhesive backed foam/foil tape that is intended for insulating pipes. Hopefully that will minimize movement.

Again, thank you for sharing your experience!
 
I say the depth is important do you "generate" the same depth. You press down 8 pounds consistently when roughing a dive bombing or Technique 40. You use different width blades and difference radius blades. I have more of the 1" wide x 6" blades ground to a 60 mm r for roughing, a 1" wide blade x 6" with a 40 mm r and a 1" x 6" with a 20 mm radius. One uses a 1" wide blade when on a wide way. If I'm scraping a 1" wide way I use a 5/8" or 3/4" wide blade.

When I taught classes in Taiwan I had a 30 year old PHD Engineer who worked with his technicians and it was so frustrating for him and for ME. He just couldn't scrape more then about 10 PPI and on a table down the row with high school educated men who worked for him. They were getting it. I had to fail him and he was depressed. I would show him and he would do it when I was there, when I walked to the next student he would try to do it "his way" thinking he could do it better. Then his boss came into the class room and told him to STOP over thinking about it. Just listen and stop trying to figure out why. I suspect your in the same situation. This is obvious when you question the 8 pounds of pressure down. I have been telling thousands of student to press down 8 pounds and they do it and don't question it. Your trying to reinvent the wheel it seems.

As you get more points, use a rounder blade and shorter stroke, pushing down the same pressure getting more and more points. The PHD took the next years class and this time he passed. He spoke fluent English and we said his boss telling him to stop trying to figure out why helped him. He said when he was in university he was taught to figure out why things work. Once he stopped trying to understand why he got it.
 
Your comment about the finish scraping passes really got my attention. I seem to be spending a lot of time in the 10 to 20 PPI range and I have definitely not been using 8# of pressure. On the other hand, I don't understand how increasing pressure can generate more PPI. To my uninformed view, more pressure = wider grooves = fewer PPI. Are you using a small radius scraper? I was using 40mm and tried the trick of raising the scraper for a more aggressive scrape, but I could only go so far before I saw nasty kickback. Should I make a 30mm scraper?

More pressure gives deeper grooves, which is helpful when you are trying to increase the points of contact. They may well be wider, but the scrape isn't flat bottomed, it is a shallow radius, and the depth is what is important at this stage. Remember there are just microns of difference between the high and low spots. So breaking up a single 'island' of area X with a shallow scrape doesn't necessarily give you two islands of X/2 size as it is just as likely to just result in 2 X sized islands as they now are able to join up with the low areas surrounding them. Shallow strokes can result in you chasing your tail moving these big contact areas around, like smearing finger paint. So a deeper cut basically creates a trough deep enough to prevent the adjacent areas from rejoining the next time you work that area, this increases the number of contacts and reduces their size.
 
I just saw this. I say Dykem High Spot is the best bluing and I used it for years. I also looked like a smurf too. I first saw Canode at GM when I taught there in the 1980's. I hated it as its easy to smear GM had banned Dykem as to many goofballs spread it on places wher they thought was funny. I had to use it, so I figured out how to use it. spread it on your plate using a 1 x 4" foam paint roller. you want to see the plate through the ink as i say in my video (USB) now on a separate place and not where your going to blue up your part. like a paint pan. then roll it on the plate your going to rub on. So its thin or transparent. also use a 2nd color that i call the highlighter. in the old days we used red lead. i now use yellow canode or charbonnel cardinal red deluted with windex (sorry for the typo's - i broke my arm and it aches today, only can type with one hand most of the time).

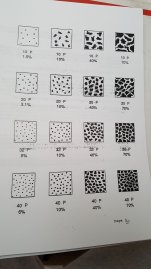
spread it on with another foam roller and wipe it off so it only takes away the glare of the shinny scraped surface. wipe it until its only in the porous iron and it's not wet. i also show on my video to rub the plate on a no blued area of your surface plate and that shines up the highest spots. once you get 20 ppi - over 100 percent of the area / 50% high and 50% low, you can shine it up. if you don't use the highlighter, it's hard to see the high low areas.. in my chart if you look at the length of the stoke at 40 ppi, the stroke is around 1/8". Also if you or any of the members would like to learn in person, i have a October and November class up here in MN. Biax Germany and DAPRA sells my stuff too. The 3rd column on the chart is what you shoot for. 40 to 60% contact for a scraped surface. 20 ppi for lathes and mills, etc and 40 ppi for inspection plates and straight-edges.
 

Attachments

  • 20170201_142115.jpg
    20170201_142115.jpg
    243.3 KB · Views: 13
  • 20160703_144737.jpg
    20160703_144737.jpg
    3.5 MB · Views: 13
Last edited:
I am offering a PM members discount too. Mt 36 year old son is teaching the classes now because of my bumm arm. he has taught 3 classes alone Member Yan Wo was his host in the Salt Lake class last year and assisted me in others. he will also travel to your shop to teach during the winter months as he is a bee keeper in the spring - fall. if you host a class - you get the training for free.
I will also give PM members $20.00 off on my usb stick / dvd on how to scrape. i have them advertised on ebay. my handle on there is king scraping. look at it for info but order from me. message me. or email me. [email protected]
 
Last edited:
I've been MIA for a while - family things and things related to fallen trees and limbs. I was surprised to see a few new postings! Canode is back apparently and a new generation (the 3rd?) is helping to teach scraping. These seem like good developments, though at this point I won't be changing from Dykem.
I did a few more scraping passes on my straight edge but am still stuck at 15 - 20 ppi average. Since it is a straight edge I would like to see 30 ppi* average or better but no cigar so far. I can get it over a portion of the surface but there always seem to be a some areas that are only around 10 ppi. Subsequent passes just seem to move the low ppi zones to different places. I have been using a 25mm radius tool and a 3mm stroke and different combinations of dive bombing and criss-cross. No improvement, just a different pattern of hi and low ppi counts.

*On the subject of ppi counts, it was explained to me by Richard King that all counted points must be the same color. Does that mean the number of mirror finish points per inch after rubbing the Dykem on the bare surface plate? Or is it OK to count mirror finish points and less shiny bare metal points together? And what about the very pale blue points?
 
I've been MIA for a while - family things and things related to fallen trees and limbs. I was surprised to see a few new postings! Canode is back apparently and a new generation (the 3rd?) is helping to teach scraping. These seem like good developments, though at this point I won't be changing from Dykem.
I did a few more scraping passes on my straight edge but am still stuck at 15 - 20 ppi average. Since it is a straight edge I would like to see 30 ppi* average or better but no cigar so far. I can get it over a portion of the surface but there always seem to be a some areas that are only around 10 ppi. Subsequent passes just seem to move the low ppi zones to different places. I have been using a 25mm radius tool and a 3mm stroke and different combinations of dive bombing and criss-cross. No improvement, just a different pattern of hi and low ppi counts.
It sounds like the item is rocking somehow (curvature longitudinally, or too thick layer of indicator ink?) I'd be tempted to flip it on its back (on 3 points) and try to indicate it with a separate height gauge/indicator and just sanity check the surface for clues. I forget what your reference plate is, but it may be a factor. The only other variable I can think of here is scrape depth, but it's not clear to me if too deep or too shallow scrape depth could cause this, possibly highly random depths could be a possible issue.

*On the subject of ppi counts, it was explained to me by Richard King that all counted points must be the same color. Does that mean the number of mirror finish points per inch after rubbing the Dykem on the bare surface plate? Or is it OK to count mirror finish points and less shiny bare metal points together? And what about the very pale blue points?
I think that shiny point burnishing step is too fine to use for point counting and likely disturbs the ink layer, I'd skip that when trying to count points unless you are really going for the most extreme level. All the video of people counting points looks like they are just counting the light blue surrounded by darker blue rings. Seemed like a lot of subjectivity involved as well :giggle:

Pictures are always appreciated...
 
First, take your bathroom scale and press your hand and power scraper blade on it, with the 150 mm / 6" . you need to get 8 pounds to get an average depth of the cut. One of the major issue when one scrapes is trying to get to many PPI before you have the same ppi all over the part. In my manual i say same ppi - 100 % of the part before shortening the stroke. your color of the ink is also important. you only shine it up pn a dry or clean spot on you plate after you get 25 to 30 ppi. you can experiment shinning it up when learning just to ID the colors 1. same color of the ink is the lowest 2. a grey or black color is the medium height 3. is shinny like a mirror. that's with dykem or canode. I used Dykem for years and it's thebest, but no longer use it. i like clean fingers. the inks have nothing to do with it. its how its spread.- i hated canode until i taught myself how to spread it.

a super sharp blade ground on a 600 + diamond or lapped on a 1200 + diamond wheel is important when scraping high ppi. i would use a 60 rad until you het 15 to 20 ppi, then switch to a 40 rad until you get 30 ppi, then a 20 rd. to get 40 plus ppi. some scrapers ever need the 20 r as they have great hand to eye coordination. i have found the folks who can't get it are over thinking it. over in Taiwan I had to fail a student who had 3 PHD's in engineering as he could never got more the 15 ppi. he was not turning of his analytical brain. .
Practice makes perfect
 
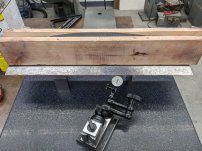
Thank you for the responses. Before I do any more scraping I decided to take Bakafish's advice and set it up on three points and measure it with an indicator. Attached are pictures of the measurement setup and the readings. The numbers in the center of the squares are the measurements in tenths and the black dots are the points of support. Gage blocks were used for support. When I hinged the part the hinge points were about 15% from the ends rather than the desired 30%.

If I were to step scrape these individual squares in a number of passes that is in proportion to the reading, would that help? For instance four passes at the +2 areas and zero passes at the -2 areas.
 

Attachments

  • aug7setup1.jpg
    aug7setup1.jpg
    600 KB · Views: 19
  • aug7scraping1.jpg
    aug7scraping1.jpg
    1.2 MB · Views: 19


Back
Top