What's new
What's new

A Warner & Swasey Fan - Just bought a No. 3

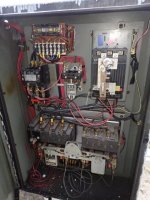
Here's a photo of the electrical cabinet on my No. 3
600 Electrical Cabinet View.jpg

The gray box in the upper right corner is the main OFF/ON switch.

There are two very large relays at the bottom of the cabinet.

There is another smaller relay midway up on the left side.

And finally there is what appears to be a 2-poll relay in the middle of the cabinet.

I haven't gone through this yet to determine exactly what each relay does. At first I thought there might be relays for forward and reverse (as per the schematic), but DocsMachine reminded me that the forward and reverse are done mechanically in the headstock with gears and clutches. There's also no electrical switches for forward and reverse. The only electrical switches on the lathe are 3 push buttons. OFF, LOW, and HIGH.

There are definitely two motors on this lathe. The main motor in the base, and another motor mounted on the side of the electrical cabinet to run hydraulic for the collet closer.

You can see the hydraulic pump motor in this photo:

No-3 Lathe 4.jpg
 
Wow, yours is considerably more complicated than mine.

Changing technologies and all that, eh? :D

On the hydraulic motor, it looks like you'll probably need an external oil reservoir to run it. I'd be interested to see more of that setup, whenever you get around to tinkering with it.

Doc.
 
I prefer a simpler machine as well, but when your only paying $302 for the thing you can't afford to be too picky. :D

I've been into electronics my whole life so I'll have no problem figuring out what does what when I finally dig into this machine. I'm also planning on putting this machine up against a wall so I'll need to take this electrical box off entirely and hang it on the wall next to the machine. This will require extending all the wires to reach the new box location. I plan on firing it up as-is first though just to be sure everything works before I invest too much time with a permanent installation.

As I mentioned previously, I bought this as a winter project. I only grabbed it now because it was nice whether for the drive to HGR, and because the price was right for a lathe so complete. It did turn out to be as complete as I had hoped, so that much is good.

In the meantime, I don't plan on doing much with this lathe until well into December or even later. I haven't even gotten it off the trailer yet. I'd love to at least get that much done. :)

When I finally do dig into it I'll probably start a new project thread either in this forum or in the Antique Machinery forum. I'll definitely post my progress when I get this thing up and running.
 
On the hydraulic motor, it looks like you'll probably need an external oil reservoir to run it. I'd be interested to see more of that setup, whenever you get around to tinkering with it.

Doc.

I worked on the lathe for about 15 minutes tonight. :D

All I did was unscrew the toenails (levelers) so they don't pose any problems when I unload this thing. I'll be unloading it a few inches at a time when I get to that point. It will probably take me several days to get it off the trailer as I'll be taking my good old time and being very careful not to let it move more than a few inches at at time. I'm just going to be "dragging" it off the trailer using wenches. I'm planning on jacking it up and putting down some sheet metal between the lathe and the wooden trailer bed so it doesn't dig into the wood. I'm not in any hurry to get it off. A few inches at a time is ok by me.

I'm going to take my time and be very careful. I don't want the thing falling over or anything crazy like that. I'll be sure to stay out of the way if it does. But still, I don't want to end up with it stuck in a precarious position. So on inch at a time is fine with me. I'll also be putting blocks under the back of the trailer beneath the ramps to be sure the trailer doesn't move when the weigh shifts.

In any case, regarding your question about the hydraulic reservoir. I took a close look at the plumbing tonight and it appears that the hydraulic pump actually uses the same oil as the headstock. There appears to be a ling going right down into the main oil reservoir and directly to the hydraulic pump. Then from the pump to the collet closer valve. So as far as I can tell at this point it's using the same oil as the headstock.

Apparently this lathe is set up for using this hydraulic collet closer only. I'd like to have a way to be able to turn the hydraulic pump off when I change over to using a standard chuck. There doesn't appear to be any provision on the lathe right now to turn the hydraulic pump off. They probably figure it will need to always be running in this configuration. So I'll need to find out where I can install a switch or relay to disable the hydraulic pump when using a chuck. That shouldn't be a big deal. The easiest solution would be to just place a switch right on the wires going to the hydraulic motor. If that switch is off the motor won't be able to run. Problem solved. :)

Didn't you mention somewhere that someone converted their collet closer to be just a mechanical lever? I might even consider doing something like that and doing away with the hydraulic collet closer entirely. That would probably serve me well for what I intend to use the lathe for.
 
So as far as I can tell at this point it's using the same oil as the headstock.

-That elbow sticking out made me think something had been disconnected. I assume it's blocked off, then?

There doesn't appear to be any provision on the lathe right now to turn the hydraulic pump off.

-Again, keep in mind these things were designed for full-time production. The operator comes in, switches the machine on (assuming the previous shift had switched it off) and proceeds to make part after part, one after the other, 'til break time/lunch time, then back to work for another four hours.

And one part might take as little as two minutes or as many as five. In a case like that, why bother switching the pump off? Especially if you have to switch it on, wait a few seconds for the pressure to come up, then open the collet.

Any decent factory using one of these machines was all about optimizing time- the books are always going on about taking multiple simultaneous cuts if at all possible. Even just an extra five to ten seconds per part, to flick the motor on and wait for it to come up to pressure, would be frowned upon.

On my machine, the collet closer is- was- powered by a small electric motor, about 1HP or so. My motor is gone, but near as I can tell looking at other machines online, there was only a main power switch, and positioned that it was clear the operator did not flick it on and off as needed. It ran constantly.

And when you went to open the collet (and advance the stock) you actuated a clutch to engage the already-turning motor. Again, it's all time savings.

The easiest solution would be to just place a switch right on the wires going to the hydraulic motor.

-I am by no means any sort of expert on motors using magnetic starters, but I believe a better solution would be to put a switch in whatever lower-voltage or lower-amperage line actually actuates the contactor.

Didn't you mention somewhere that someone converted their collet closer to be just a mechanical lever?

-I'm in the middle of doing that. As I said, the motor, half the clutch and whatever mounting parts go in between, have long since gone missing on my machine. I'd toyed with the idea of trying to refit a motor (I have a 3/4HP face-mount 3-phase) but ultimately decided that I'd prefer a manual linkage.

I've already made part of it, which I'll be posting here as I catch up on my thread over in the Antiques section, and hope to get most of the rest done later this week and/or weekend.

I might even consider doing something like that and doing away with the hydraulic collet closer entirely.

-Probably worthwhile. You have a totally different linkage than I do, so what I did- am doing- won't work, but it seems it'd be easy to attach something to that yoke the ram pushes on, to convert it over to a long lever.

Doc.
 
The Mystery Shaft to Nowhere?:

I notice there is a shaft on this lathe that isn't connected to anything. It appears to have some type of connector on the end of the shaft that's clearly meant to attach to something. I'm not sure what this shaft is for? Also, since I haven't yet fired up this lathe I'm not even sure when it spins.

Here's a photo of the shaft. It's on the back of the lathe near the bottom of the lathe bed (see photo)

No-3 Lathe 6a.jpg

There also appears to be some sort of mounting block cast into the lathe bed that probably served to mount whatever is supposed to be attached to this shaft. I'm guessing this would be for some kind of optional attachment?

Anyone know what that shaft is for?
 
I notice there is a shaft on this lathe that isn't connected to anything. It appears to have some type of connector on the end of the shaft that's clearly meant to attach to something.

-Pretty much a guess, but that looks like the coupler between the drive gearing, and both the oil and coolant pumps on the back of my machine.

Again, just a guess, but it may be that due to the location of the electrical enclosure, they extended the shaft and mounted the coolant pump in a more accessible location, rather than hiding it under the headstock.

It's also possible the original pump is in the original location (in your case, hidden behind the sheetmetal panel) and the coolant is to come out a pipe that passes through that upper slot.

In which case the shaft is an extension... but for what, I'm not at all sure.

I'm not aware of any other "power feed" accessories, or any attachment that would need a drive shaft. So in that case... maybe a secondary pump? Although can't think of any reason for that either, unless it was a high-pressure pump for processes like gun-drilling.

All pretty much total guesses at this point. You'll have to actually remove that sheetmetal filler and give it a direct look.

Doc.
 
Oh no! The termites are back! :eek:

Don't worry about it. If you need a closer look chances are very good that you already have no clue what it's for.

Looking at a close-up of the end of the shaft isn't likely to be much help. :D
 
@ Doc,

Ahhhh,... The coolant pump. That makes sense. The coolant pump is probably missing on this lathe. There is no plumbing on the top of the lathe for coolant fluids. So chances are pretty good that the coolant pump and system have been removed.

At least now I know what the shaft is for. :D

Thanks Doc. :cheers:
 
-Pretty much a guess, but that looks like the coupler between the drive gearing, and both the oil and coolant pumps on the back of my machine.
That could be a match to the factory drawing in the #3 manual, yes.

W_S_3.jpg

Two pumps, same power source.

Coolant path and layout clearly detailed.

Lubicating oil lines basically vanish into the interior, covered in a different drawing.
 
The coolant pump is probably missing on this lathe.

-Possibly. The delivery tubing was missing on my machine, too, but the pump itself was still present.

The manual even states that if the cutting oil/coolant isn't to be used for a while, to 'disconnect' the pump by sliding the coupler back a touch, so it doesn't engage anymore.

And that's what somebody did on mine- the pump inlet and outlets have been blocked off, and the coupler slid back- and long enough ago that it was prior to it's last paintjob. Which, judging by the dry, flaky paint, was an easy 20-30 years ago.

Again, you're going to have to pull that sheetmetal cover and see. :D

For that matter, it's entirely possible they removed both the original-style headstock oil pump and the coolant pump, and the hydraulic pump is supplying both the headstock and the collet ram.

That's pure out-of-the-blue guess, but at least a possibility.

Doc.
 
UPDATE: Oct 15, 2020: Remove Lathe from Trailer

I finally got the lathe off the trailer yesterday. It basically turned out to be an all-day job. I was working with a come-along wench and pulling it a few inches at a time. I also had to pull it down some ramps. The ramps are make of heavy angle iron. They held up just fine and did not bend. But there was about a 3 inch gap between the rungs of the ramps. And the front feet of the lathe were only 4 inches wide. So I was very concerned that a foot might fall through the ramp, or somehow get caught between the rungs. Fortunately it all went very smoothly.

There was a slight surprise which I was kind of ready for. When the headstock base left the wooden trailer bed and got onto the metal ramps the entire lathe then quickly slid clear to the bottom of the ramps in one fell swoop. Fortunately the trailer is very low to the ground so there wasn't a lot of angle to the ramps. The ramps are also quite short, only about 4 feet long.

Once I got it to the bottom of the ramp I couldn't pull it anymore because it was digging into the wooden floor of my garage. My floor is just 2x6 oak planks sitting directly on dirt. And yes some of them (most of them) are rotted.

I was able to place a couple of 3" x 3" heavy angle iron under the feet of the lathe to serve as a rack to slide the lathe on. Once I did that it was very easy to pull it the rest of the way off the trailer. It currently sitting on those pieces of angle iron. And that's where it will be staying for a while.

I stopped back here to check the date of when I picked this lathe up. It was Sept 14th. Strangely I just happened to decide to take if off the trailer on Oct 14th. So it was sitting on the trailer for exactly one month.

It feels good to finally have it off the trailer. I confess that I was a bit concerned as to how well, (or not well) this might have gone. Fortunately it came off without any major problems. The worst that could have happened is that it could have shifted and fell over sideways. That, of course was my greatest concern. I wasn't worried about my own safety as I was taking every safety precaution possible. I was always quite clear of the lathe when pulling it. and if it did fall over, getting clear of any danger would have been my primary action.

So I never felt in any danger. None the less I didn't want to end up with a huge lathe laying on its side in my garage. :D I didn't really expect that to happen, but when moving something this heavy with limited resources you need to consider all the possible things that could potentially go wrong.

I even suspected that it may very well slide down the length of the ramps on its own, so that wasn't an unexpected surprise. I probably should have hooked up chains from behind to lower it down the ramp at a more controlled pace. But I didn't do that, and fortunately there wasn't a lot of slop as the weight of the lathe had actually brought the tail end of the trailer down almost to ground level.

In any case, it's off now and all is well.

Now I need to get back to cutting winter firewood. :D

Feels good to have the lathe down off the trailer though. I'll need to move it again, but not until I pour some concrete pads to set it on. It's going to be an ongoing project to be sure.
 
We bought have bought two gear hobber from HGR, a couple years apart. One we found needed a lot of work and returned It , within their 30 day period , no questions asked. I took a big saw I got at an auction in chicago for $365 I think, sat on the old truck 6 months and just wanted rid of it. Drove it up to HGR to sell on comission , they take half when it sells. I forgot about it. About 8 months later I get a check from them for almost $700 . I have gotten a huge ammount of stuff from them. Its like the candy store to me.


Back
Top