What's new
What's new

Adjustable 3-jaw

fusker

Cast Iron
Joined
Apr 13, 2006
Location
Denmark
Finally got around to making my own copy of Henry Ravns one-screw adjustable three-jaw chuck. Makes it easy to center round stock, easier than in a 4-jaw and much easier than using shims in the 3-jaw.
Is the design known to members of this forum? I haven't come across it anyway. Will try to post thumbnails but have run into difficulties at the moment.
Regards, fusker
 
I despise 3 jaw chucks for anything but the most rudimentary light trims and skims.....................but this henry ravns chucks sounds interesting and may convince me to dig my three jaw back out.

Keep us posted
 
Henry Ravn, master tool maker (post 1/3)

I met him abt. 40 years ago. He was a soft-spoken elderly gentleman, sitting at a drawing board, responsible for complicated dies for household heating plastic parts (Danfoss thermostat units). These were made with integral threads so the dies had to have automatic rotating functions, retractable plungers and so on. All mechanical, of course.
He also made full scale models of the parts which we engineers dreamed up, unless the acceptable tolerances were "coarse" (that is, more than 1/100 mm, about half a thou, in which case he was not interested but let the factory's tool makers have a try). These parts he made on his own machines back home in his basement.
Anyway, he showed me this ingenious 3-jaw which he used on his own lathe and grinder. Lets see now if it's possible to post pictures:

Seems to work out, 5 of 13.
fusker
 

Attachments

  • Ravn centrerpatron 15.12.09.09-5.JPG
    Ravn centrerpatron 15.12.09.09-5.JPG
    10.4 KB · Views: 405
  • Ravn centrerpatron 15.12.09.09-6.JPG
    Ravn centrerpatron 15.12.09.09-6.JPG
    10.2 KB · Views: 407
  • Ravn centrerpatron 15.12.09.09-12.JPG
    Ravn centrerpatron 15.12.09.09-12.JPG
    10.7 KB · Views: 419
  • Ravn centrerpatron 15.12.09.09-15.JPG
    Ravn centrerpatron 15.12.09.09-15.JPG
    11 KB · Views: 413
  • Ravn centrerpatron 15.12.09.09-16.JPG
    Ravn centrerpatron 15.12.09.09-16.JPG
    10.6 KB · Views: 389
Henry Ravn, master tool maker (post 2/3)

At that time I didn't own any machinery, not even a lathe (ugh!) but after I left the place/got kicked out I remembered mr. Ravn and swore I would one day try to honor him.
fusker
 

Attachments

  • Ravn centrerpatron 15.12.09.09-22.JPG
    Ravn centrerpatron 15.12.09.09-22.JPG
    9.5 KB · Views: 310
  • Ravn centrerpatron 15.12.09.09-24.JPG
    Ravn centrerpatron 15.12.09.09-24.JPG
    11.1 KB · Views: 303
  • Ravn centrerpatron 15.12.09.09-30.JPG
    Ravn centrerpatron 15.12.09.09-30.JPG
    8.2 KB · Views: 329
  • Ravn centrerpatron 15.12.09.09-31.JPG
    Ravn centrerpatron 15.12.09.09-31.JPG
    10.2 KB · Views: 325
  • Ravn centrerpatron 15.12.09.09-33.JPG
    Ravn centrerpatron 15.12.09.09-33.JPG
    9.7 KB · Views: 320
Henry Ravn, master tool maker (post 3/3)

I have used an old 3-jaw (must be more than sixty years old, see logo: Wesselmann) which I kept from the wreck of a broken flat bed lathe. Unfortunately there was only one set of jaws.
The chuck has been supplied with a loose fitting ring that can be turned by hand. The screws holding the chuck together have been replaced with bolts and nuts so you may loosen the connection between the front and back parts - in order to displace the front just enough (2 mm which is maybe exaggerated) to center the round stock held between the jaws. Of course, the centering recess in the chuck has to be turned down by this amount and the bolts must not fit too closely (holes are drilled accordingly larger).

The ring has a loose fit on the back part of the chuck and at the front part is so large that the front can be adjusted radially abt. 2 mm each way. In the ring is a set screw (8 mm Allen key).

An indicator will tell you when the chuck is in the position of largest throw. Keep the chuck here, turn the ring so that the set screw is in the same position, turn the set screw until the indicator is showing half of the throw - now the stock is centered. Now clamp the chuck parts with the three nuts, and you're ready to go.

I would not recommend too much load on the chuck but for light applications it's OK.

Edit: The pictures on my computer are labeled but it seems they disappear in transit.

Regards, fusker
 

Attachments

  • Ravn centrerpatron 15.12.09.09-34.JPG
    Ravn centrerpatron 15.12.09.09-34.JPG
    9 KB · Views: 283
  • Ravn centrerpatron 15.12.09.09-40.JPG
    Ravn centrerpatron 15.12.09.09-40.JPG
    10.9 KB · Views: 338
  • Ravn centrerpatron 15.12.09.09-43.JPG
    Ravn centrerpatron 15.12.09.09-43.JPG
    13.5 KB · Views: 319
Last edited:
Not so special?

Sorry, Doozer. I had an idea it was probably invented already already but I've never seen it before.
Well, at least I learned the american name.

On edit: Googled set-true chuck and came up with types with 3 adjusting screws. The Ravn type has only one - but you did notice, didn't you?

Regards, fusker
 
Set-true chucks have 4 adjusting screws.

Trying to center a chuck with 3 screws would be frustrating.

--Doozer
 
Set-true chucks have 4 adjusting screws.

Trying to center a chuck with 3 screws would be frustrating.

--Doozer

Doozer, if you're going to take the trouble to respond, you might as well take the trouble to read fusker's posts

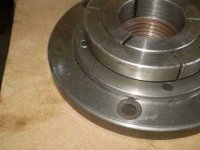
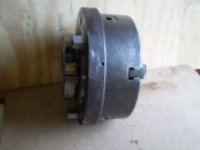
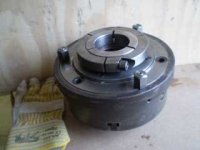
It's nothing like a "Set Tru" (or Grip-Tru, Ajust-Tru, or any other proprietary design), and it doesn't have four or three adjustment screws.

It has one, which can be infinitely re-oriented relative to the chuck body.

- - - -

Fusker - nice work! Thanks for taking the trouble to describe it, and to post photos.

I've toyed with the idea of something along those lines.

Another possibility that occurred to me was a purpose-made jack which located on the bed under the chuck, with a V pad to lift the chuck. Similar mode of use, except you'd always rotate the chuck so the eccentric 'throw' was downwards before tweaking.

I think this would work better for really heavy chucks - it seems to me the Ravn ring doesn't restrict the chuck from travelling in a curved path, partly from the pusher screw and partly from gravity. However I imagine this would not be a problem in smaller sizes. And you could always turn it so it was pushing vertically (down or up)

An advantage of my 'on-lathe' approach would be that it would work for any chucks whose backplate register fit had been 'eased'

Not so easy to apply for a gap-bed lathe, though...
 
Single screw adjusting

Troup, I agree there may be a problem with adjusting a really heavy chuck. With a heavy chuck I would not trust it to be held in place just by the 'clamping' nuts anyway. I must admit in the beginning I was a little scared of loosening the nuts, but as the centering recess is turned down only a couple of millimetres the chuck body will never slide more than that.

My chuck is 280 mm (11") in diameter, same as Ravn's as far as I remember, and it seemed he had not experienced any problems. But then, he was not the one to do heavy work and take coarse cuts. I wil try it out with progressively heavier cuts and report the progress (or failure).

One thing that may conceivably give trouble is this: The three clamping bolts will seldom be in a symmetrical position to the adjusting screw, so maybe there could be a slight offset at an angle relative to the screw movement? Four bolts would be better, theoretically. I have not yet any experience, time will show.

Doozer, thanks for replying. I think I should have explained the 1-screw design more explicit. I would have if I had ever worked with a Set-Tru chuck.
Regards, fusker
 
Troup you ball sucker! I did read all Fusker's posts and it is not real clear how it works.
I do see now the rotatable ring with the one pusher screw.
This design seems like the answer to the question that had never been asked.
If someone came up with ring idea, and made it, but they could not think up the concept of a simple set-true design (which is basically a 3 jaw being gripped by a 4 jaw), the guy really must like to complicate things. The ring is goofy at best. I guess is you never saw an adjust-true chuck, the ring might seem like when the indians first saw guns.

--Doozer
 
For the benefit of those with enquiring minds who haven't spotted what I would have thought was actually pretty obvious, there is a worthwhile benefit from being able to line up the pusher along the axis you need the chuck to move. Basically you can score a hole in one, most times: Measure runout once, correct once.

With the conventional Set-Tru, Grip-Tru, or Ajust-Tru setup, you either have to scribble down the runout and the phase angle relative to the pusher screws and do some trig, or (more usual) do multiple trial and error moves, because the correction is shared variably among a pair of pusher screws.

What I tend to do is use one pusher only, to nudge the body sideways until the runout DOES line up with the pair of screws at right angles to the one I initially picked. Then it's a one-shot correction.

Fusker: I wouldn't be too hesitant about taking heavy cuts.
Provided your three clamping screws are of suitable size, they will create enough friction grip to keep the chuck body from moving, unless you have a crunch-up, that is, in which case you'll have more pressing worries than a bit of runout!
It's a widely used rule of thumb that a high tensile bolt will create a similar friction grip to the allowable load in shear. (ie the force to shear the bolt, reduced by a suitable safety factor)

My comments about the chuck weight were just on the topic of whether a heavy chuck body would move only along the desired straight-line axis, or describe a falling trajectory like a bullet during adjustment, which it seemed to me might defeat the 'once only' objective. As I understand the design, there's nothing constraining it to a straight line, although I guess if the ring were machined with an oval rather than a round bore for the chuck, perhaps this could be achieved?

I'm sorry you struck such an ill-informed and closed-minded response, but there's a "bit of it about" since that unfortunate outbreak in Mexico City a while back.


Back
Top