What's new
What's new

American Pacemaker info needed

Bummer, I guess I will just have to keep looking.

I built a makeshift follower a little over a year ago, might have to build another beefier one later for the larger work.
 
Heres the headstock end of the clutch rod. It appears to slip into the arm and is then pinned, not sure if straight or taper.

Any ideas how to remove that thing? It's in a most challenging spot.

Perhaps you drop the whole bracket?
4ced463d08713961a2d0ee632c428c04.jpg


Sent from my SM-G991U using Tapatalk

It is a taper pin. I enclosed a picture of what the square control rod looks like when it's removed. You may be able to knock the taper pin out and then tap the square rod out. Be aware that this rod is spring loaded, and it is also timed with the clutch linkage. If you are off a tooth, it will affect your handle position. In the end it may be just as easy to unpin the linkage and drop the bracket. Either way, it's not that hard.
 

Attachments

  • IMG_0240.jpg
    IMG_0240.jpg
    87.6 KB · Views: 43
Heres the headstock end of the clutch rod. It appears to slip into the arm and is then pinned, not sure if straight or taper.

Any ideas how to remove that thing? It's in a most challenging spot.

Perhaps you drop the whole bracket?
4ced463d08713961a2d0ee632c428c04.jpg


Sent from my SM-G991U using Tapatalk

Cole
I'll be doing the same thing with my Pacemaker. If you slid the bar out the headstock end with the lever on the end of the bar, just far enough to give you access to drive the pin out and remove the lever, then pull it out the tailstock direction.
If the bend allows sliding that far. Don't know if you have already finished this job.
I have intended to take a good look at mine. The weather shut me down for a while
 
Well, if there is a Emoji for egg in your face I deserve one, or five. This job is a pain!

Cole there is an angle to knock that lever pin out. where that oil catch tray that the cast bracket bolts to the bottom, it angles up if you put your head in by the belts there is a straight shot down into the pin hole on the lever from an upper angle. Your punch will be at the same angle as that 45-degree casting.
I took a propane torch and heated the lever casting right where the pin goes through for a minute before trying to drive it out. It drove right out. You need a long punch. 8"

I unbolted the bracket like tailstock4 suggested doing. Four bolts and it has two pins. The bolts are out but the bracket won't move. Either I missed a bolt or the pins are holding tight.
Im taking a mirror up to take a look.
I need to look at a parts diagram to see how that segmented gear is interlocked with the lever. The pin is out but I don't want to break that bronze gear segment.

Cole hope this isn't walking on your thread. Break time
 
Last edited:
Well, if there is a Emoji for egg in your face I deserve one, or five

Cole there is an angle to knock that lever pin out. where that oil catch tray that the cast bracket bolts to the bottom, it angles up if you put your head in by the belts there is a straight shot down into the pin hole on the lever from an upper angle. Your punch will be at the same angle as that 45-degree casting.
I took a propane torch and heated the lever casting right where the pin goes through for a minute before trying to drive it out. It drove right out. You need a long punch. 8"

I unbolted the bracket like tailstock4 suggested doing. Four bolts and it has two pins. The bolts are out but the bracket won't move. Either I missed a bolt or the pins are holding tight.
Im taking a mirror up to take a look.
I need to look at a parts diagram to see how that segmented gear is interlocked with the lever. The pin is out but I don't want to break that bronze gear segment.

Cole hope this isn't walking on your thread. Break time


Last post on this cole2534. Sorry no pictures

With the pin out the shaft drove out toward the tailstock. The gear segment stayed in place so reassembly will be easy. Just slide the shaft back in and insert the pin. I hope you can get your pin at that angle I explained.


Edit
I forgot to mention that the linkage bar going across the bottom has to come off ffirst

One photo

20220215_151052.jpg
 
Last edited:
No progress here except picking up some tooling for it. I need to move some stuff around the shop but my I've not had the help to do it.

Sooooo let's do some armchair work-
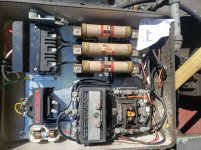
Would you guys trust this motor starter? It doesn't look messed up (ie- no burn marks) but it's definitely old and was wired by a monkey. May as well correct that stuff before I need it.
3801cbccccac07ebc8f041cdbb6132d2.jpg


Programmed via Mazatrol
 
Be a ahead with one you could actually buy heaters for Like if where it was used before had 480 and you want them to be 240 - that's double the amps on the overload circuit
 
By straitening it up you are also checking connections. As far as trusting it, I do trust the older motor starers. Im not making my living with my machinery. Your points look good but you may find a set of points on the auction site. We always had spare sets at work so if it started chattering, we popped in a new set. There's not much else to go wrong.
I hate to see sloppy wiring like that. It's so easy to tie it up neat while doing it the first time.
My 1952 is fairly clean but I'll still check connections.
 

Attachments

  • 20220110_111940.jpg
    20220110_111940.jpg
    97.9 KB · Views: 49
Last edited:
Makin progress!

Still need a circuit breaker for the coolant pump. 1/4 3ph 230, amp draw not listed on nameplate but should be about an amp. The wiring is 12ga. Soooo 20a breaker or something like a 2a to act as an overload?
37454d542807311bb3d791ce87364cab.jpg
0142cf1bacbd7930de3ba2e017bffe32.jpg


Programmed via Mazatrol
 
IT'S ALIVE! Got a few minor issue to tackle and then level it

Still haven't fixed the clutch rod, will tend to it later.
Gotta hook up the controls/aux transformer, right now it's all plugged into a 120v outlet.

After that's done I'll button up all the access panels, those MFer are as heavy as the rest of the machine. Pulling the headstock cover is a 2 man job for sure.

I got some 4340 bar layin around, I'll do some cuts in it to see what 10hp feels like in a manual machine :)
 
Nice! I've been following your thread on ARF, and just stumbled upon this one.

A little OT but where did all of the followers for these lathes go? We've got 4 American lathes and not a single follower? I have built one to get by with, but would really like to find a correct one.

That's funny; I have a follow rest for my 1941 16x54 Pacemaker, but I'm missing the steady rest. I wonder if it would be worth approaching a small foundry about making a limited run of reproduction follow rests. Probably prohibitively expensive, but I've never inquired about this type of thing.
 
Question- how do you remove stuff from the tailstock quill? There's no slot for a drift. Assuming that the screw won't push it out.

Programmed via Mazatrol
 
The screw is supposed to push it out, if you install something too short for that to work you'll have to pry it out, or disassemble the tail stock and use a long punch through the screw hole.
 
Question- how do you remove stuff from the tailstock quill? There's no slot for a drift. Assuming that the screw won't push it out.

Programmed via Mazatrol

Hvnlymachining is correct. Your arbor needs to make contact with the screw. A sharp jerk on the handle will usually eject them. However, if you have a sticky one, you can reach around back where the acorn nut that holds the handle is and give it a whack with a brass or copper hammer. The shock will travel down the screw ejecting the arbor – assuming of course that it is making contact.
 
South Bend tail stock quills this way too. I'm thinking original taper tooling was a little longer to bump into the quill screw when quill is fully retracted. But there was some issues with regular or shorter taper tooling not reaching the screw.

A couple of solutions I'm aware of. One is to drill/bore the end of quill feed screw and stick a brass or bronze extension in it, that will reach the shorter tooling, just prior to full quill retraction.

The other is to add the extensions to the shorter tooling themselves.


Back
Top