What's new
What's new

Antique lathe

JDM:

I am glad to read about your progress with getting your old lathe working again. The internal taper on many old lathe tailstocks is often found to be damaged. This is the result of taper-shank drills or a chuck/arbor spinning inside the tailstock 'quill' (spindle). If the damage is not too deep, running a tapered finishing reamer inside the tailstock is usually all that is needed. You wrote that the tailstock quill has been reamed oversized or otherwise damaged to the point that a 'clean up' with a finishing reamer is not possible.

Here is an idea you might consider for the repair to get your tailstock working again:
To make a newq tailstock q
 
to make a new tailstock quill would require turning work to a good fit in the tailstock body, milling a keyway, and fitting the threaded bushing (if used) for the tailtock feed screw. A quicker method would be to use the existing quill. Set it up in a 4 jaw chuck and indicate it so it is running true. Bore the damaged portion of the quill to a straight bore, laving as much wall thickness as you can. Machine a piece of steel to a 'shrink fit' in the bore you have put into the quill. A shrink fit requires the quill to be heated to maybe150 degrees C to expand the bore. The piece of steel you turned is at a calculated oversize and will not enter the bore unless it has been expanded by heating. You can make the piece of steel a little longer than the depth of the bore, so it can be faced off flush with the face of the quill.

Once you have the steel plug fixed in the bore, you can insure it won't move by drilling and tapping (2) small setscrews (Stellschrauben) into the end of the quill, half
in the plug, half into the quill, at about 180 degrees to each other.

When the plug is pinned into the bore by these setscrews, you can then proceed to rough-drill, bore, and finish ream a new correct taper in the plug/quill. This lets you use the old quill and saves you the work of having to make a new quill and possibly cut a heavy (Acme ? Square ?) thread for the feed screw as well as having to mill a keyway the length of the quill. If you can get the use of another lathe, that would be the best way to do this repair. When I have run a finishing reamer in a tailstock quill, I have done it in the lathe where the tailstock repair was needed. I first indicate the tailstock quill to the headstock spindle (put a dial indicator on an arm off the headstock spindle or chuck and use it to check the tailstock quill for centering to the headstock spindle, adjusting as needed.). Doing this test, you may find there has been some 'drop' between the headstock spindle and tailstock (tailstock centerline lower than the headstock due to wear of the tailstock base/bed of the lathe). On old and worn lathes where the tailstock base can be adjusted (offset) to allow turning tapers, it is common to place some shim stock between the tailstock body and its base to take up the drop. Adjusting the tailstock side-to-side using the offset screws is also done if the lathe has this type of tailstock base. From your photos, it looks like your lathe has a solid tailstock base, so you may have to live with where the centerline of the quill happens to be. For finish reaming, with the quill of the tailstock centered to the headstock spindle, I put the live center into the headstock spindle. The top of the finishing reamer will have a 60 degree center hole, and this gets seated on the headstock live center. I use a wrench to turn the reamer by hand, taking very light cuts and trying a new tapered center or arbor in the tailstock quill until good contact is had. Since you write that your tailstock's internal taper is too enlarged and damaged, shrinking/pinning in a plug will let you re-use the tailstock quill and give you a fresh taper at correct depth.
 
Thanks a lot for your advice! It is definitively easier to get a sleeve in than to make the thread and the keyway!
I am still waiting for the measuring tools, after i get them i will know more. But i fear the bore will need to be too big for the shrink fit solution. There will only be 2-3mm left and less in the keyway area. I think it will break there.

But i will adress that topic later. First i will continue cleaning and measuring. I also need to get a 5mm square key for the chucks and wrenches for the headstock nuts.
After the cleaning i will have a good overview of all the tolerances and If the chucks even run somehow true.
 
It's quite common for Geneva pattern watchmakers lathes to have a "backwards" headstock arrangement which confuses alot of people. It's really practical as you can mount the lathe on the left side of your bench and swing to out perpendicular to the bench and then use it head-on with the end of lathe facing you.
This is probably irrelevant but might be the source of rumors about German machinists using lathes backwards.
 
I thought it would be a bit easier...
The threads on the tailstock and in the Cross sled are 11mmx1,8... Totally uncommmon...
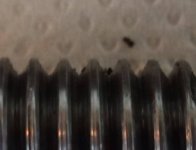
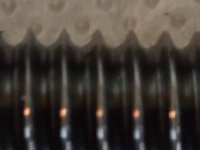
In the Crosssled the threads are worn out not on the nuts(those have seen some repairs) but on the rods.
In the areas where the nuts dont get the thread looks nice and rounded, but in the used area it is totaly sharp and worn.
 
Would 7/16" 14 be a reasonable thread? This is quite close and it makes more sense than the metric measurements...
 
JDM:

I do not know if your lathe has a micrometer collar on the cross-feed screw. The micrometer collar is matched to the pitch of the thread on the cross feed screw. If the lathe has a micrometer collar on the cross feed screw, the pitch of the new thread (distance a nut advances in one turn of the thread) must be the same as the original cross feed screw. 7/16"-14 is close, but not the same in terms of pitch.

A cross feed screw is also a Left Hand Thread, so that when the cross feed crank is turned clockwise, the cross-slide advances into the work. Feed screws on lathes and other machinery are most usually made using a 'power transmission thread' rather than a 'fastening' thread. Power transmission threads are typically 'square" or 'Acme', while fastening threads are a "V" form.

If the cross feed screw and nut are in need of replacement, a possible repair can be done by purchasing ready-made Left Hand Acme Threaded Rod and a bronze or cast iron nut from a supply firm. In the USA, we get this sort of thing from McMaster Carr or other specialty firms which manufacture Acme threaded rods and nuts. The original cross feed screw is cut off from the portion which has the journal and stub that the crank mounts on. This portion is then drilled and reamed. The Acme threaded rod is turned to fit snug into this reamed hole, andt either pinned or silver-brazed into the portion of the original cross feed screw. A stock Acme thread nut is modified as needed to mount in the original cross slide saddle.

Unfortunately, your lathe has a non-standard pitch thread. This leaves two choices:

1. Make the repair using the nearest stock size of LH Acme Threaded Rod and nut, which will mean the micrometer collar (if fitted to your lathe) will no longer be
usable. You can get around the loss of the micrometer collar by using a dial indicator to measure depth of cut.

2. Cut a new screw and nut to the pitch of the original. This is not so easy as it sounds, as you would need to grind a small boring-bar with a form tool to cut the internal thread in the new nut, and cutting a small diameter internal Acme Thread can be a bit tricky (spring of the boring bar, very small working space, so a lighter tool is all that can be used).

You are up against a somewhat difficult problem, but it can be solved.
 
Thank you Joe!
Unfortunately (or in this case fortunately) it does not have micrometer collars.

The tailstock screw is a left hand thread, but the cross feed screws are right hand threads. Its strange and will take some time for me to get used to it...

They are also V Grove threads as you can see on the pictures, the good thread and the sharp worn one.
The lower screw is in a good condition but the upper one is wery worn. After I reassemble it I will see how much backlash there is and if it is too bad to work with.

The good thing without the micrometer collars it that I am much more free to get a stock size Rod and nut to fit. Then I would also get it Left handed.

Chris
 

Attachments

  • IMG_20220611_134943~2.jpg
    IMG_20220611_134943~2.jpg
    26.3 KB · Views: 4
  • IMG_20220611_134957~2.jpg
    IMG_20220611_134957~2.jpg
    23.1 KB · Views: 4
Here are pictures of the quill, it has seen some abuse on the outside too. Also some marks that line up with that chuck. I guess that is some kind of old type 4 jaw chuck...
 

Attachments

  • IMG_20220611_124521.jpg
    IMG_20220611_124521.jpg
    482.4 KB · Views: 3
  • IMG_20220611_124606.jpg
    IMG_20220611_124606.jpg
    591 KB · Views: 3
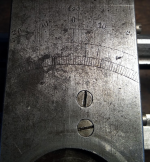
Something nice that I found after removing a lot of dirt... there is an angle indicator for the upper cross sled. I like that :)
 

Attachments

  • Screenshot 2022-06-11 223759.png
    Screenshot 2022-06-11 223759.png
    929 KB · Views: 11
JDM:

The device which clamps to the outside of the tailstock quill is a kind of four-jaw chuck. In the USA, old timers call it a 'Cat Head'. On your lathe, someone had the idea of making a larger-capacity tailstock chuck. The two sets of screws are to center the drill in the chuck, as well as to make sure the drill is in line with the centerline of the headstock spindle (and not running at an angle to it).

Since your lathe does not have a micrometer collar, you can make a new cross feed screw with a Left Hand Thread. The worn cross feed screw/nut that is in the lathe may not be original to the lathe. It is not common to find a lathe or other feed screw with a right hand thread, and it is also not common to find a feed screw with a V form thread.

A common size of Acme thread used in the USA on smaller lathes for tailstock and cross feed screws is 1/2"- 10 threads/inch. This size Acme threaded rod is available in left hand thread as are nuts to fit it. Nuts are usually available as a cylindrical body rather than a hexagon. 10 threads/inch is a common pitch for feed screws in the USA because one full turn of the screw will advance the nut (or cross slide/tool) 0.100". I did check McMaster Carr, and they do have metric Acme threaded rod and nuts, only available in right hand thread and somewhat larger in size than you need. Some browsing online for suppliers local to you in Austria may turn up some Metric Acme Threaded rod with LH threads. McMaster does have LH threaded Acme rod, but only in inch sizes.

Speaking for myself, I would have a hard time using a lathe where the feed screw in the cross slide worked 'opposite' the tailstock screw. As I wrote, my belief is some previous owner may well have replaced the cross feed screw with something they had available. Could have been a screw and nut from some other mechanism, could have been they had that non-standard sized tap and die which was about the right diameter/pitch for the cross feed screw. A pitch on the cross feed screw of 1,8 mm does not sound like something a machine tool builder would use. It is common practice to design a feed screw so one full turn advances the nut by some 'whole' or 'round' number which can be evenly and easily divided into decimal parts. If we consider a feed screw having 10 threads/inch, one full turn advances the nut 0.100". It is then a simple matter to divide the micrometer collar into 100 divisions (lines), with each graduation = 0.001". On a metric lathe, a similar type of division is needed. If the pitch of the screw were 2,0 mm, dividing a micrometer collar into 100 graduations would give a movement = 0,02 mm (about 0,0008", a fine graduation and good for lathe work). However, there is an interesting feature to cross feed (and top slide) screws on lathes: that is, the advance of the nut is the depth of cut on one side of the work. If the tool were advanced by 0,02 mm, in actuality, the diameter of the work would be reduced by 0,04mm. SOme lathe builders fitted micrometer collars which read the 'total depth of cut' (diametral) and some fitted collars which read the actual movement of the cross slide (radius). Either way, fairly fine pitch threads with a 'round number' for the pitch were used. Even if you do not have a micrometer collar, having a feed screw with a 'round number' for the pitch will give you a sense of depth of cut. If you are rough-turning and know the pitch, you can advance by 1/2 or 1/4 turns and get pretty close to the dimensions you need. Old lathes in the USA did not have micrometer collars, nor did the machinists have dial indicators in those days. Knowing the pitch of the feed screws and using simple calipers and a steel machinist rule, they worked to surprising accuracy.
 
that looks like a stout little lathe for its size. I got started on a similar style lathe that was about 1/4 of the size of yours and it served me well until I got a bigger lathe (relatively speaking). They're pretty forgiving of stupidity too, plus they need care and planning to get the most out of them, so they're good teachers too.
 
Metric Trapezoidal thread is probably what you are looking for thread wise. It has a 30 degree instead of 29 degrees like ACME has. I don't believe metric ACME actually exists, but it is commonly used to refer to trapezoidal threads due to their similarity.
 
I have been looking around, it seems for 11mm there are only the thread cutters available but no screws, also for 10mm there are only right handed screws. 8mm is too small I think and 12mm might not fit (i have to measure it on the weekend).

There is also not much space to fit a decent sized micrometer collar without limiting the travel of the sleds.

The nut is another topic, the actual nut is a rectangular block with very little space to the sled above. I don´t see an easy way to modify a round nut to fit easy.

I will get all the measurements done on the weekend, create a few cad models and get in touch with my old scool. They can do it on proper machines and even get it hardened afterwards. That should then be fine for another lifetime... I can even improve the design and get micrometer collars working maybe.
 
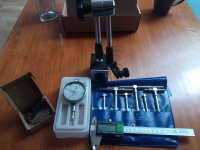
The first set of measuring tools arrived. Its not the expensive stuff but it should do fine for the beginning. Except the caliper, its three times as expensive as my other one but feels a lot cheaper...
 

Attachments

  • IMG_20220614_122456.jpg
    IMG_20220614_122456.jpg
    735.3 KB · Views: 6
JDM:

We are glad to follow your progress with your old lathe. Experience is the best teacher, and you are learning well !

For the cross feed screw, I'd suggest seeing if a screw 1/2" (approx 12,7 mm) can fit in the space on your lathe. One way to check this is to use a wooden dowel or other round rod. As I wrote, McMaster-Carr does sell 1/2" -10 left hand Acme all-thread rod and round nuts. The round nuts are made of either cast iron or bronze. McMaster will have dimension for the nuts.

Using what we call 'dummy' gauges ( a round rods the diameter of a 1/2" screw and the corresponding round nut), see if that combination can work for you.

Since your lathe does not have a metric micrometer collar, you can use anything that fits/works for the cross feed screw.

The original portion of the cross feed screw (with the journal that turns in the 'saddle' of the lathe as well as the portion the hand crank mounts on) can be re-used. The worn screw is cut off this portion, and a hole is drilled and reamed on its centerline. A piece of 1/2" diameter Acme thread rod can be modified by turning down to a 'shrink' fit in the reamed hole in the portion of the original cross feed screw. A shrink fit is made by turning the portion of the new screw so it is slightly larger in diameter than the reamed hole in the portion of the original screw. This amount is calculated based on: diameter of the parts; coefficient of expansion of steel; and, temperature difference. I usually figure shrink fits on smaller steel parts like these using a heat of 300-400 degrees F. I also figure the amount of expansion to include a very slight
clearance so the parts slip easily together when the bored part is heated up. Once the parts cool, things are locked together. You can also drill a hole cross-wise thru
the assembled parts and put in a steel pin, or rely on Loctite 603, or silver braze the parts together.

As for the nut, if the round Acme thread nut can't quite fit into the space on your lathe, filing the sides to reduce its width could make things fit. Modifications to the nut so it can connect with the cross slide can be silver-brazed to the round nut's body.
 
Thank you, I am curious and always try to learn something new!

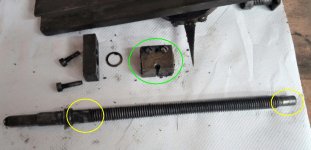
Usind a different size rod is a bit tricky, I dont see it working. In the picture you can see the two bearing areas marked. The left one is the same size as the thread, that means I can not go larger without modifying the sled too. Same for the right one, it is just slightly smaller than the thread, that means I also can not go smaller, maybe with a bushing it would work.

The shrink fit is a very interesting technique, I will definitely try it at some point. But I prefer doing new things on parts where it doesnt matter if i screw it up :)

I found TR10x2 left handed for a reasonable price. I will not order it yet but first finish cleaning the whole thing, reassemble it and hope there are no surprises on the headstock. I fear from all this wear that the headstock bearings will also have a lot of wear...
 

Attachments

  • 2.jpg
    2.jpg
    286.3 KB · Views: 7
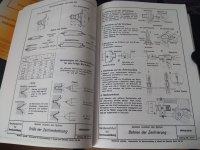
I got myself a reprint of "course for assistant lathe operators" from 1939. Probably as close as you can get to learn the techniques from back then...
I am sure a lot has changed but the basics should be fine and suit the machine...
 

Attachments

  • IMG_20220615_161134.jpg
    IMG_20220615_161134.jpg
    688.5 KB · Views: 7
  • IMG_20220615_161214.jpg
    IMG_20220615_161214.jpg
    873.2 KB · Views: 7
JDM:

Your photos of the old book bring back memories of my teen-age years. I worked summers and part-time during my high school and college years in machine shops. The first shop I worked in was owned and run by German immigrants, who had come to the USA in 1923. They spoke mostly German in the shop. My grandmother spoke mostly Yiddish, and when my parents wanted to discuss something not for us kids' ears, they also spoke Yiddish. The result is I had some understanding of German, and that was what got me the job in that machine shop. As I worked with the machinists and the foreman, I picked up more German. At some point, the old foreman, having figured out I was able to handle calculations and read drawings, used to call me to his desk. It was something like: "Joe... bitte, kommst du und die rechnung machen". He would hand me a drawing for a job, and the handbook he used when he was an apprentice in Germany prior to 1923. The name of the book was "Tabellenbuch fur das Metallgewerbe". A lot of the calculations involved trigonometry, so I'd use the tables in the foreman's old book. It was in the days before pocket scientific calculators, so I had to do all the calculations 'long hand', with pencil and paper. The foreman or one of the toolmakers would check my mathematics. Sitting at the foreman's desk with his "Tabellenbuch", running calculations beat running a boring production job on a hand screw machine or Nichols production mill. I'd leaf thru the foreman's "Tabellenbuch" and pick up more technical German terms, which I remember to this day. I remember sitting at the foreman's desk with the paper, pencils, and his book and he'd bring me a quart of cold lager beer if it was during the afternoon. Your book is a good bit newer than the foreman's "Tabellenbuch", which was more of a general sort of handbook. Still, it does bring back the memories.

Just the other day, one of my friends called and asked if I'd come to another friend's automotive repair shop. The shop has a number of old machine tools. My friend had the arbor (shaft) from what we call a 'buzz saw', a circular saw used to cut firewood. He was adapting the old buzz saw to run off his tractor and the arbor needed some work, as did a new pulley. I set up the work in an 18" x 72" Monarch engine lathe built in February, 1942 and got to work. I skim cut the shaft journals as they were heavily corroded and pitted (the saw has babbitted bearings with plenty of shims for taking up clearance). I also turned the drive end of the shaft down to fit into a pulley, and bored the pulley hub to fit the shaft. It was a perfect day, doors to the shop open to let the sunlight and fresh air in, and people we knew kept passing thru the shop to visit. We joked: the lathe is 80 years old, and my friend with the buzz saw is one month older than the lathe. I am a kid, being a bit over 8 years younger than the lathe. I had not run that Monarch lathe in a good few years, but it is like playing a piano. I caught up with a number of people I had not seen in some time as I ran the old Monarch lathe, as my friend's shop is that kind of place. An old time country garage and machine shop. We've re-babbitted bearings there, repaired all sorts of things ranging from classic car parts to locomotive parts, antique engines, sawmill and woodworking machinery, and farm machinery. Skimming the journals on that saw arbor was no big deal as I know my friend has a bearing scraper and has scraped in plenty of babbitted bearings. I guess we are just old-timers who take this kind of thing as routine. My wife knew I was off to a good day with my bros, and knows I am in what I call a 'safe haven' when I am in a machine shop.

I am sure you will get a lot of enjoyment and quite a bit of education from your old lathe. As I like to say, anyone with the money (or nowadays, with a credit card) can buy new tools. Whether they can use them and turn out good work with those new tools is not guaranteed. When a person repairs, makes parts for, and makes some of their own tools, they are in a whole different class. It is not only a confidence builder, but teaches a person to think and plan and visualize as well as developing their manual skills and 'muscle memory'. I am sure that once you get your old lathe put right, you will wonder how you lived without it, and have many happy hours and good projects to be proud of resulting from it.
 
Thank you so much for sharing that story! It is that kind of inspiring things that I enjoy! Dankeschön!

The Tabellenbuch Metall (they shortened it at some point) still exists and I also have one. It is also available in english: Tabellenbuch Metall
I used it a lot in school. I went to a kind of technical college, we had a lot of different workshops there to get a broad knowledge of the basics from manual work like filing and scraping, woodworking, welding, brazing, forging, casting to the machine work on lathes, mills, precision grinding and hardening, tempering or electroplating. And a lot more...
Unfortunately due to that many workshops we did not spend a lot time in each.
I still can remember when I was in the wood workshop and we had to sand something I was so bored that I told the teacher that I have been asked by the teacher of the mechanical workshop for help and went there to ask him if he needs help. Then I spent 3 more hours on the lathe instead of sanding my piece.


Back
Top