What's new
What's new

Butcher-block workbench top repair?

specfab

Titanium
Joined
May 28, 2005
Location
AZ
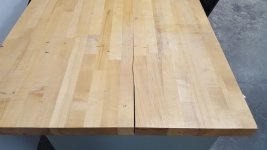
I picked up a couple of used workbenches with 30 x 72" butcher-block tops, one with a substantial crack/separation of glue seam and actual wood tearing, pretty much in the middle of the 30" dimension, running into the top from the end, about 15" or so parallel to the length. At the widest part (end of table) it's about 1/8" wide. The interesting part is it doesn't create a wider dimension on that end of the table. It still measures within about .010" of the 30" width. I am "shocked" at how this wood could shrink that much within the bulk of the material, and have such a large crack with essentially no dimensional change on the outside dims.

Anyone have a slick suggestion for fill-in and general repair technique? I tried putting a couple of bar clamps across the end of the table to see if this could be closed up with some glue in place, but it's way too stiff for that to work, IME, so some sort of filler seems to be in order.
 
I would think that you can screw with it and screw with it. but filler will suck and fall out, if you cannot clamp it, the warpage is serious

Run a skilsaw down the middle of it, drill some holes Kreg style[diagonal] from underneath and glue and screw it

Done in under an hour and ought to last

No one will notice that one or two laminations are a blade width thinner
 
Last edited:
Best way would be to clamp on a couple of guide boards and rout out the damaged area, then chisel the corners square and glue in a patch.

Other way might be to use a resin fill the way some woodworkers do on natural slab tabletops, which are prone to cracking and voids.
 
I'll second the Skilsaw suggestion. If a single cut won't do it, clamp up a guide to saw one piece off, and then offset it parallel to cut the second. Leave a bit of 'cutoff' so the blade tracks true. Don't try to skim it.

Guide doesn't have to be dead straight either. The 2 pieces matching is all that matters.

A *good* saw like a big Festool and a guiderail would be better ... or easier anyway.
 
I’ve had similar cracks open up in benches.
The wood will spring and do what it wants, so clamping it back will introduce more stress into the table top. I just leave the crack and dump some West System epoxy in the crack without clamping and let it cure and fill the gap. Before pouring the epoxy in I cover the bottom of the crack with clear packing tape. The epoxy will not creep through the packing tape. West systems will penetrate quite well. It’s good to inject the epoxy with a syringe. I’ve done this on a few benches and have not had the crack open up after five years or so.
If you have extra time on your hands cut the bench apart joint all the pieces and re glue. But why go through all of that for a shop bench.
 
As Scruffy said, if you want good advice from professional woodworkers, we need more details. A post about metalworking this vague on the General forum would generate some pretty crusty comments.

But if you just want to patch the split and just be able to use the bench without having stuff fall thru the crack, there have been some pretty good suggestions here. I personally dislike the trendy poured epoxy stuff, but if you're going to do it, make sure to color it blue. Could also mix in some of this to really jazz it up-

Easy Inlay
 
Thanks for all the input. I didn't have any pictures for the original post, but there is one attached here now (I hope). I was also considering splitting the top on the table saw and re-gluing, but that goes against my lazy approach philosophy. In any case, let me know if the picture produces any revelations.;-)
 

Attachments

  • 20220331_164518small13.jpg
    20220331_164518small13.jpg
    87.9 KB · Views: 116
If you decide you really, really want to glue and clamp, you can use a shop vac to suck the glue from one side to the other, fully coating the inside of the gap. When gap is this wide, that approach is hardly necessary. Helps a lot when things get really narrow, though. If you have a bag in your shop vac, it won't hurt anything.

If you're using epoxy, probably shouldn't do it this way. And I'd go with the epoxy myself...

Not a professional WW. Don't play one on TV, either.
 
The only acceptable fix is Richard's suggestion of the blue epoxy. It's also a good candidate for some mother of pearl inlays.

Another thought...leave it. It's got a crack and is probably stabilized. BFD

Or the fix I would do...rip it, joint it and glue it back together. Would probably take less time than an OSHA approved late morning break.
 
Absolutely rip it on the table saw and glue it back together. So simple and easy.
 
Forgot to mention this - if you go the epoxy fill route, ya gotta inlay a butterfly (bowtie) across the crack.

Ripping the top into two pieces would be my choice, but it might not be as simple as it seems. It's likely that the the two piece will move in some way dues to internal stresses in the top. It's also pretty difficult to get a glue joint quality cut off the saw, even if the pieces don't spring. Plus it's unlikely the edges are straight enuf to run against the fence and get a good cut.

If I were doing this first thing would be to rip the top on the bandsaw - much less drama. Then I'd joint the sawn edges to get them straight and square. Follow that up with a handplane to further refine the surface and plane a little hollow into each edge, to get a spring joint - puts the glue joint at the ends of the boards in compression to try to avoid what happened to this top.

If I only had the table saw, I rip into two pieces first to relieve the stresses. Then I'd attach a straight board to each half to give me a good edge to run on the fence, and take a cleanup cut. I'd still want to kiss it with a handplane, but if that was not in my skillset, I'd just use a glue with good gap filling abilities - thickened epoxy (with linen fibers) or something else. Plus you'll want to somehow ensure that the two sides of the glue joint line up perfectly - dowels, biscuits, spline, or just blocks clamped on. I guess you could screw blocks to the underneath. Make sure cover them with box packing tape to keep them from adhering, or knock them off before the glue cures. And I'd clean up the squeeze out right away with a rag and solvent, or wait til the glue was firmed up enuf to scrape it off. Don't allow it to fully harden or set, makes scraping it off really unpleasant and risks tearing out wood.

Good luck
 
Thanks (again) to all for the feedback.

Richard Newman -- thanks for filling in the details of the approach that I had been starting to decide on. I do only have a Powermatic 66 (no jointer available) to use for this, so your note about using a straight guide board is a point well taken regarding the "final" saw cut.

As a more general question, is there typically a preferred glue among shops that do a lot of butcher-block assembly for the edge to edge bonding? Would exterior grade Titebond present long-term reliability issues? I am located in Arizona, where it is typically much drier than elsewhere. I have seen this sort of splitting issue on other butcher-block tops, especially where the wood is not sealed with a finish.

All you need is the original titebond.

If ripping is difficult on the table saw and you don't have a track saw, you can use the same concept Richard suggested using a straight edge/board as a guide for a circular saw. Elevate the top on a work bench or saw horses and support both sides of the cut. Clamp the guide and top in place so the two sides don't move as you finish the cut.

If there's tension released from ripping the top in half and it's not beneficial in the form of a naturally sprung joint to glue up, there's another way to joint the edges with a router so they mate cleanly. Space the two ripped sections a little less than the width of a straight router bit and setup the straight edge so the router barely cuts into each side. This works even if your straight edge isn't perfectly straight because both sides get cut referencing the same edge guide. Use a sharp router bit and take as small a depth of cut from either side as possible to make the router easier to control.
 
Good advice above from Rocketdc! I like the router jointing idea. You can use aluminum cutting endmills, they work well with wood, and are less expensive than spiral router bits

I use Titebond Extend, because it gives me more time for complicated glue ups.

Living in a dry climate like AZ, it's no surprise you see a lot of splitting on butcher blocks. The best thing you can do to prevent that is to try to prevent the end from drying out before the rest of the top equalizes. I'd seal the endgrain with brushed on epoxy, until it doesn't soak in any more. Solvent finishes are not a effective, they have micropores from the solvents evaporating. End cleats, like on a breadboard can also help, but they have to be splined to the endgrain, and only glued in the center so the board can expand and contract. A lot of work, but effective and attractive.
 
Thanks for the extra info. I was already thinking about a router-finished edge for gluing, but didn't yet have a good concept of how I might do that. I'm a plastic fab guy from way back with a lot of metals machining experience now at my advanced age, and tend to apply concepts based on stationary machine tool application, rather than hand-held stuff. I don't have a router table in the company shop, but I do have a decent Bosch router, so I was trying to figure a good way around that. You guys seem to have hit the nail squarely. Thanks --
 
Try not to be shocked at how much the wood "shrunk". It didn't shrink any more on the end than in the middle. What happened was that the end was narrower when clamped together and the stress over time caused the crack. That is why it is still close to the right width. The original machining was to blame not the wood movement. With that many laminations it doesn't take much of a difference in each piece to end up smaller by the size of the crack.
So this was probably the opposite of "sprung" as others have suggested is a good way to go if you decide to rip it and re-glue. However I would not attempt to spring an already laminated top, it will resist and need a lot of clamping force to close the gap. Perfect straight jointed surfaces are the answer for this repair if you rip it apart.

Or you can do a quickie repair as follows.
Grab a router and cut a shallow groove, maybe 1/2" deep. Then make a piece to fit and glue it into place. Then cut a wedge to fill in the end and gently tap it into place with glue. I would have that all done in about 30 minutes but maybe that is too much work for your lazy philosophy? It is a workbench top, how nice do you need it to look? Once you beat on it for a few years you will forget all about the crack repair.

If you decide to rip and re-glue I would use the router technique given the tools you have on hand. You can also achieve the same result but only cut one side at a time with the router which makes it a bit easier to make a full depth cut in one pass. Just keep the straight edge clamped in the same place and both cuts will come out as mirror images and the joint will be almost invisible. Which won't match the rest of the top. Set up the cut with a 3/4" gap and cut the first side that you are clamping the straightedge on, then move the other side into position and make the second pass.

One special note for that router technique which I have done many times. Do not rotate the router while making the cut. Keep the same spot of the router base against the straight edge. Most router bases are not perfectly concentric to the cutter. A spiral solid carbide cutter is the ticket for this technique.
 
Don’t get too fancy here. Rip it, check the fit by eye and if it closes up nice, use tite bond. If not use epoxy. Clamp per standard procedure for the stickem you use and go on with life.

First cut with right side against fence to cut away all the material to the left of the crack, then move the fence just enough to clean up the right side of the crack. You use the same edge against the fence both cuts. It will likely close up fine. I’d epoxy it, partly because I have it on hand and its perfectly suited to this particular job.


Back
Top