What's new
What's new

Calling all South Bend 11's

I made up a list of the various models posted with pictures on this thread. I'll give the model number and post number.
Model 27 post 10,171,286,287,290
Model 32 post 160,194,195
Model 33 post 261
Model 63 post 144,148,149
Model 84 post 27,80,81,86,151,214,274
Model 111 post 208
Model 333 post 273
Model 363 post 247,250,303
Model 384 post 217,218,220,221
Model 411 post 295
Model 1864 post 256,257,327
Model 8111 post 147
 
Last edited:
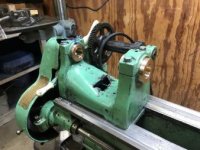
I here is a pick of the 11 it needs a cross slide

Will the Crossword for me can work on an 11 it looks like it has a powerfeed for cross slide

Hi Jade
Without the Apron and cross feed it isn't much good for anything but parts. I can't see much in the attached photo. If you get it let us see some better pictures. If it is a model 84 take look at the other post for that model.
Good luck
 
I have one just picked up at city building been siting for wver
 
Last edited:
I just sent a deposit to the man who has it
I will pick it up in a week o two
I found a cross slide apren on ebay
For 100.00 its for a ten do u know if thst will work
On the eleven?
Thanks

Jade
 
Do u still have the apren
I need it bad anyway long shot here
Thanks
Jade
(831-915-6268
 
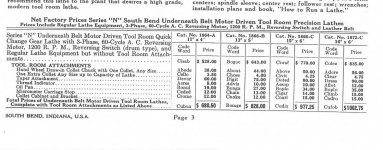
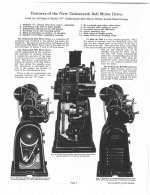
A little more info on the South Bend series N 11" lathes from a brochure. Hope it shows up big enough to read. I was able to come up with a tailstock and drive covers for my series N model 1864-A so hoping to start in on it before too much longer. Ed.

SKM_654e20111608341_0001.jpgSB series N cat numbers May 1931 brochure.jpgSKM_654e20111608350_0001.jpgIMG_2375.jpg
 
1921 SB 27-A here. Checking back in after some work. Ways casting date was 100 years from yesterday, so in absence of a better date, we celebrated her 100th birthday with me finishing up some upgrades I’ve been working on, in a mad rush for the day.

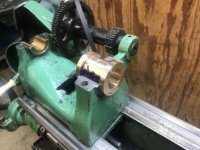
New bronze bearings, custom made for her.
430677B5-0A29-4DA0-AFEB-5D6FCC3371E0.jpg

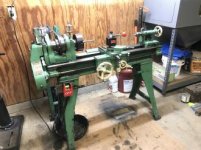
New drivetrain. (Not original, since original was from the top, but working within a budget, and what I can readily get/what came with it.) 1hp. Reversable. 5-speed, instead of 1. X2 if I ever get the back-gears working again. Still some bugs to work out, like how to disengage from the motor so I can indicate properly.
D402D7A6-F60D-4AB8-A361-ADF7CA0E2069.jpg

As it currently sits, with new QCTP.
AB9FE5A2-1C17-44A4-B837-87574A6B43D2.jpg

Acquired the autofeed worm wheel from Ted. It fits, but worm OD was ~0.003” too big, and haven’t got it ground down, yet, to try it out.

New problem, discovered last night. Does anyone know how to improve rigidity in the carriage? Parting fine from 3/4”-3/16” on some 1018 & 4140, then pulls the parting blade under the work, and I have to e-stop. Did it 3x. It’s not the blade or setup, and feedrate was as gentle as possible. I start lifting on all the pieces, and saddle can lift a tad off ways, crossfeed a smidge from saddle, compound a bit from crossfeed. Gibs are all as tight as possible, with still being able to slide. Advice or reference articles would be appreciated. I was hoping this girl was about ready to start making parts again, but maybe not yet.
 
932 bearing bronze from Bravo Bronze. Priced around, and they were still the most affordable. ~$160/ft. Started with 2.5” OD, 1” ID, to cover both front and back bearing. Started with 2.5”D 6160, $25/ft, to practice. Took measurements of original bearings, for non-critical dimensions, then best guess for critical dimensions, based on measure of headstock and spindle. Spindle had a taper on each bearing surface, thinner toward the ends. Had to chuck up the spindle and take off the taper, smooth and flatten. Would have been ideal to have a precision grinder, but I don’t have one. Then made bearing ID =/+0.001” to spindle. Split those. Located and drilled the bottom pin and oil hole. Got tired of waiting on my buddy who has a functioning lathe, so put the aluminum bearings in, to play with, and found the spindle had lateral play. Measured max lateral play of each bearing, then dimension to get both bearings in contact with spindle with feeler gauges, then went to the bronze. Duplicated process, with +dimensions to bronze. Didn’t split those. Goofed and made front bearing the exact width of headstock, so it’s a press fit. Minor annoyance. Gave +0.001-0.002” on non-critical side of back bearing, so easier to be taken in and out. Not sure why, but back bearing had to be walked in, 0.002” at a time, until top bearing cap would wet out layout blue. Located bottom pins on bronze bearings, oversized the diameter around pins, so bearing face is in firmly in contact with headstock, (aluminums were press fit to the pin, and front was gapped 0.002 from headstock), but measured to not break through. Then top caps on and located center for oil holes. Drilled for diameter at max of both sides of contact with bottom pin, to be sure oil didn’t miss. Dunno that it was the right thing to do, but I carved a small oil channel in bottom of bearings up to the spindle front contact surfaces, to try keeping those oiled, too. Didn’t split these. Assembled them onto spindle, the dropped it all in. Figuring to split the tops and shim the bottoms, like the Heavy 10s, (albeit minus the adjustable spacer block at the top, since that was a different design), if I can ever get this thing running well enough to wear. Running with drip oilers. Wasteful, so far, but I keep it erring on over-oiling.
What few pictures I have to follow...
78568A91-B7E1-4F5D-9361-DC7DB5780003.jpg
4BEC6230-BBF7-401F-B855-C68B47C4E351.jpg
990B4BD0-4007-4D43-9183-7A248116C90F.jpg
1B8F0BE2-F892-4C67-BBE8-0A06B4FF99C8.jpg
 
OK guys I’m in beEp
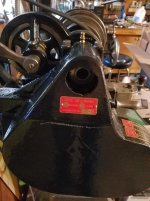
It looks like i have a carege now I’m missing a couple of parts on it. The back here I’m missing one too in two places maybe three so I’m going to grind them out and bronze fill them back in and hand file The back years I’m missing one tooth in two places maybe three so I’m going to grind them out and bronze fill them back in and hand file them to good

Also I found a aprean but it doesn’t have a hand wheel or operating levers


so I’m going to purchased another apron from a heavy can in cannibalize the house not an all of the other parts to make mine work and I’ll probably live in the house night with a bronze bushings and machine new threds into it of the right diameter

If anybody has an opinion on this process please let me know cause I would like to know that I’m going in the right direction
 
How is this


I hate the way to say it works I can’t post any pictures and such a bitch


Back
Top