What's new
What's new

Carriage ELSR assembly

How hard is it to clean the brushes when you are done? I'm rather pathetic with that part of painting... To clean well seems to require a huge amount of (whatever) cleaning agent. It seems like I have to go through gallons of the stuff (well, I'm exagerating now) to get a stupid brush clean.. Something like a sprayer is much easier because it has hard metal/plastic surfaces. For this reason, I tend to use lousy brushes that I can throw away... I guess I should change my ways because I agree that spraying this small stuff is a bit of a PITA. Your parts look like they wetted down beautifully without any brush marks... Very nice.

Sometime we should make time to meet in person. We're obviously pretty close to one another. :)

--Alan
 
Alan, do you have a brush comb? Wood or plastic handle with metal teeth, used to clean a paintbrush?

I usually use a small amt. of thinner in a plastic butter tub, soak the brush and clean it with the brush comb to work the paint out of the bristles up near the ferule, then do that again with clean thinner, then work some hand cleaner in and wash it in warm water and detergent. Haven't had to buy a new brush in years.

-Dave
 
"Russ, FWIW my hand drawn shop sketch of the ratchet is attached. My CB dia is larger than the original as I didn't care to use a good #10 SHCS CB on the material and the clearance hole Monarch used doesn't fit a standard pilot on that size CB either. I just used a flat ended end mill to do the CB. The vee slots were made with a two flute end mill ground to a 90 degree point."

The attached drawing was made for me to better understand the setups required to make the Detent part. The format is .dwf (AutoCAD) and a viewer, Volo View, can be downloaded free from their website.

I would appreciate any feedback on this effort, positive or negative, and hearing about any drawing corrections/revisions that need to be made. I will consider making this type of drawing available on other 10-EE parts that the forum might like to see if it is of any benefit to the users.

Thanks to DaveE907 for providing the sketch. If I were more machinist than engineer I would not have needed "to see if I understood the part". The sketch has all the necessary information in only two views!

It doesn't appear that I can attach the .dwf file type. Anyone that would like to have the file sent to them can email me at [email protected]

Regards, Stan
 
Cobalt, happy you found the sketch useful, it was just a quick shop sketch to help me make the part. Had to smile at your machinist/engineer comment as I'm both and sometimes I forget which mode I'm in.

This photo may help to show how I made the part. Good luck with yours!
 

Attachments

  • new 094 (Small).jpg
    new 094 (Small).jpg
    46.1 KB · Views: 218
Stan,

You may have some web space as part of your e-mail account. You might be able to upload the file there. There are also free file hosting services that will host PDF files, perhaps you could post a PDF version of the drawing?

Cal
 
Ee3597

Re: dwf file offer via email

I made a pdf file of the drawing of the Detent, EE3597, and ran into the forum size limitation, so I have ziped it and hopefully it will work for me this time

DaveE907 did not say what hardness was to be expected with 1045 oil quenched and tempered at 400F, but I surmise around 35 RC. I have offered as an alternate material, AISI 4130/4140 Q&T 30-35 RC. That is about as hard as you want to machine. I come from an oilfield background where we relied more heavily on the alloy steels than on the plain carbon steels. That is probably not as hard as the original part, but it will not chip out like the original exhibited. It may indeed wear some from ratcheting between the grooves, but will likely last my lifetime.

Stan

The .dwf is available at: http://www.cobaltequipment.com/Monarch/
 

Attachments

  • EE3597.zip
    47.1 KB · Views: 70
Stan, your drawing is well done and your alternate material will work but as you note, will wear.

To clarify, I used 1045 because it was on hand and adequate for the intended use. "HARD-N-TUFF" is a steel alloying and hardening compound made by American Chemical and Flux Products. It carburizes, chromizes and nitrides a very hard and durable case graduating to the interior tough parent steel. Even after tempering, the case can barely be scratched with a sharp file. It's a powder that was mixed to a paste and applied only to the teeth during soak at critical.

If you care to heat treat 4130/4140 the compound will work very well on that alloy too. A torch can be used if care is exercised not to overheat the thin sections or corners.

I come from an aerospace background where none of these materials would ever be considered. :)
 
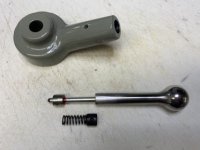
Old thread, but good stuff. I'm repairing my ELSR handle, but have a question, how "deep" is the detent pin? In this picture I have it set for around 3/16 of an inch. Once I determine the measurement, I'll drill and pin the bushing (EE-3600 from sheet 137)
 

Attachments

  • IMG_2112.jpg.jpg
    IMG_2112.jpg.jpg
    14.1 KB · Views: 38
Old thread, but good stuff. I'm repairing my ELSR handle, but have a question, how "deep" is the detent pin? In this picture I have it set for around 3/16 of an inch. Once I determine the measurement, I'll drill and pin the bushing (EE-3600 from sheet 137)

Monarch has dimensioned parts drawings for every part, by part number. Give them a call.
 
Thanks Dave. I'll give them a call. I spoke with Scott last week, that's when I discovered the pin and lever are a single piece. He said that they have a jig they use to set the depth of the detent. As you can tell from my last picture, I blew the budget on a new handle hub, so I had to try and repair the lever with a new pin. The other parts came from the original assembly.

cheers,

jdub

I’ve run into the same problem. For some reason that lever takes a lot of abuse. I had a broken hub on the 59 lathe I am working on (there was a big chunk missing on one side, where the ball stem exits the hub). I fixed it by cutting off the broken part, turning a shoulder and pressing a new piece of iron in place (then brazed, bored, etc.). The tit on the end of the ball stem was also broken off, same problem you face, but I didn’t measure the length. Instead I made it too long and then adjusted the length until it worked right.
 
Thanks Dave. I'll give them a call. I spoke with Scott last week, that's when I discovered the pin and lever are a single piece. He said that they have a jig they use to set the depth of the detent. As you can tell from my last picture, I blew the budget on a new handle hub, so I had to try and repair the lever with a new pin. The other parts came from the original assembly.
cheers,

jdub

I have a couple questions on this topic as well. I am back on my multi-year project, and I am re-assembling the ELSR. Someone has been in it before, and there are a couple missing parts. I suspect that the plunger isn't original. You can see from the picture below that the plunger is fairly short, and then it is pinned to the lever with a roll pin. I haven't seen a roll pin anywhere else on the lathe, and there is very little meat left on the plunger. Doesn't look original to me at all. It looks like from Dave's post back in '08 that his was two pieces? I am curious if anyone else has a pinned lever/plunger like mine in the picture below?
PXL_20230224_014837643.jpg
 
That is very practical advice, and I think I will follow it rather than worry about it now. I remember years ago when I took it apart that it didn't feel great, however it is easy enough to take off at a later date if my recollection is correct.

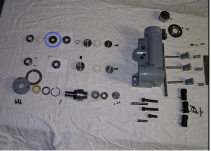
I do have one more question that requires more attention. My machine was missing the part that you can see in Dave's ELSR rebuild. It is circled in blue. I don't suppose anyone has dimensions on this part or one they are willing sell? I looks pretty easy to make, but I am not sure of the exact geometry (it looks like it could preload the bearing).

1677219950167.png
It is part number EE 3610 on Sheet 137

1677220217106.png

Also, let me know if it would be better to start a new thread. I can delete this one if necessary.
 
I probably have that part, contact me off-line and I will do some checking. My 59 10EE rebuild is right at the point where the ELSR needs to be fitted and the lathe rewired to use the ELSR functions. Its been sitting like that since a 59 Porsche landed on my doorstep in Aug. 2021, but the Porsche is running and I need to get back to the lathe and finish it up. So I need to go through the ELSR setup anyway. My recollection may be wrong, but I thought the ELSR and the non-ELSR setup was the same at that location. Do you have the same parts diagram you could post for the non-ELSR machine, that shows the difference?
 
I would lose my motivation on the Monarch if a 59 Porsche landed on my doorstep as well. I would probably lose my wife as well. That is her dream car. I am going to keep quiet given that you are only 2 hour drive from here to Salinas, and I still fancy her quite a bit.

I called Monarch today, and learned that they have an individual parts list for each machine they made. Apparently, my machine never actually had that part fitted to it. Regardless, I think it is still needed. If you look in the below picture, you can see the stack up. Without the space, there is nothing to take up the slop in between the shaft collar and the circlip.

You are correct about the part diagram. They are the same and the full page shows only the bottom shaft components with out the housing scabbed onto the none-ESLR schematic. I have posted that below as well. Rimcanyon, I will reach out to you offline. I believe I saw your email posted in another thread with some spare parts you were offloading. I very much appreciate you having a look for me.
1677285412844.png
1677285640657.png


Back
Top