What's new
What's new

Cincinnati Bickford Drill Press

Chanutan

Plastic
Joined
Jul 21, 2022
I got this drill press yesterday as I've been in the market for a replacement drill press. I am about to start getting it cleaned up and operational. It is definitely a piece of mechanical genuis. I've read some of the threads on here and am getting some great information!

Couple of simple questions as I'm definitely new this era of drill press...

1. Whats the best oil to use in all the ports?
2. Is there any "best" place to look for parts?
3. How do you know what to look for if something is off? I think I'm in over my head on this. Im realizing this machine is probably more than I really wanted to take on right now.

There has to be at least a 1/4" of grime. Its no big deal as i used to work in the oil patch, but I've got it get it clean enough for a woodshop, which is the purpose for it now.

Ive always cleaned oilfield tools with a mixture of about 75 diesel and 25 gas. Keeps them from rusting and gets everything pretty clean. For a final clean, I will probably use mineral spirits.

Here is some of the initial pics....any comments are welcome...thx!

Update:

After cleaning this machine and getting into decent shape, I did a little video...


Also, here is the link to some more pictures after cleaning it...


Attachments

  • Screenshot_20220722-071025_Gallery.jpg
    Screenshot_20220722-071025_Gallery.jpg
    527.1 KB · Views: 51
  • Screenshot_20220722-071033_Gallery.jpg
    Screenshot_20220722-071033_Gallery.jpg
    578.2 KB · Views: 51
  • Screenshot_20220722-071043_Gallery.jpg
    Screenshot_20220722-071043_Gallery.jpg
    491.6 KB · Views: 51
  • 20220728_103005.jpg
    20220728_103005.jpg
    976.2 KB · Views: 3
Last edited:
That's a really nice looking drill - Looks like nothing broken or missing, and even the table looks in good shape.
Thanks for the photos.
 
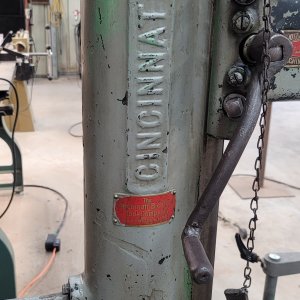
I own a simpler & smaller version, a Cincinnati Bickford 25" drill- this model does not have the sliding head/quill, no enclosed gearbox for the power quill feed, open back gears. However, these old drills are somewhat generic in their designs. I use my C-B drill for heavier work, and have owned and used it for over 25 years.

Here are a few points and answers to your questions:

1. Re: where to find oil ports: anyplace there is a rotating shaft, there will be an oil port.Shafts for things such as the pinion to feed the quill will have drilled oil ports in the cast iron housings or frame of the machine. Smaller rotating shafts will all have oil ports as drillings, usually at the 12:00 position. My own C-B drill was heavily coated with a sludge of old oil mixed with dirt (aka 'grunge'). I cleaned the drill by scraping off the grunge, then with a strong detergent (Zep "Royal Purple", if I remember right), rinsing with water, and using diesel fuel and rags on the more stubborn grunge. As you clean you will 'unearth' oil ports. These will likely be choked with grunge. Use a piece of copper wire or an oxyacetylene torch tip cleaner (the fine wires have serrations on them) to open the oil drillings, then stick a 'wand' into them and spritz in automotive brake cleaning solvent. Wear eye protection when doing this, and if you are working indoors, have good ventilation and/or wear a
respirator with proper cartridges for chemical vapors. Blasting out the oil drillings with automotive brake cleaner will flush the remaining grunge back up and out of the drillings.

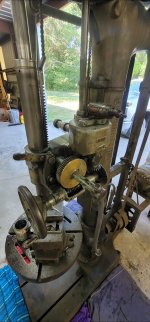
There are a few very important oil ports to locate and clear. These are located at the top and bottom of the spindle quill (the part of the spindle assembly which does not rotate is often referred to as the 'quill'). The top oil port on the quill will be something of a notch, and the lower oil port will be a drilling into the quill as you face the drill press from the front. As you move up the drill, there should be an oiler on the front of the top of the main frame, just under the 'crown' gear. This oils the top spindle bearing. As you continue up the drill, get a stepladder and clean the top of the crown gear (the larger bevel gear the spindle passes up thru). As you inspect the top of the crown gear, you will likely see an oil hole. This is to lubricate the thrust bearing under the crown gear, between the crown gear and top of the mainframe/upper spindle bearing. Make sure this port is cleaned out.

On the top and bottom of the quill, there will be thrust bearings for the spindle. The top thrust bearing will likely have a semi-split nut to adjust end play. Not sure about your C-B drill, but it may have ball thrust bearings top and bottom on the quill. Check the thrust adjustment to set a light preload if ball thrust bearings are used. If a plain thrust bearing (bronze or hard bakelite washers) is used, adjust to about 0.003-005" free play using feeler gauges. These thrust bearings are oiling points and important ones.

2. Re: Oil to use: I use ISO 46 oil. These older machines were designed to use what is still known as a "DTE" oil (dynamo, turbine, engine), an oil designation which predates the automobile and is still used in industrial and powerplant lubricant designations. I use "Tractor Hydraulic Oil", which is a DTE "medium-light" oil, ISO 46 weight (about SAE 20 weight) and contains anticorrosion and anti foam additives. Do NOT use automotive gear oils anywhere on your drill. Gear oils contain additives which can attack 'yellow metals' such as brass and bronze. You can use a heavier bodied oil on the feed gearing, something like a 'way lube'. An open gear lube is good to use on the heavier gearing such as the bevel gearing on the spindle and back gearing. Cautionary note is that open gear lubes are tacky and will catch and hold airborne dust and debris (such as grinding dusts, sawdust, and similar).

3. Larger bearings, such as on the top shaft & bottom cone pulley shaft will have 'oil port covers' on them. These will be either hinged lids or rotatable 'oilers'.
Check the free play in the top shaft (the horizontal shaft with the smaller bevel pinion gear driving the spindle). Use a small pinch bar & dial indicator. These
will be babbitted bearings and have shims in them. You may find things a bit loose if the drill did not get proper lubrication and maintenance. I believe these to be
the only adjustable bearings (other than spindle thrust) on the drill. I'd go for about 0.003"-0.005" free play in the top shaft bearings (a WAG -wild ass guess).

4. There is NO place to look for parts. These drills are ancient history. If you are missing a part other than something common like bolts or shaft keys or taper pins,
you are on your own to solve the problem. Reverse-engineering is the order of the day. Working with old machine tools requires a person to be resourceful and
able to reverse engineer and make replacement parts (or to repair damaged parts using welding, brazing, new steel, etc).

5. Never treat this drill as a 'lightweight'. It is a serious 'real machine tool' when compared to the round-column vee-belt drive drill presses in common use. This type drill produces several orders of magnitude more torque than any of the vee-belt driven lighter drill presses. If you are doing any work on this drill, clamp it to the table using tee bolts, slotted hold down dogs or straps, or any other secure clamping means. If you use a drill press vise, clamp it to the table. If a drill grabs on this type machine, it will wind up anything loose- the job, the vise, and you- if you are hanging onto it. If you are getting wound up by the drill and manage to punch the 'off' button, the stored energy in the rotating parts will keep on winding you in as things coast down. DO NOT underestimate this type drill when using smaller diameter drills in it.

I keep an assortment of 'jewelry' (hold down hardware such as all thread rod/nuts, slotted links, flatbar with holes drilled in it for holding previous jobs, tee nuts, etc) in containers by my own C-B drill. I also made an oil can from a damaged 1 pint pump oil can. The flex spout was gone, and I fished this can out of a trash container years ago. I made an extended spout out of 1/4" diameter stainless steel tubing bent at 90 degrees rather than straight up off the center of the can's pump top.
This spout has a pointed nozzle made from O-1 with a slight relief filed on it. It lets me get to the oilers and oiling points on my C-B drill and other old machine tools. The pointed nozzle is made small enough to depress the ball in spring-loaded oil-hole covers. By filing about half of the point away, oil is able to flow into the spring-loaded ball covers on oil holes. A complete nozzle point would not allow much oil flow. I keep a short stepladder handy with my C-B drill. It lets me get to the oiling points on top of the drill.

Another point: get in the habit of taking the flat belts off the pulleys when you are not using the drill. In humid weather, leather belts will stretch and take a permanent set, becoming too slack to transmit much, if any, power. I leave the flat belt (2" leather belt on my C-B drill) run off the cone pulleys when not in use.

I joke that between giving all the oiling points a drink and putting the belt back on, as well as making the setup to hold the work, I spend more time than drilling the actual holes with my C-B drill. But, it is a great old machine for pushing larger diameter drills thru steel and similar. Years ago, I had a job to drill a bunch of 1 1/4" diameter holes in some locomotive leaf spring material. I made a quick drill jig from A36 flatbar and punched 1/4" pilot holes thru the spring material. I opened the holes with taper-shank bits, drill in back gear, using the power quill feed. I was taking chips away with a shovel and wheelbarrow. A great old drill, for sure. I had made a setup for clamping the spring leaf material to the table, and used a piece of hardwood between the spring leaf stock and table.

Another point: I keep an assortment of hardwood blocking and board cutoffs by the C-B drill to use in setups where the drill needs something to run into, or for holding rough work such as castings or welded steel parts where surfaces are neither flat and may be some odd shape. Never throw away any hold-down items you made for a job. You may wind up needing them again, or may be able to modify them for another subsequent job.

No matter how much care you lavish on old machine tools, they are still not going to develop any affection for you. If you get too familiar or are hasty or cut corners in terms of setup and clamping of work, the old drill will not bat an eyelash nor breathe hard as it winds you in. These machine tools were built in an era when there was no OSHA, and it was an era when people were expected to use their own brains to figure things out and take responsibility for their own actions. Few guards, no emergency shutdown features, no 'safety warning stickers'. It is on the person using these old machine tools to figure things out and work safely.
 
I had one of these years ago very similar to this one. Mine was bought new in 1912 and used in the same shop until the mid 70's when the original owners retired. Mine came with a homemade boring head and I was told at one time it was used to rebore Ford model T blocks. I bought it to drill forgings for a job I had. I quickly learned that the slowest feed on the power feed was still too fast to drill these forgings. If the drill got even a little dull the drill press would break the drill. Never could stop the drill press, it was a beast. I sold it in a moment of weakness and have regretted it since.
 
Maybe the OP is doing heavy timberframing or wooden boat building/repair. The drill would be great for drilling thru timbers, or to drill steel plate connectors used to join timber framing. It could also push a heck of a large mortise cutting tool. Otherwise, I agree with Dundeeshopnut: that Cincinnati Bickford drill is way overkill for normal woodshop use.

I get into what I call 'hybrid' timber frame design for some houses and other structures. Rather than relying on the traditional mortise-and-tenon joints, I design fabricated steel connectors using bolting. This style of construction was used a lot by the WPA (Works Project Administration) and the CCC's (Civilian Conservation Corps) during the Great Depression to build lodges and other structures in our national parks. I use this style of construction when people want timber framing and do not want to pay for 'real' timber framing with mortise and tenon connections, or we wind up using engineered lumber (such as "Glulam" beams). Getting holes drilled squarely thru the timbers or 'glulams' is often a challenge for the builders. A drill like the OP posted would be handy for this kind of framing. Similarly, on larger wooden boat work, drilling framing timbers or other timber members for bolting would be a good job for this drill.

I believe with the handlever up on the top of the drill, this machine may be built with a tapping feature (able to be shuttled between forward and reverse rotation by throwing that lever). That tapping feature would enable to OP to run 'Greenlee" or "Ship's Auger" bits and back them out if need be.


If he were closer, I'd offer him my 25" C-B and maybe throw in the old Barnes smaller camelback drill in trade for the C-B he has.
 
You have some good answers already. Let me add do not run the machine much until you are sure you know how to oil every piece.

Here is my checklist for evaluating old drill presses like this:

Is every tooth on every gear present and in good working condition?

Is there any damage from taper pins being overdriven? (blowouts)

Do all of the bolts match on the babbitt bearing covers?

Is every babbitt bearing in good working condition?

Is there scoring on any shaft from lubrication failure?

Are the bearing cap shims present, intact and the right size?

Does the quill travel smoothly through its entire range?

Is the table badly overdrilled?

Is the table raising crank handle missing? Table move correctly?

Is the spindle bent?

Is the spindle taper undamaged?

Does the machine come with motor, controls and belts?

Are there any other broken or damaged parts?

Is the machine's power downfeed functional with all its parts?

Have any castings or gear teeth been repaired?

Is the machine designed to be driven with a flat belt?
 
The thought of timber framing had crossed my mind but I figured there must be purpose made PORTABLE drills for this purpose sort of along the lines of the hand powered drills where you sat on a frame that held the drill square to the beam. Seems moving the drill would be a lot easier than moving the timber for every hole. Drilling the steel joining plates does make sense though.
 
Dundeeshopnut:

I agree: there has to be some sort of 'timberframer's equivalent' to the portable/magnetic based drill presses used in steel work. I know the timber framing industry has some interesting tools such as a 'multiple chain' saw for plunge-cutting mortises and some huge diameter portable cutoff saws. I imagine there has to be something in the way of a portable clamp-on drill press for drilling holes accurately/squarely thru framing timbers.

I go thru a fairly predictable discussion when I get on some home structural design jobs. People with money seem to want incredibly long, clear spans in rooms of their houses. Sometimes, this means taking out load bearing walls carrying a second story or second story attic rooms. I run the numbers and come up with a few design choices. Sometimes, with limited headroom, I offer a 'flitched' beam as a design choice. This sandwiches a steel plate (or plates depending on design) with wood or laminated veneer lumber (LVL) beams. I make a point of telling the designer and the contractor that it is a major PITA to install flitch plates, and suggest using the flitch plate(s) as the drilling template. When a design may require two (2) flitch plates sandwiched with three (3) LVL's, I tell the people this is a design that is OK in theory but a real challenge to get drilled so the bolting goes thru squarely. After a little discussion, I drop the news that the field labor to make up a flitched beam, let alone handle it, is going to be a considerable cost. At that point, I will usually suggest using a steel 'wideflange' beam section and boxing it in with wood. Quicker, cheaper on labor, and cheaper than LVL's and having a set of flitch plates made up at the local steel fabricator's.

In the old days of wood mill building construction, the hand powered sit-on drill that you describe in your post was used to drill holes thru framing timbers. Using that drill, holes to bolt flitch plates on either side of a timber beam could be accurately drilled.

Nowadays, most contractors working on heavy timber framing seem to favor the Milwaukee 'Hole Hawg' drills for running ship's auger bits. They also use a real monster of a cutoff saw called a "Sawsquatch", made by Skil. I believe it swings a 12" diameter circular saw blade. I've never seen any sort of portable drill press setup for use on timber framing. I suppose a person could use one of the 'drill press stands' with a 1/2" or 3/4" electric drill, with some modifications. A hole thru the base of the stand for the augers to pass thru, and some means of clamping the base of the stand to the work would be needed. A couple of heavy strap binders and maybe some adjustable steel angle 'cleats' to chock the base against turning would work.

I do have an old text called "Modern Timber Design", first edition 1943, by Hansen, published by Wiley. This is a handy little book I fished out of a pile of old engineering books that were being discarded at the powerplant. I get a lot of good information from that old text. It does have some illustrations of a production line for producing heavy timber trusses using rings at the bolted connections. The rings are inletted into the mating surfaces of the timbers to act as shear connectors.
To inlet the rings, the shop had built some 'jacknife' type drill presses using 3/4" electric drills, drill press stands, and shop made 'jacknife' type arms to swing the drills to whatever location they were needed.

The OP has gotten himself one fine old drill. It is a few notches above my own Cincinnati Bickford 'camelback' drill. Mine dates to around WWI, and came with the factory motor drive. It uses a phenolic (aka "Micarta") pinion on a 3 HP open-frame GE repulsion induction motor, driving a cast iron bull gear on the lower cone pulley shaft. Power feed is driven by a 1" belt and 3-step cone pulleys. Get into too heavy a drilling and the belt (or the friction clutch) slips. With the back gear engaged, the drill has some very slow speeds and incredible torque. I stay within the limits of drills sized for a number 3 MT shank, so 1 1/4" diameter or thereabouts is it.

Something to check on these old C-B drills is the thrust bearings on the spindle. Mine originally had a caged ball thrust bearing on the lower end of the quill, taking the main or larger thrust loads from drilling. A set of thrust washers was on top of the quill, and there was a 'semi split' adjusting nut to lock in the thrust adjustment./ The lower thrust bearing was worn out, and the thrust washers were pretty well worn. I took measurements and called Kaman Bearing and talked to one of their sales people who knew his bearings. The sold me two INA ball thrust bearings. Not a big price, under 20 dollars back then. One was sized to a very close fit on the lower spindle, while the other had a very slight clearance. This allowed for takeup with that split nut on the spindle. I adjusted the thrust bearings and locked in the adjustment, and that was over 25 years ago, haven't had to adjust it since then. The spindle on these old drills turns in a plain bore in the quill. I did not notice any replaceable bushings in the quill when I had it apart 25 years ago. My guess is C - B figured a drill press spindle, properly used, should not see much radial (side) loading, mainly thrust load. I did not find any scoring or visible damage, so cleaned things up and put it back together. I always make sure to oil the spindle before starting the drill. On longer jobs, I will stop and re-oil maybe every 20-30 minutes if I am running a job where I have a lot of repetitive holes to drill.
 
Most woodworkers I know abhor oil on the wood but for timber framing probably not a deal breaker. For fine woodworking however, unless you never oil these drill presses, eventually a couple of drops are going to fall on the work and I think it wouldn't play nice with a water base stain.
 
I got this drill press yesterday as I've been in the market for a replacement drill press. I am about to start getting it cleaned up and operational. It is definitely a piece of mechanical genuis. I've read some of the threads on here and am getting some great information!

Couple of simple questions as I'm definitely new this era of drill press...

1. Whats the best oil to use in all the ports?
2. Is there any "best" place to look for parts?
3. How do you know what to look for if something is off? I think I'm in over my head on this. Im realizing this machine is probably more than I really wanted to take on right now.

There has to be at least a 1/4" of grime. Its no big deal as i used to work in the oil patch, but I've got it get it clean enough for a woodshop, which is the purpose for it now.

Ive always cleaned oilfield tools with a mixture of about 75 diesel and 25 gas. Keeps them from rusting and gets everything pretty clean. For a final clean, I will probably use mineral spirits.

Here is some of the initial pics....any comments are welcome...thx!
Wow, thank you everyone for all the detailed information! I am very grateful!

Have a few more pics...Still alot of cleaning.

I was very please to see perfect 90 degrees on the drill. It was the first thing i checked when i was thinking about this drill.
 

Attachments

  • Screenshot_20220722-200715_Gallery.jpg
    Screenshot_20220722-200715_Gallery.jpg
    185.7 KB · Views: 17
  • Screenshot_20220722-200745_Gallery.jpg
    Screenshot_20220722-200745_Gallery.jpg
    189.5 KB · Views: 17
  • Screenshot_20220722-200812_Gallery.jpg
    Screenshot_20220722-200812_Gallery.jpg
    217.3 KB · Views: 16
  • Screenshot_20220722-200645_Gallery.jpg
    Screenshot_20220722-200645_Gallery.jpg
    203.7 KB · Views: 17
  • Screenshot_20220722-200835_Gallery.jpg
    Screenshot_20220722-200835_Gallery.jpg
    242.5 KB · Views: 17
  • Screenshot_20220722-200856_Gallery.jpg
    Screenshot_20220722-200856_Gallery.jpg
    193.9 KB · Views: 16
Most woodworkers I know abhor oil on the wood but for timber framing probably not a deal breaker. For fine woodworking however, unless you never oil these drill presses, eventually a couple of drops are going to fall on the work and I think it wouldn't play nice with a water base stain.
I get that. Once i get the press running, i will see what kind of mess it makes. Anything that will require a perfect clean will get dressed with rags ro cover any possible drips.

I make fairly large pieces and the joinery requires precision. This press is likely ideal. We will soon find out.
 
Dundeeshopnut:

I agree: there has to be some sort of 'timberframer's equivalent' to the portable/magnetic based drill presses used in steel work. I know the timber framing industry has some interesting tools such as a 'multiple chain' saw for plunge-cutting mortises and some huge diameter portable cutoff saws. I imagine there has to be something in the way of a portable clamp-on drill press for drilling holes accurately/squarely thru framing timbers.

I go thru a fairly predictable discussion when I get on some home structural design jobs. People with money seem to want incredibly long, clear spans in rooms of their houses. Sometimes, this means taking out load bearing walls carrying a second story or second story attic rooms. I run the numbers and come up with a few design choices. Sometimes, with limited headroom, I offer a 'flitched' beam as a design choice. This sandwiches a steel plate (or plates depending on design) with wood or laminated veneer lumber (LVL) beams. I make a point of telling the designer and the contractor that it is a major PITA to install flitch plates, and suggest using the flitch plate(s) as the drilling template. When a design may require two (2) flitch plates sandwiched with three (3) LVL's, I tell the people this is a design that is OK in theory but a real challenge to get drilled so the bolting goes thru squarely. After a little discussion, I drop the news that the field labor to make up a flitched beam, let alone handle it, is going to be a considerable cost. At that point, I will usually suggest using a steel 'wideflange' beam section and boxing it in with wood. Quicker, cheaper on labor, and cheaper than LVL's and having a set of flitch plates made up at the local steel fabricator's.

In the old days of wood mill building construction, the hand powered sit-on drill that you describe in your post was used to drill holes thru framing timbers. Using that drill, holes to bolt flitch plates on either side of a timber beam could be accurately drilled.

Nowadays, most contractors working on heavy timber framing seem to favor the Milwaukee 'Hole Hawg' drills for running ship's auger bits. They also use a real monster of a cutoff saw called a "Sawsquatch", made by Skil. I believe it swings a 12" diameter circular saw blade. I've never seen any sort of portable drill press setup for use on timber framing. I suppose a person could use one of the 'drill press stands' with a 1/2" or 3/4" electric drill, with some modifications. A hole thru the base of the stand for the augers to pass thru, and some means of clamping the base of the stand to the work would be needed. A couple of heavy strap binders and maybe some adjustable steel angle 'cleats' to chock the base against turning would work.

I do have an old text called "Modern Timber Design", first edition 1943, by Hansen, published by Wiley. This is a handy little book I fished out of a pile of old engineering books that were being discarded at the powerplant. I get a lot of good information from that old text. It does have some illustrations of a production line for producing heavy timber trusses using rings at the bolted connections. The rings are inletted into the mating surfaces of the timbers to act as shear connectors.
To inlet the rings, the shop had built some 'jacknife' type drill presses using 3/4" electric drills, drill press stands, and shop made 'jacknife' type arms to swing the drills to whatever location they were needed.

The OP has gotten himself one fine old drill. It is a few notches above my own Cincinnati Bickford 'camelback' drill. Mine dates to around WWI, and came with the factory motor drive. It uses a phenolic (aka "Micarta") pinion on a 3 HP open-frame GE repulsion induction motor, driving a cast iron bull gear on the lower cone pulley shaft. Power feed is driven by a 1" belt and 3-step cone pulleys. Get into too heavy a drilling and the belt (or the friction clutch) slips. With the back gear engaged, the drill has some very slow speeds and incredible torque. I stay within the limits of drills sized for a number 3 MT shank, so 1 1/4" diameter or thereabouts is it.

Something to check on these old C-B drills is the thrust bearings on the spindle. Mine originally had a caged ball thrust bearing on the lower end of the quill, taking the main or larger thrust loads from drilling. A set of thrust washers was on top of the quill, and there was a 'semi split' adjusting nut to lock in the thrust adjustment./ The lower thrust bearing was worn out, and the thrust washers were pretty well worn. I took measurements and called Kaman Bearing and talked to one of their sales people who knew his bearings. The sold me two INA ball thrust bearings. Not a big price, under 20 dollars back then. One was sized to a very close fit on the lower spindle, while the other had a very slight clearance. This allowed for takeup with that split nut on the spindle. I adjusted the thrust bearings and locked in the adjustment, and that was over 25 years ago, haven't had to adjust it since then. The spindle on these old drills turns in a plain bore in the quill. I did not notice any replaceable bushings in the quill when I had it apart 25 years ago. My guess is C - B figured a drill press spindle, properly used, should not see much radial (side) loading, mainly thrust load. I did not find any scoring or visible damage, so cleaned things up and put it back together. I always make sure to oil the spindle before starting the drill. On longer jobs, I will stop and re-oil maybe every 20-30 minutes if I am running a job where I have a lot of repetitive holes to drill.
Joe, thank you so much for the level of detail. I will read this and read it again, and then probably a few times after that.

Thank you!
 
Sweet machine! Curious though, what the hell are you going to do with it in a woodshop???
Thanks for the reply. The answer is my old drill press was completely worn out china junk. I needed something new and saw this. Decent price and i thought how cool is this old machine! 🤠👍
But in alo seriousness, i make some big stuff and precision is also very important. Big forsnet bits have a hard time in hard maple. Im sure this beast wont have any trouble.

I also do welding and metal fabrication, so i kinda have a need for something this big. Not to mention i have a bunch of old oil wells to tend to and it seems i am always fabricating something. I would rather have more press than i need, as long as i have the shop space.
Thanks again!
 
Joe,
Thanks again for all the detail!
Couple of questions...
I was thinking about using my blow torch for cleaning everything. But, after reading about the babbited gears, i am afraid of getting too hot and loosening something i dobt want to loosen. Any advice on that?
2. Thanks for the tractor oil tip. I also asked a machinist buddy and he though use 3 in 1, but i think i am going to need alot more than 4oz bottles...lol
3. Definitely will check that bearing. Thx!
4. I am used to having to fabricate and i do have some resources locally, but i thought i would ask. I just hate always having to shut down in order to fix something. Happened on my compressor just the other day.
5. I've been in the oil patch for many years. Pulled and drilled alot of wells. I can fix just about anything. I still have all my fingers and toes despite more close calls than I care to count.
I remember once as a deck hand on a drilling rig we had a string of 4 1/2" drill pipe with a sticky last thread. Coming out of the hole, whenever i was finished with the power tongs, we would pull up to lay the piece of pipe out on the flatbed and that last thread would stick, and very quickly you'd see the line get tight and start to pull. When the thread broke, the 500 pound piece of pipe would bounce around the frame of the derrick like a windchime. I almost lost my arm in that derrick a few times.
Thanks for the warning with this machine. I clamp everything. But, the end result is precision if you doing it right.
As far as safety, i was thinking about a footswitch for the on/off. The position of the switch is currently next to the flat belt and i dont want to accidentally rush to hit it only to wind up in the belt. Im going to source that and see what i can find.
 
Last edited:
You have some good answers already. Let me add do not run the machine much until you are sure you know how to oil every piece.

Here is my checklist for evaluating old drill presses like this:

Is every tooth on every gear present and in good working condition?

Is there any damage from taper pins being overdriven? (blowouts)

Do all of the bolts match on the babbitt bearing covers?

Is every babbitt bearing in good working condition?

Is there scoring on any shaft from lubrication failure?

Are the bearing cap shims present, intact and the right size?

Does the quill travel smoothly through its entire range?

Is the table badly overdrilled?

Is the table raising crank handle missing? Table move correctly?

Is the spindle bent?

Is the spindle taper undamaged?

Does the machine come with motor, controls and belts?

Are there any other broken or damaged parts?

Is the machine's power downfeed functional with all its parts?

Have any castings or gear teeth been repaired?

Is the machine designed to be driven with a flat belt?
Metalmagpie,

Thanks for all the info to check!

I added some pics today as ive been going through the machine a little more. Needs a lot of elbow grease to remove the decades of grime. So far, everything looks to be in order. I will keep updating my progress and add any pics that seem relevant!

Thanks again!
 
The more of your pictures I see the more I'm convinced the one I had was the same model? One thing I see missing on yours is the adjustable stop for the power feed. Mine had a sliding collar with a set screw that went around the spindle and you could adjust the depth of the hole and it would trip out the power feed with that collar.
 
Chanutan:

I would NOT use a blowtorch to strip/clean the drill press. The old finish may well have a lead-based paint, and there will likely be some filler added to smooth out the castings. My own 'durthers is to just clean things as best I can with strong detergent/water, followed by kerosene (or diesel) and/or mineral spirits. I use a 'Scotchbrite' pad soaked in kerosene or steel wool soaked in kerosene to scrub off the stubborn grunge. My own belief is old machine tools are meant to be used if I own them. Hence, I do not treat them as 'full on restorations' or 'museum pieces'. Clean 'em up, get things put right as far as bearings, adjustments, repairs, etc and put 'em to work. The old paint and its effect is considered by some to be a 'patina', and some of the antiques/arty crowd will go out of their way to have an 'aged patina' re-created on new stuff. A compromise to stripping the machine of its old paint (and filler) is to get some automotive body 'spot filler'. Sand the painted areas and use the spot filler on areas where chunks of finish/ filler have spalled off. Sand and blend, then prime and paint. I am no Rembrandt nor restoration artist. I use Rustoleum enamel paints. They go on nicely, seem to lay on a heavy coat when brushed on, and (usually) self level. I believe Sherwin Williams paints may offer a 'hardener' to be added to their industrial enamels to make them a bit more durable. This hardener is quite toxic, so I've stayed away from it.

As experience with any machine tool shows: if you use 'em, you are going to put hot chips and cutting oil on the new finish. In nothing flat, the new finish will have some battle scars. It's your call as to whether to repaint or not. I clean the machined surfaces with steel wool, stone the table to take off any 'dings' (raised metal from impacts with steel tools or similar), and call it done.

Your drill does have the ball type thrust bearing on the lower end of the spindle quill. If you are up for dismantling the spindle, you can check this bearing for wear on the race plates and balls. As I wrote in a previous post on this thread, new replacements are available from bearing supply houses. The new ball thrust bearings I installed on my C-B drill are shielded, fully enclosed, with oil holes.


Re: 'Three-in-One Oil": This oil is a 'household' lubricant for things like sewing machines (back when people sewed to make or repair the family clothing), fishing reels, guns, typewrites (back before personal computers and word processing took over). 3-in-1 is a very light bodied oil, probably on the order of a high speed spindle lubricant (Velocite ?). ISO 46 tractor hydraulic oil is fine for these old machine tools. It is equivalent to a 'straight' 20 weight oil, mineral based. If you find the oil is slung out of the spindle and you wind up with a 'racing stripe' on your clothing and skin, or the ISO 46 oil runs out the top shaft bearings and down the machine frame, you can add some Lucas Oil Extender to the ISO 46 oil. The Oil Extender is basically a 'tackifier', and gives the oil more film strength and tackiness so it will not run out of bearings quite so freely. Nothing in the Lucas product that will hurt anything on old machine tools. An oil formulated for the old engine/old machinery community is "Green Velvet PBJ Oil". Green Velvet oils are pricey. PBJ = pins, bearings, journals. The PBJ oil is a straight weight mineral oil with a heavy dose of tackifiers. The DIY version is to mix ISO 46 tractor hydraulic oil with the Lucas Oil Extender, 50-50 being about right for that healthy dose of tackifiers.

Re: Power quill feed: C-B used a 'knockoff dog" to trip the power feed out of engagement. This knockoff dog looks like a lathe-dog which has been bored to a sliding fit on the quill. It has a thumbscrew to lock it in place. The tip of the bent tail on the dog hits the trip lever on the power feed mechanism and knocks it out of engagement. It is a part that can be duplicated using steel. If the drill is assembled, this dog can be built as a split assembly with capscrews to pull the halves together around the quill. Saves dismantling the spindle from the drill to install a dog made per original design.


Back
Top