What's new
What's new

CMOS battery welded and soldered in

FredC

Diamond
Joined
Oct 29, 2010
Location
Dewees Texas
I have a Omniturn motherboard that the Cmos battery just failed. The machine is about 24 years old. Replaced the battery in the other machine and it was a piece of cake. This one as the title mentions is soldered to the board with welded on leads to the actual battery. I found an old bad mother board that has a replaceable CMOS battery. I measured the distance between the leads on the permanent battery and got .806 inches on the battery holder the distance is .764. Both seem to have solder only on the underside of the board. What are the chances of success in replacing the battery with the battery holder? From previous discussions here I know boards have multiple layers, if the only connection is on the bottom of the board how difficult will this be? I sent the previously discussed boards out to be repaired so I never got a solder sucker. Can one be improvised with a vacuum pump and a plastic nozzle? Figured plastic might not draw the heat off the joint.


Anyone ever done this? Both are 3 volts. The Omni mother board is rather special to fit the riser and expansion cards.

Bad cap thread: https://www.practicalmachinist.com/...king-electrolytics-380850/?highlight=bad+caps
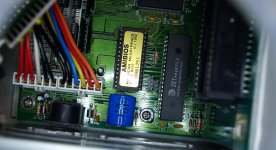

AHC CMOSRS.jpg
 
I would recommend getting a good desoldering setup if you own older CNC's. Stuff like this is simple when you do.

I recommend Hako.

Older laptops often have soldered CMOS batteries. I've had to fix a couple. Wasn't anything special.
 
Just watched a Youtube video, and it probably is not a simple thing to replace it with a button battery socket. Evidently these large soldered in batteries have a charging circuit, finding the trace that charges it and cutting it may be required. I guess finding the correct battery and soldering it in maybe the best way to do it. If it lasts for 20 plus years again I will be not be fixing it again.
 
Solder suckers are cheap really, even if you only need to use one once. You might manage with a vacuum pump and some 5/32" oil hose if you have a reservoir and a valve to give you the high flowrate needed.

Generally It's not too hard to replace the batteries. If you can cut the battery off its leads with a pair of side cutters, that makes the job far simpler because you are only dealing with one end at a time and without the battery there it isn't wicking the heat away from the soldering iron so much. Use tweezers or needle nosed pliers to hold the ends, fingers have limited endurance! The solder sucker is handy to clear the hole once you've got the battery connections out of the way.

I've had to do a few on "irreplaceable" machines, and it isn't the worst job that needs doind.
 

Can you take a picture such that the reflection doesn't obscure the markings on the blue thing, which I assume to be the failed battery.

Most likely, these batteries can be replaced. A simple matter of soldering.

Given that the motherboard is likely irreplaceable, I would find the part and take the assembly to someone with the correct equipment and experience doing this kind of thing.
 
Looks like of pc board.

If the battery in question is the blue thing it is a large capacity compared to coin battery but they had not figured things out back then.

Unless you are good at soldering do not try to unsolder it.

Look closely at the ends and notice the legs are spot welded on.

Locate the smallest wood chisel you can find or sacrifice a screwdriver.

Make a very sharp wood chisel shaped point, perfectly flat on one side with shallow angle and very very sharp.

Carefully applying gentle pressure you can get under the leg and pop the welds one at a time.

Now you can add the same type of battery with wires added.

The issue to be careful of is make certain your iron is NOT grounded and all connectors unplugged from board.

You can add connector so next time it is plug in or use socket for coin battery but insure same voltage and bigger is better.

Mount to insulated bracket someplace and heat shrink the connections on the legs.

Sent from my SAMSUNG-SM-G930A using Tapatalk
 
I desoldered and replaced a battery on the board of a old boiler control computer. Just use a solder sucker and small soldering iron. Get a new battery with the same volts/ah. On mine I soldered leads to the battery, then to the board, and attached battery to board with hot glue. Batteries don't like heat so be careful and quick in attaching the leads to minimize heat. Control works fine to this day.

New Vacuum De-solder Gun Desoldering Pump/Soldering Solder Sucker Removal Tool | eBay
 
A hot-air rework station would be the best (and I agree, Hakko is good) , but as you've read many people have used small soldering irons and solder suckers.
 
I have worked on a lot of PC boards and most are of the ones with "through hole" mounted components are fairly easy to work with. OK, I said that and it is true. But then there are others. And there is no way that I can accurately tell you which ones they are. But those others will give you, me, almost anyone fits. Sorry, but that is the way that over 50 years of electronic component replacement has taught me that it is.

In your case, if possible I would try to cut those metal straps as close to the welds on the battery as possible. Then I would solder the new battery or battery holder to those stubs. That will avoid a whole bunch of possible problems that could arise if you try to unsolder them from the board.

If you are going to try to unsolder them, it can be done without a solder sucker. In fact, the solder sucker with a small, round hole, is not really suited for the long holes for those battery straps and you can have problems melting all of it at one time and then removing the soldering iron and putting the solder sucker on it accurately. This can lead to a partial removal of the solder, leaving the component still stuck to the board and you need to ADD more solder to try again. Since the battery has only two connections, you can heat one of them at a time and pull that end of the battery out of the hole in the board. Then do the other end. This way you can keep the soldering iron on the joint until all of the solder melts and the lead comes out easily. I have used this technique many times with two and even three legged parts and it can save a lot of wear and tear on a fragile PC board. After the component is removed then solder wick can be used to clean out the hole. This is better than trying to suck the solder out of a long, non-circular connection like this.
 
That is called "puddle extraction"

Works well when done correctly, not so much when not.

If the holes have room and the leads are not mis-shaped along with no tiny trace on cut board one can heat until it puddles then carefully lift the part.

Problem is if too much heat and possible burr or fragile trace the trace on top may lift with the part.

We had done this with large ic, clip all legs then one at a time remove.

Can be simple here but depends on your skill and iron.


Sent from my SAMSUNG-SM-G930A using Tapatalk
 
I would replace like for like, or at least like for equivalent. Trying to reverse-engineer a different battery solution into there is going to end up being more trouble than replacing the battery every decade or two.

A basic desoldering bulb and a temperature-controlled soldering iron may be enough. If not, then Chip-Quick is a huge help for removing junk parts you will not be re-using. Just be sure to remove all traces of the alloy from the PC board pads before soldering in your new component.

Be careful not to overheat the traces on the board during desoldering or they may lift off.

 
Sometimes I cut the pins up near the battery weld and then solder quickly onto the protruding pins. This minimises disturbance to the main board.
 
Well I got the battery off the board using a combination of the suggestions, thanks to all so far. I guess it is a good thing that I caught it now as it had just started leaking. Cleaned the board up with Q-tips dampened with alcohol.

The battery has this writing on it on the outside in the blue: GP, GP60BNKX33.6V K3,
60mAh (with a triangle shaped logo), MADE IN HONG KONG The blue plastic is so reflective I have doubts that I could get a good photo.

On the + end GP SYLVA CHARGE,NiCd ? (welded here so a little uncertainty), I13GI (same uncertainty),
60K

I found this rechargeable 3.6 volt battery on Amazon:https://www.amazon.com/Rechargeable...&keywords=cmos+battery&qid=1616426019&sr=8-20
40mAh not sure if the smaller mAh would be an issue if so would 2 of them work?

Just talked to Mike Welch at Omniturn and he said use a 3.6 volt cordless phone battery. mAh on the battery does not mean much for this use. He recommended mounting the battery in a location where it could be replaced "hot" like on a regular CNC. I was thinking about that anyway as this one was a pain pulling it all apart to get the motherboard out. The older control has the coin battery in an accessible spot, I took pictures for the next time on it.

Again, thanks for all the replies.


Back
Top