What's new
What's new

Coming Soon: A Beam 18" Featherweight Parallel/Level. And more lengths later

After getting a faithful copy of the original pattern (this purpose-made urethane shrinks less than 1% and captures detail to very fine resolution), I poured two-part rigid urethane into the mold.

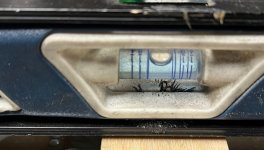
I leveled the mold and poured the urethane.
repro-in-mold-prep-materials-and-leveling-jpg.365782


The cross pieces of plywood have drywall screws in them with the heads embedded in the urethane. They will help extract the plastic pattern after the urethane sets. Even with the wax, PVA, and silicone the rigid urethane still adheres to the mold. Shims were used to level the mold. Spacers under the cross pieces allow wedge insertion to pry urethane loose from the mold.
REpro Mold Shimmed.JPG
Pretty well leveled.JPG
Cross pcs have drywall heads down.JPG


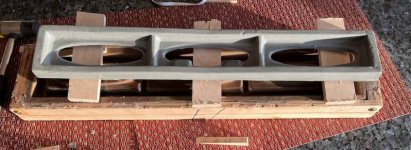
The final result. This rigid pattern will require only a little touch-up before attaching to the working match plate.
repro-out-of-the-mold-smallest-jpg.365783


I am having some custom letters made to attach to the other pattern half. Those will not be ready til later this week.

Denis
 

Attachments

  • REpro Mold Shimmed.JPG
    REpro Mold Shimmed.JPG
    670.5 KB · Views: 177
  • Pretty well leveled.JPG
    Pretty well leveled.JPG
    364.9 KB · Views: 177
  • Cross pcs have drywall heads down.JPG
    Cross pcs have drywall heads down.JPG
    484.7 KB · Views: 179
  • REpro in mold prep materials and leveling.JPG
    REpro in mold prep materials and leveling.JPG
    896.3 KB · Views: 178
  • Repro out of the mold smallest.JPG
    Repro out of the mold smallest.JPG
    78.2 KB · Views: 179
Well, I finally got some letters 3-D printed in PLA by a sympathetic guy in the PNW. Today I let them into my master pattern. Since I asked for 3/16" wide backing plates with radiused ends, dropping them into corresponding mortises in the pattern was amazingly easy. I just set the pattern up on the mill and located the mortises and made appropriate-length grooves with a 3/16" end mill. Then the tiles just fell into place. In fact, pulling them back out after dry fitting them was a bit of a trick as there was only a very slight gap between the pattern and the tiles bearing the lettering.

Lettering Tile2.JPGLettering Tile3.JPGLettering Tile4.JPGLettering Tile1.JPGThere was very slight fettling to do after I glued them in. Then I misted on a couple coats of lacquer. From this I will make a silicone negative mold and then cast 2 Repro copies.Once those are done I will be attaching them to a matchplate and then adding gates and runners made from a combination of wood (for straight parts) and Sculpey baked modeling clay for curved or flared partions of the gate/runner system. Then fianlly I will cast the whole works again. I will not be surprised if some tweaking of the matchplate will be nededed to get good clean draws of the plate as well as possibly needing to adjust gate/runner. But, ya gotta start somewhere, I guess.

BTW, I have a Prusa MK3 kit on order with an expected shipping date of 2-3 weeks. It is made in Czech Republic but DHL claims they can transport it in 3 days for 50+ dollars. Here's hoping there are no hang ups along the way. I had recently agreed to buy a nearly new MK3 from a guy in Seattle with delivery on Sunday. But, then he backed out unexpectedly and without explanation. Bummed about that a bit. I felt like a deal was a deal and I sure would not have backed out on my end. Oh, well...

I have been doing tutorials and practicing modeling in Onshape CAD software. Like all full-featured CAD software it has a bit of learning curve with the requisite occasional head banging. I am hoping to be able to print largish patterns in segments and glue them together to act as masters but not working patterns. We'll see how that works out in reality.

Denis
 
So, I did make a silicone negative mold of my wood pattern with the letter tiles inset. The silicone is pliable and pricey. So, providing a fairly close-fitting and displacing wood framework saves on silicone expenditure and reinfoces it so that it does not bulge and sag.

Silicone Mold.JPGSilicone Mold3.JPGSilicone Mold5.JPG

The silicone molding wonderfully and was easy to use. (I used Magicfly from Amazon as it was cheap abnd had good ratings) A nice thing about silicone molds is that they are self-releasing as opposed to urethan rubber molds which are not. Similarly, rigid urethan molds are not self-releasing.

Using the silicone mold I cast the lettered side of the pattern and got the following excellent results.Repro Casting Side2.JPGRepro Casting Side2 2.JPG

The Repro One peeled out of the silicone mold cleanly and easily. No wax or other release agent was needed.

Next is construction of a match plate and then finally I should have a chance to test it out with molten iron.

Denis
 
Denis, while you can touch up the lettering on the cast pattern, if you do another one, take some action to get the little air bubbles out of the lettering grooves in the silicon mold. One old-school way that's appropriate for a mold with just a few areas like this, is to take a small fine-point (artist's) paint brush, and stroke the mold lettering negative spaces with a little bit of resin before pouring the bulk of the resin.
 
Denis, while you can touch up the lettering on the cast pattern, if you do another one, take some action to get the little air bubbles out of the lettering grooves in the silicon mold. One old-school way that's appropriate for a mold with just a few areas like this, is to take a small fine-point (artist's) paint brush, and stroke the mold lettering negative spaces with a little bit of resin before pouring the bulk of the resin.
Stu,
Thank you helping me on this point. And I should really have done that . I did try out the pre-painting on the letters and, indeed, found it worked perfectly.

So, using the method you suggested, I made another Repro casting and the result was flawless. Zero bubbles!

24C4F156-F4C9-44DF-911B-A87339F7AB64.jpeg

BTW, dont ask me why this one is on its side—-the new software “helped” me, I guess.

Denis
 
Last edited:
I now have most of the kinks worked out and a functioning matchplate so I can cast these two-to-a-mold. The first set were cast yesterday AM.

Here are some pics of the casting pair still connected to the pouring basin, runners and gates and then a couple more or less cleaned up as raw castings.7-1-22.JPG7-1-22aresize.JPG7-1-22c.JPG7-1-22d.JPGFinished Raw2 Resize.JPGFinished Raw Resized.JPG

Both are spoken for. I am going to introduce these castings at 160 dollars for a raw casting or 300 for a pair as folks likely will want to use them in pairs often. They are grey cast iron and are properly thermally stress relieved. Shipping will be 24 dollars USPS Priority for one or two castings. I expect to cast them again in a few days. They weigh just a little over 12 pounds as cast and probably shave a pound or two off in machining them. I will macine them on both faces, all sides and ends for 150 dollars additional. These are trial prices and will stay the same if things go as I expect. If machining proves to take a lot more time, the price will, naturally, have to be adjusted.

The castings are roughly 18 by 3 by 1.25 inches.

I will be receiving a Prusa MK3 3D printer oioin about ten to 14 days. That should streamline things like getting the lettering done---the part that caused the longest delay. And it should make new pattern production smoother and faster. Time will tell on that point.

Denis
 
For those that might be interested in cross-sectional views of the parallel, here are a couple of cuts made through a dimensionally OK casting that otherwise did not meet standards and will be given another chance---by remelting.

Here is a section through one of the webs and a mid-oval section.
Sectional View1.JPG

From a different angle.
Sectional View2.JPG

Hardness testing at the corners (most likely areas to chill) and mid section and other areas all were between Rc10 and 12. That should be very good for easy scraping and good durability.

Denis
 
Thanks for all of the above likes and postive comments. They are truly appreciated.

I now have four of these castings in stock, stress relieved and ready to go. I plan to cast 2 more tomorrow and an 18 prism/str edge/level/paralle tomorrow as well. It is so nice to have nice weather these days. It is a lot different than trying to get a melt in when a weather break happens to occur. I continue to tune my patterns, matchplate and process. Each new pattern requires some trials to get the process down.

It is most efficient to contact me at [email protected]. PM's are combersome.

Denis
 
Mark,
I was puzzled by the last sentence above. So, Google to the rescue: “ Teaching (your) grandmother to suck eggs is an English language saying that refers to a person giving advice to another person in a subject with which the other person is already familiar (and probably more so than the first person).”

Now I get it. ;-)

Denis
"Off topic", but "not really".

Happens my Grandmother (and two Aunts) made rather artistic decorative art from (emptied) hen egg shells. Poor folks Peter-Paul Faberge thing? Save that his shop was COPYING far more ancient art (see also Ostrich eggs..) into precious materials.

The raw egg material wasn't sucked out. It was 'blown' out. Potential pathogens are bad enough with handling of eggs as it is:


"Teaching your grandmother to blow eggs" might be more technically correct?

"Polite Society" correctness, OTOH?

Above my current pay grade!

:D
 
I looked back into post 26 above and wanted to clarify a point on the weight of the castings. EACH one weighs 8 pounds 2 oz as cast. The way I stated it above might seem to imply th ey each weigh 16 pounds. Nope. 8# 2oz. So a pair will fit in a large USPS FRB for domestic and international shipping.

Denis
Maybe I was the only one confused on this point. ;-)


Back
Top