What's new
What's new

DC welder heating...why no luck?

At a glance...this appears to be an M40 Acme thread with a 7MM pitch.

I counted 5 threads within a .950" span. Is that a 7MM pitch? The OD of the shaft is 1.580" which is pretty close to 40MM.

McMaster actually sells new nuts...I haven't measured every dimension but I bet they would work with some lathe time. But....$236 each.

I heated the nut up to about 325F using a MAPP torch. Then I sprayed more Kroil down the threads. Then after it cooled a bit I repeated it.

I'll probably reassemble it enough to let me put torque back on the shaft to see if/how it has freed up. Later, once I gain some enthusiasm back. Right now it's just another oily slop-mess.
 
Old Kurt vises have this problem. Kurt fixed this some years ago by adding a milled slot down the screw. The screw then works just like a thread chasing tap. Gunk and corrosion collects in the slot and doesn't jamb it up.

I have fixed several old locked up Kurt vises this way by grinding a slot in the screw.

If you can get the screw out, even dirty and with the nut still attached, set it up on a mill and cut a notch or key down some or all of the length. I'd use a woodruff, probably 3/16 width for a 40mm screw.

Throw the screw back in, power it up and down a few times and I bet it works like new after that.
 
..The thing you want to heat is the "nut", not the screw. Heating the screw expands the screw and will make it tighter. Heat the "nut" with a torch...

Yup, heat is your friend in this situation. Give the nut a little heat to start, let it cool, slather on some
lube and see if things move. If there's no movement do it again, taking the heat a little higher. Rinse
and repeat till you get some movement.

We used to work on some heavier pieces of machinery and I've seen situations where the nut had
to be heated cherry red several times before it would break loose,..
 
So here is the infamous nut....I greased the threads under it and reassembled it. It took a 48" pipe wrench to break it free, but once the threads hit the grease it got easier and easier until I could turn it by hand.

I can see where the first thread is lifting out of the nut. This is clearly, IMO, the result of dirt and crud being ingested. The rest of the threads look much better....I'm not sure what they should look like but I think it's fair to say they are 'good'. I'm sure the lifted thread was adding some resistance as well.

I'm going to cut away the first thread or two, clean it all, and put it back together. I also have the long-and-heavy screw out and will clean it. Some of the thread s are just packed full with grease/dirt/metal.

I do like the idea of the groove....I didn't measure the acme thread length but I'm guessing there is 30-36" or so. So I would cut down to the root diameter?

voest nut.jpg
 
Also, here is the new main motor, temporarily wired. It runs well with the new driveshaft and adapter. The head of the drill seems to work OK...I haven't checked it all out yet. The power downfeed works, I know that much.

voest motor .jpg
 
I do like the idea of the groove....I didn't measure the acme thread length but I'm guessing there is 30-36" or so. So I would cut down to the root diameter?

To the root or deeper if you like. Think of it like a one flute tap. You have to give room for the crud to go.
 
Are you sure that thread is good? It may be the picture but it sure looks wiped out to my eye. It may just be dirty grease I see though, not sure, viewing on a phone right now. In any case I would double check the minor diameter of that nut. Once the thread is just about ready to cut loose that diameter will increase pretty rapidly.
 
That's why I say I'm not sure what it should look like. But....it felt fairly tight on the shaft even once it became hand-loose, and I'm guessing it will work for some time yet.

Interestingly...I could buy a new screw and nut, in SAE dimensions, for less money than just the metric nut. Of course, that would require more machining to make it fit but it wouldn't take much.


This project is a little unusual in that I'm not looking to 'gold plate' it like I normally would.....I don't have any real need for this drill (as I have the Oerlikon) and once I get done making it work, I plan to sell it cheap. If no one buys it....it's gonna have to get scrapped. I don't have permanent room for it.
 
eKretz, you were right...the nut does have some wear on it. I cleaned it up and the top side of the lands have a groove worn into it that was full of packed crud. What's a bit odd is this is on the top side of the lands...which means the force was in the downward direction. It would seem that the other side would be worse since the weight of the head/column is on it.

The screw looks better ....the top 20" of threads look mint. The lower 10" have more signs of corrosion though they still seem to have held their profile well.

Luckily, the oil seal used in the top gearbox is easily found....a common 45-65-8 National seal.voest nut tooth .jpg
 
That is an odd wear pattern. Were there any damaged spots on the shaft threads that could have acted like a broach? Galling or anything similar perhaps? Still snug and no or very little backlash could just be due to deformity in the nut threads. I like that you're trying to bring it back to life and not letting it get tossed in a bin or scrapped, good on ya'.
 
That is just a weird, weird wear pattern. I would want to make a new nut, and then flip the screw end-for-end. (so you have a new wear surface) Then re-assemble and call it good.
 
Can't flip the screw because it has an unthreaded end that is machined to hold the upper bearing.

I wire brushed the screw where it was grungy....but still a lot of junk in the grooves and lands. I chucked it up in the lathe, sprayed it with oil, then ran some Mitchell's abrasive cord down the threads 30 or 40 times, using the lathe to feed it. Sort of like rotary dental floss. The cord did a great job of cleaning the root diameter and the lands as well. The nut now easily feeds down the screw by hand and it's not sloppy....it actually feels pretty good. It's not good as new but it's also not about to lose the threads either.


If I were making a lifetime commitment to this drill, I'd look into a ballscrew conversion. It'd cost about $1000 which is about $400 more than a replacement acme setup.

I'd like to use a new nut but I'm just not gonna spend the $250 buying one. Interestingly, I see someone on Ebay is selling them, new, in various sizes. But....their price is even higher than McMaster!


The nut had been out before...someone used capscrews to hold it in place when it is designed for M8x1.25 x 30MM flat head screws. They also buggered up one hole on the nut flange that sits under the column seal in the process.
 
I was wondering about that hole... Maybe they made the nut and just did a bad job of it. There shouldn't be a whole lot of force on it while it's moving, should be fine as long as you get it clean and deburred.
 
I'd like to use a new nut but I'm just not gonna spend the $250 buying one. Interestingly, I see someone on Ebay is selling them, new, in various sizes. But....their price is even higher than McMaster!

Thanks for the tip on the abrasive cord, I've never heard of it before. Are you sure you can't make a nut cheaper than $250? I bet you could.
 
COunterweight? Essentially, no. Not unless you used some sort of pulley and cable but it would be so clunky it would not be worth it. I looked and the M40 screw is rated for around 13000lbs....the head and column is probably under 2000lbs. So I think with lubrication and cleaning it would last forever. But.....this aspect of the drill is simply not well thought out. It begs that dirt will find it way into the threads. If you ran this drill in a shop, daily, I think you'd need to pull the screw and clean it all once a year....and still need a new nut every 5-10 years.

Good eye on the hole. That hole sits under the lip seal that is used on the column so the head must be flat for the sake of clearance. In order to accommodate a cap screw, they just wallowed it out wide and deep until the cap screw sits under the top of the flange. Lousy workmanship.
 
Honestly....I have a lathe but no brass and no acme-suitable cutter. By the time I got done buying the brass and cutter, I think I'd be in trouble.
 
Here's the screw with the slot milled in it. I didn't have a key cutter in 3/16', nor do the local supply house. I just used a 3/16" end mil. The screw cut very consistently and it seemed pretty soft. I went about 1/32" under the root of the tooth. Then I put it back in the lathe and gave it lots of polishing passes to get any burrs off. The nut really runs smoothly on it now.

One other point....this is not an M40 7MM thread but rather M40 5MM. The ptich measures at .200" which is right at 5MM. So that means McMaster doesn't catalog any nuts....


voest screw slot.jpg
 
Last edited:
Reassembled the screw today....sure is nice working on parts that aren't dirty. I made a basic shaft deflector of sorts out of PVC...I figure it will help some loose debris from getting at the screw and the screw-hole.

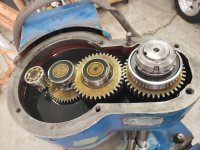
The gearbox - obviously well made and costly - use a series of reduction gears in gear oil. They all looked in very good shape and went back together easily.

I cleaned off the vertical column and wiped it down with way oil, then hooked up the power. Hit the switch and....it works perfectly. It went from being stuck solid to moving up and down with an effortless feel. The two best parts? The head travels very smoothly...it gives the impression of bank vault door swinging on its hinges. That, and the sound....all you hear is the 'music' of the motor and gearbox.....that quiet, industrial sound that high end machinery makes when it's set up and oiled properly.

Next step is to figure out the two switches mounted in the head...these control the main motor (forward and reverse, continuous) and vertical feed motor (forward and reverse, momentary). I don't have any wiring diagram for them and there are lots of loose wires.voest screw assembled.jpgvoest gearbox assembled.jpg


Back
Top