What's new
What's new

Defiance VTX-1 Creative Evolution Z-probe

Digital Birth

Plastic
Joined
Nov 28, 2021
Hi All,

I have managed to get a Defiance VTX-1 with Creative Evolution Controller.
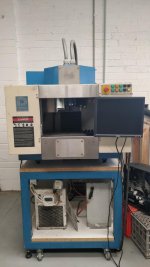
VTX-1.jpg
TOOL CHANGER.jpg

Powered up, dos machine and controller work, all axis move, spindle spins, I am a happy man.

Before I start running GCode I need to learn a lot as I am very new to CAM and CNC, but have been a CAD designer for some years. So I was wondering


1. Is there was a way to add a tool length Z probe to set tool offsets?
2. how do I zero my workpiece?


I'd love to automate this as much as possible but understand it may be a simple feeler gauge method, but I am open to any tips you have.

The controller has an ISA PMAC lite card in the PC.
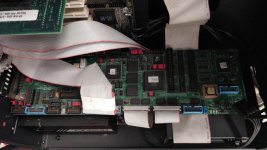
PMAC-LITE-1.jpg
PMAC-LITE-2.jpg

and an AC-34AA 32 in/out opt i/o card
ACC-34AAA.jpg
 
This is what I would like to connect, but I am unsure where I would need to connect / wire it too

Z-axis-probe-tool-touch.jpg


This is a program used for automatic probing of the tool length offsets

Edit the program for the tool numbers to be set. For Example, if you are using only tools 1 through 3, edit N2 and N3 to show 2=10 and 3=10 respectively.
Tool 1 will be the base tool, from which the others are relative. When a value of 0 is used, that tool will not be set

Code:
N.1 G4:1=50 // (BASE TOOL NUMBER, 0 TOOL OFFSET)
N.5 G4:-39=8:-3.8=9 // (X & Y PROBE CENTER FROM REF)
N.90 (#10 = TOOL NUMBER)
N.91 (#11 = X OFFSET FOR Z TOUCH)
N.92 (#12 = Y OFFSET FOR Z TOUCH)
N.93 (#13 = Z RAPID POSITION FROM REF FOR Z TOUCH)
N.935 G4:-16=13
N.94 (#14 = CUTTER DIA FOR RADIUS TOUCH)
N.95 (#15 = Z DROP FOR RADIUS TOUCH)
N.99 G33 /PROBE TEST - PRESS CYCLE START AND PRESS PROBE 3 TIMES
N.991 G100 X#8 Y#9 Z-1 M5
N.992 G4 M0
N.993 G4 M83
N.994 G33 /PROBE TEST OK - PRESS CYCLE TO START
N.995 G4 M0

N1:#50=10:0=11:0=12 G71 L100
N2:0=10:0=11:0=12 G71 L100
N3:0=10:0=11:0=12 G71 L100
N4:0=10:0=11:0=12 G71 L100
N5:0=10:0=11:0=12 G71 L100
N6:0=10:0=11:0=12 G71 L100
N7:0=10:0=11:0=12 G71 L100
N8:0=10:0=11:0=12 G71 L100
N9:0=10:0=11:0=12 G71 L100
N10:00=10:0=11:0=12 G71 L100
N11:00=10:0=11:0=12 G71 L100
N12:00=10:0=11:0=12 G71 L100
N13:00=10:0=11:0=12 G71 L100
N14:00=10:0=11:0=12 G71 L100
N15:00=10:0=11:0=12 G71 L100
N16:00=10:0=11:0=12 G71 L100
N17:00=10:0=11:0=12 G71 L100
N18:00=10:0=11:0=12 G71 L100
N19:00=10:0=11:0=12 G71 L100
N20:00=10:0=11:0=12 G71 L100

N99 G100 Z-1 M2
N100 G4:#10<>0JMP110| G72
N110 G4 T#10 M6
N115 /G4 M4 S800
N120 G100 X#8 X/#11 Y#9 Y/#12 Z#13 M84
N130 G4:#10==#50:POZ=101=102:0=100|:POZ102-#101=100
N140 G240.1 Z#100 T#10N200 G100 Z#13
N210 G72
 
I am also interested in this. I just got mine operational. Had some tool changer errors. Removed the arm and lower cover and found some plastic shavings blocking the arm position sensor. Do you have the Creative Evolution CNC manual that came with the controller? I have the manual for V1.27 (controller is updated to V1.3) and haven't found any info in it yet for adding a probe. I use a probe on my 3d printer and they are awesome.
 
This is what I got from Geonics as far as probing. I'm guessing it could be used for part position and fixtures too.

I believe all of the Defiance machines were setup for a Renishaw finger probe using a Renishaw MI8 interface board. This was used for measuring tool length. I am not sure if Defiance actually put any on the VTX machines because of how small the machines are, but maybe. It was not a fully automated system, once the program positioned over the probe the user would press and hold the jog buttons to contact the probe which automatically set the Z parameter in the tool page for tool length. It work very well.


Back
Top