What's new
What's new

Excello 602 tear down for quill spring replacement

Scratcher

Plastic
Joined
Feb 28, 2023
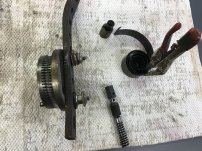
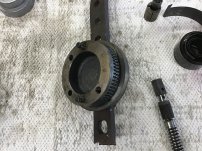
Is anyone familiar with tear down to get to the quill return spring on this style of bolt pattern? I understand the procedure of using the 7/16 bolts as pushers after inserting the set screws in the two threaded larger bolt holes. I got this from an older manual, but the older style does not have the two other smaller threaded holes that I have the cap screws inserted in, in my pic. I assumed this was a later designed separate piece that was pushed off first, but no luck. Is that a locator pin in the center? The problem is that the “cover” has too small of holes to let the 7/16 bolt pass in to the threads. At first I thought there were tight fitting washers blocking the holes but doesn’t seem to be. Thanks in advance for any info.
 

Attachments

  • 9391DFD7-05A4-4D2C-8106-2090586F58FB.png
    9391DFD7-05A4-4D2C-8106-2090586F58FB.png
    6.9 MB · Views: 18
This is the same manual I have. I’m to part 7 and that is where I am stuck. The 7/16 bolts won’t thread in because the hole covering them isn’t large enough to let the bolt pass. I think you can see it if you enlarge my pic. It’s like there are 3/8 flat washers blocking the holes. What am I missing? Thanks for the reply Chris’s
 

Attachments

  • 01FDD092-CE6A-4C94-A11F-2CFE847598B6.png
    01FDD092-CE6A-4C94-A11F-2CFE847598B6.png
    1.7 MB · Views: 9
Just thought I would update this thread in case anyone might run into this in the future. I had to use the small holes to jack against the frame with the bar in the pics. Luckily the surface was recessed about 30 thousands so I jacked a little until flush then kept using more washers between the frame and bar. The pictures tell the story. I still think it is two pieces so I’m going to rotate the top 180 degrees and then have to drill one hole to get fresh worm gear as this area is bad. Someone in the past obviously wasn’t loosening the bolts enough on both sides before adjusting the nod as it moves freely by hand..
 

Attachments

  • 2EE88C9B-DBCE-43FD-8D6C-7B6FAEBE797C.jpeg
    2EE88C9B-DBCE-43FD-8D6C-7B6FAEBE797C.jpeg
    2.5 MB · Views: 18
  • 0FE71A42-5D18-4172-9FED-5F87183BE426.jpeg
    0FE71A42-5D18-4172-9FED-5F87183BE426.jpeg
    2.3 MB · Views: 17
  • A8D29942-51E4-4135-AF5D-0D8426D5CE96.jpeg
    A8D29942-51E4-4135-AF5D-0D8426D5CE96.jpeg
    2.1 MB · Views: 18
  • 45439E98-8AB3-4A59-BE03-3955C6C08874.jpeg
    45439E98-8AB3-4A59-BE03-3955C6C08874.jpeg
    1.6 MB · Views: 19
Glad you got it done...Was the spring broken and did you have to replace it? Where did you source the part from?


Back
Top