What's new
What's new

Fitting a bowed magnetic chuck

The Op said the base is Aluminum and Aluminum is not easy to grind.
A shame he did not notice the bow before he took it apart. He could take it apart again but a good chance the warp/bow was in the chuck from a prior chuck top grind.
I think the aluminum base should be milled to flat.

To do that one would set the mag chuck upside-down on a honed mill table with the mag turned off. Sharpie mark the mill footprint, Take it off and indicate four places where shims are intended to be placed and draw a map of that finding.
Place the chuck back on the mill and feel and place shims at the shim intended places so the Aluminum concave is facing up and the chuck is zero / zero at the far (long travel) ends.
The bow facing down should be just touching the table, If off the mill table then a shim should be slipped under to make it solid. A very sharp/new end mill cotter should mill the aluminum base to flat.
A fly cutter could be used but I think that it may make a slight concave or convex that would/may need more attention/work to make it flat.
After done the aluminum base should set on a surface plate being close to flat.
I like a mag chuck to set on the set pad dead flat or with a little pressure at the middle bottom, so not to have a hollow at the underside of the chuck.
Once the chuck bottom it can be put on the set pad and WET top grinding be done.

Yes, I can grind a chuck dry and many good grinder hands can do that,but it is a poor method because evnen a chuck that feel not hot may have some swelling..and burning a chuck top can put in permanant stress that remain even after the burn is ground away.

.
 
Last edited:
I think the aluminum base should be milled to flat...
Thanks @michiganbuck that's pretty much how I envisioned it, including using an end mill rather than fly cutter. Only quibble is that, when flipped bottom up, the aluminum will be convex; I'll shim it to get the four corners as parallel with the mill table as possible (to minimize material removal), and then shim the middle for support.

You don't think that when I grind the top side of the chuck, it will change the induced stresses enough to require revisiting the bottom? I guess I'll find out. My thought was to shim under the four corners on the set pad and rough grind the top (carefully and slowly, with coolant), before milling the bottom and then finish grinding the top.
 
The proper way (after the chuck bottom is flat) is to test/qualify the machine to be capable run flat for the length of the chuck and then grind the set pad...and then grind chuck. If you burn the set pad you may scrap the machine. If it does not test/qualify to run flat you need to re scrape/put in new balls, regrind or replace the ball racks or the like.
*This job is best done by a professional.
 
Last edited:
QT Op: My thought was to shim under the four corners on the set pad and rough grind the top (carefully and slowly, with coolant), before milling the bottom and then finish grinding the top.

That's a good plan, a little more work and perhaps take most of a day.
Too bad you have not tried that wheel on a big part.

Back in the day wheel makers would put walnut chunks/grits in the wheel mix before they fired it so there would be open spaces in the wheel, That way you could hae a hard wheel that would still run cool.

Do dress with a sharp facet on your diamond. I will go back to find that very good dressing youtube ,
 
Last edited:
Hello,
I didn't read all the comments. A couple of observations. I hope your using coolant to grind the chuck. Also no need to get 100% glean up. The machine must be worn so trying to grind the chuck with in a few tenths won't happen. I would grind the chuck bottom flat. I would also check it on a granite table if you have one big enough. Then check the pivot point ot what I call the "hinge" when scraping. If it is high in the bottom middle, I would use long Starrett feeler gages under it to get the hinge at 30%. Mark where the feelers are located. Then set it on the grinder table and slide in the feeler gages in the exact places. You said you verified the table top with parallels and it didn't get ground. That's best as when you grind a able top it might warp the table. I say it is like grinding or machining a thin steel part it warps when ground on one side.

If it was so rusted and pitted you could grind it, but if the machine is old and worn the way it is now, is probably flatter then it would be if you ground it. I didn't see where anyone mentions to turn on the magnet when you grind it.

After you set the chuck on the feeler gages on the table chuck surface, tighten the left hold down bolt, snug, not reefed. Then use a lock washer on the right hold-down bolt and only tighten the bolt so the lock washer is 1/2 compressed. This allows it to move if it gets hot. This is more important on an electromaget, but I would do it on the hand operated one too. Then dress a 46 grit wheel rough, or take .002" passes fast until the wheel cleans up and the grit is open so it grinds cool. USE Coolant. ALSO turn on the chuck so it pulls down the same way it pulls down when your using it.. On old chucks that used lead coils, use a 40 mm pr 1 1/2" round radius scraper to pull out a little lead to make the strip concave a little. This doesn't let the lead to foul the wheel.

Then grind the chuck with lots of coolant. I have also seen some paint on STP for coolant when the machine doesn't have a coolant tank. Once the chuck cleans up 90%, then Dress the wheel again course . Turn off the grinder, shut off chuck, loosen hold downs, it and clean everything up, then flip the chuck over upside down on the table, magnet side down and turn it on. Then kiss grind the bottom to clean up 90%, Then remove the chuck and flip it back over and put it on again the right way using the lock washer on the right side again. In the old days we used white lead under the chuck to keep it from rusting. Today you can way oil under there and tighten it up, silicone the T-slots. Then your done. Remember you won't get perfect if the machine hasn't been scraped. It will indicate close as your only measuring a single point.
 
A couple of observations.
Thank you Richard, I appreciate your advice.

Back in the day wheel makers would put walnut chunks/grits in the wheel mix before they fired it so there would be open spaces in the wheel, That way you could have a hard wheel that would still run cool.
I have ordered a porous wheel and may use that instead of the one I have. I may also do a practice run on something other than the chuck.

Will report back when I have a chance to spend some time on it. If I wait for the porous wheel, that will be a week or so.
 
Good to have, make a plate of perhaps 1/2 or 5/8" x 6 x 12" (about) steel plate with it having a few 3/8 threaded holes and a few 3/8" clearance holes (25/64) making it dead square to perhaps 10, 20, 50 millionths. A very good apprentice/skilled hand project for grinding a big part and making square...
Use it for an indicator stand, parts gauge, handy fixture, miniature surface plate, and a checker for square gauge.
 
Last edited:
The machine table looks gruesome, with pitting (a few spots 0.005-0.009" deep) and staining, but measures very flat other than the pitting (by touching the unpitted spots or with parallels on the table).

I was concerned that I did something weird when reassembling the chuck, like nonuniform RTV thickness, but I was pretty careful to put a thin uniform layer, and a little squeezed out all around.

I appreciate any advice you can give me.
There are people here like Buck, with a lot more experience than I have, so won't give advice. But here was my experience with the mess under a 30-year-old chuck:
I wonder if when you disassembled and re-assembled the chuck, you created the bow because of the way that you tightened the bolts or screws that hold the parts together.
 
here was my experience with the mess under a 30-year-old chuck:

I wonder if when you disassembled and re-assembled the chuck, you created the bow because of the way that you tightened the bolts or screws that hold the parts together.
Thank you for posting the link. I had read and enjoyed your thread, and just read it again.

I also have wondered about creating the problem when I reassembled the chuck. There are a couple dowel pins that should have aligned the parts before tightening the bolts, but it’s still possible I did. I tightened back and forth, progressing around. But since I used RTV, my thought was that I much prefer not to undo the halves.

I have the chuck shimmed and bolted down, and yesterday I got my porous wheel, so I’m ready to grind the top, flip and grind the bottom, then grind the top.
 
Compared to the luminaries who have already posted, I know nothing at all. I had a KO Lee and a Walker chuck and the factory procedure said to use flood coolant even if you had to rig up a pond pump in a bucket. Wet grinding is critical.
 
You don't think that when I grind the top side of the chuck, it will change the induced stresses enough to require revisiting the bottom? I guess I'll find out. My thought was to shim under the four corners on the set pad and rough grind the top (carefully and slowly, with coolant), before milling the bottom and then finish grinding the top.

Yes, it might. You should check after every cleanup to see what has happened on the opposite side. In my experience, higher probability of movement is especially common when you're grinding in a mag chuck that has dissimilar materials on either side. The last time I did one I think I flipped it 5 or 6 times before I got it to where I was happy with it. It was like yours: aluminum bottom and iron top. And I didn't use any clamps at all until I was almost completely done and finish grinding the top for the last time. Only had it blocked in with wide stops clamped in the table t-slots until the end.
 
I don't think you would want to grind 6x18" aluminum (the Base), likely need to dress 100 times.
I would mill the bottom flat wIth long travels end milling, having .008 under the concave top side facing down. Then flip the top up and grind it in on the SG.
Milling the bottom first you may be lucky and not need to grind the top twice.

The alternative put .008s or .010s under the base and grind the top first.
(It is possible that the stress has already been grown out, deep stresses may take years to work out, which is why one never wants to burn a chuck.)

It really doesn't matter with being about the same work one way or the other.

I would have some block-ins on the mill table just touching so as not to depend only on my hold-downs.
 
Last edited:
One bugger in griding a chuck is that it goes easy, and when you are grinding the full chuck that is when you get over confidant and keep going too fast ..and burn it.
I have even taken a count when off at both ends to allow more time to cool.

You see some green guys trying to be off the chuck only 1/16" at the ends showing off, thinking that saves time. ( I remember when I thought that)
I knew of a top grinding shop that would not allow coolant on the surface grinders. That is not uncommon, you just take more time to get a job done.
I grind a lot of jobs dry. Even have ground a lot of chucks dry, but wet is best.
 
Last edited:
I would want it pretty near dead flat to the set pad, or some draw-down of a bottom belly zero to a few thow. I would not want a hollow under the chuck, if having a hollow under I would make it flat or put just enough shim under zero to .002
 
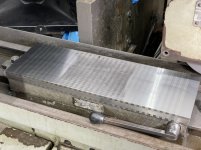
I started grinding and it seems to be going okay. It will take a while. I have no experience but it seems reasonable. 0.001” depth, .020” stepover, 46 H Porous wheel.

The spark trail spreads across the wheel by the end of two passes, so I re-dress then.

B2EDEA14-9B7E-4C7B-BEDD-532617AC5525.jpeg

Third edit: using more coolant definitely helps. Fewer sparks and just seems better. I have a hand spray bottle I’ve been using to supplement the mister.
 
Last edited:
Milling the bottom was pretty straightforward. Blocked in and then held down lightly; nothing moved when the strap clamps were tightened. The bottom now measures no more than 0.0005” proud in the middle.

6EF4601B-BA7F-497D-ABA5-21235306EE3F.jpeg

I’ll do the top finish grind another day, likely with some sort of makeshift flood-coolant setup.

E116794D-D1BF-44DD-8ED3-155DCC746C16.jpeg
My idiot burn mark is only .001” deep so it should clean up okay.
 
Yes it moves very quickly. This is why you'll often see the more experienced guys here warn the less experienced ones against trying to grind the top of the actual grinder table in until they get a little more experience under their belt. One quick mistake like that and you can have a major problem that could potentially ruin the machine's accuracy.
 
Last edited:


Back
Top