What's new
What's new

Getting to know my Deckel FP1 - A small weekend project

Joined
Aug 10, 2007
Location
West Coast
Well, been using my FP1 quite a bit lately, doing several projects and getting more familiar with it.

Like always, it never seem like one can have enough tooling...I recently bought a few MK4 collets for Stan Krum here on PM, which came in handy as I used 2 of them for this project. I also found out that the collet can't be removed from the horizontal spindle without rotating the vertical head out of the way...that left me with my 5/16" collet in the spindle with a piece of drill rod in it. I leave that in there so chips don't get in the spindle...but luckily I bought a set of the spring collets from byawor, and ended up using 2 of those including the 5/16".

I am working on a 1911 pistol also, but in California the penal code is changing for single shot exemption, and as best I can tell, it will not be possible to create a pistol with the potential to be come a semi-automatic after Jan. 1st. Because of that I wanted to have an AR pistol, so milled this out this past weekend.

I think I need to replace my bearings on the drive shaft. When ballen was visiting he mentioned that might be the case and would be something to look at, but at that time we didn't get very much time to run it. In running the mill more, I do believe the noise I've heard and suspected was in the motor, is actually in the driveshaft bearings, being echoed through the opening for the motor arbor to attach to the pulley/belt. Anyway, that's a project for the future for certain.

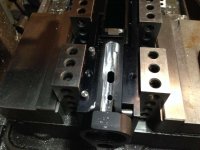
The jig I used is not the best, and it was difficult to keep it flush, the bottom wanted to pinch in with the jaws on my Kurt vise. So I used 4 x 1-2-3 blocks to hold it solid. Seemed to work ok for this purpose.
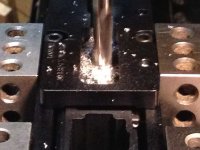
ar-lower-tiny-sixes-and-nines.jpg

Pockets are rough finished.

ar-lower-third-template-roughed.jpg

Cleaning up the walls, luckily I had a 3/8" end mill with 2" of cutter lenght to handle this.

ar-lower-cleanup-walls.jpg

Milling is complete, cleaned up, and narrow passage connecting front/rear of trigger pocket is to size.

ar-lower-milling-is-complete.jpg

Here's the finished lower, officially a pistol lower. It is important to note that I built a pistol, not a rifle, as this will host a 10.5" upper with a Sig Sauer Stabilizing Brace (sanctioned by the ATF to not be a stock, and permissible to shoulder as such and not be classified as a Short Barrel Rifle).
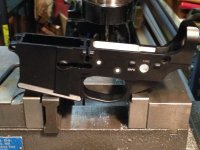
ar-lower-completed-lower.jpg

This was my first AR, and honestly I wasn't crazy about building one as there is not too much to it. With the pistol laws changing in California, I was encouraged to make this one. I can make more AR rifles in the future if I want, that wouldn't be a problem, but pistols will. I have a 1911 frame and slide I've been working on also, and have done much of it on the Deckel also...this has all been a learning process in understanding the FP1 for me.

NOTE: As an aside, I had to lower to speed to 190 on the vertial head when taking a 1.250" cut along the walls, otherwise I would get too much chatter on the 7075 T6. The end mill was HSS in this case, where I used a carbide bit to mill most of it...just that the cutter length was only 1" on the small end mill, so I couldn't do the full wall with it. When I had first calculated it seemed I should run the end mill a bit faster, but that just didn't work in the real world for me. I could only take about .010"-.015" on a pass, at about 1.8 ipm.

Cheers,
Alan (enjoying his humble and antiquated Deckel FP1)
 
Hard to determine a date a homemade or 80% receiver was milled and technically became a firearm ;)

Absolutely. But there is nothing to determine if it is done before the date, and in this case I find it best to be safe.

I will only have 2 pistols that I built myself, this and a 1911. That will have to be good for me.

That said, I was in a gun shop getting a disconnector spring and they felt it would be ok to build after the 1st as long as it was manufactured by an unlicensed individual. They felt the law was changing mostly in regard to transfers. But I read the law differently, and others I have spoke with do as well. Until the roster is deemed unconstitutional, it looks like more restrictions. Seems a good chance of the roster being revoked.

I'm not trying to disway you from making statements like the above, but the DOJ would use it to prosecute you if you were being charged with illegal manufacture of firearms, and they found it searching on the inet. Just saying... :rolleyes5:

You don't have to worry about me, but there are thousands of people that may read your post.

Legally, you are correct and there is no proof needed other than one's word AFAICT. I am documenting mine to be safe, on time line. There is also nothing that says the firearm must fire, it only needs to pass the sniff test. Legally it can only fire one round, if it is a single shot exemption. I've modified a magazine so it won't drop and/or allow any ammo to be inserted. My 1911 has a 7" barrel in a 5" Government model, to meet the SSE requirements. Once it is completed as an SSE, I can choose to modify it any way within the law. So, I could change it to semi-automatic if I desire, as I could replace the 7" barrel with a 5". ;)

Cheers,
Alan
 
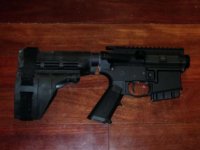
Now it's complete, just waiting for the upper. It's getting a 10.5" DSG/Seekins 5.56mm upper. That's a stripped upper on it right now.

NOTE: bullet button to be California legal.

ar-lower-stripped-upper-left.jpg

ar-lower-stripped-upper-right.jpg
 
Too bad you aren't in SoCal, I have a Deckel FP1 I'm trying to set up and like guns :)

There's a lot of help here in the Deckel forum. I think the Deckel is a great machine to have for firearms type work, but that is only one area I'm interested in. Mostly I'm fascinated with the mechanics of firearms, and the 1911 is just the epitome of mechanics for me. These ARs are just kinda so-so for me.

I will caution you to understand and know the CA penal code, and keep studying it, if you plan to work on ANY firearms. California has a lot of crazy penal codes and there's some fine lines between having legal firearms and either "dangerous weapons" or Assault Weapons (AW).

I had originally planned to use the sig brace as shown above your post, but have since changed my mind and am not going to use it until I see a statement or court case with one, because I don't want to be a poster child for an AW. I couldn't remove the pics above and had asked the moderator to remove this thread, but it's still here so I'm answering.

I've done a few other projects also, but this just gave me a much better understanding of my Deckel and using it. The joy stick is, well, a joy to use! :)

It's really cool to be able to control the feeds with it, especially for roughing out and such, it's great.

What type of Deckel do you have? I have one of the less desirable lever models (early 60s possibly), but really getting to like using it.

I really like the ER40 collets on it, as I find one annoyance for me with the MK4 collets (in my case, but SK40 would be the same) is that when I loosen the collet, I hold onto the top portion of the drawbar. The key for me is NOT tightening too much, otherwise you stand a good chance of getting the collet/sleeve stuck. I originally had the sleeve with a spring collet stuck in my spindle when I got the mill, so trying to be careful after getting it out. The danger is if you grab the top of the draw bar, and loosen the draw bar with a 12mm wrench, in many cases the tool bit will drop out...and therein lies the reason I now have a ding on one of my calipers where a carbide end mill dropped on the glass... :( (live and learn) I'm a bit more careful about that now...but you really need 3 hands for that operation...or place a board under the bit and/or place something soft so the bit doesn't crash on the tooling/table/work. :rolleyes5:
The other thing I'm learning is that while the Kurt 6" vise works ok on the FP1, it is limted where it can be placed as the slots in the table limit useful range once it is mounted. A 4" Kurt would be perfect, and a 5" might be ok also, but the 6" is just a tad big and requires I clamp down in the closest slot to the spindle for most stuff. However, I like the size of the 6" for much of the work I do, it's just a good size for much of the work I will do on the Deckel.

Feel free to post pics and/or ask questions, you might also find some useful info in the gunsmithing forum here. I'm not a total gun zealot, and firearms are a sure way to upset folks, that I have learned...but there's a lot to learn here on PM in regard to machining. I don't know where a better forum for Deckels is, this is about the best one.

I'm finally getting what I need to calibrate fixtures, perform basic operations safely, understand the feeds and speds better, etc...these are GREAT machines. :)

I do need new bearings on my driveshaft, but I can deal with that at some ponit...

Cheers,
Alan
 
I have the lever style FP1 as well. I know there's a lot of sticky things doing gun work in CA, even if it's personal use. I mainly do non gun-related stuff just for personal projects. I purchased the Deckel a while ago, but haven't had it up and running until yesterday. Everything seems to work (I was able to test it when I bought it), but I want to clean it up. It has somewhat crappy non-factory paint job on it which kind of bugs me. I pulled the table last night for it and started to just clean out the grime, and added some oil to the headstock to start getting everything lubed up again. The machine had sat for what looked like a long time before I got it. But it was inside, so nothing is all that bad of condition. I have a manual that I bought that I will be printing out soon.

I did get a ton of stuff with it, the vertical head, horizontal head and multiple arbors, the dividing head and extension with a bunch of plates, probably two dozen collets, couple collets for the horizontal part and an adapter to the vert collets and some other misc stuff that I haven't totally gone through yet. The few things that I thought might be rough, like the machined mounting face on the dividing head, actually cleaned up really well with a light stoning.

I think once I get more familiar with it, it's going to be a neat machine. Mine is also graduated in thousanths, which helps. I know some of them are metric, even though all the bolts and slots and specs are in metric.

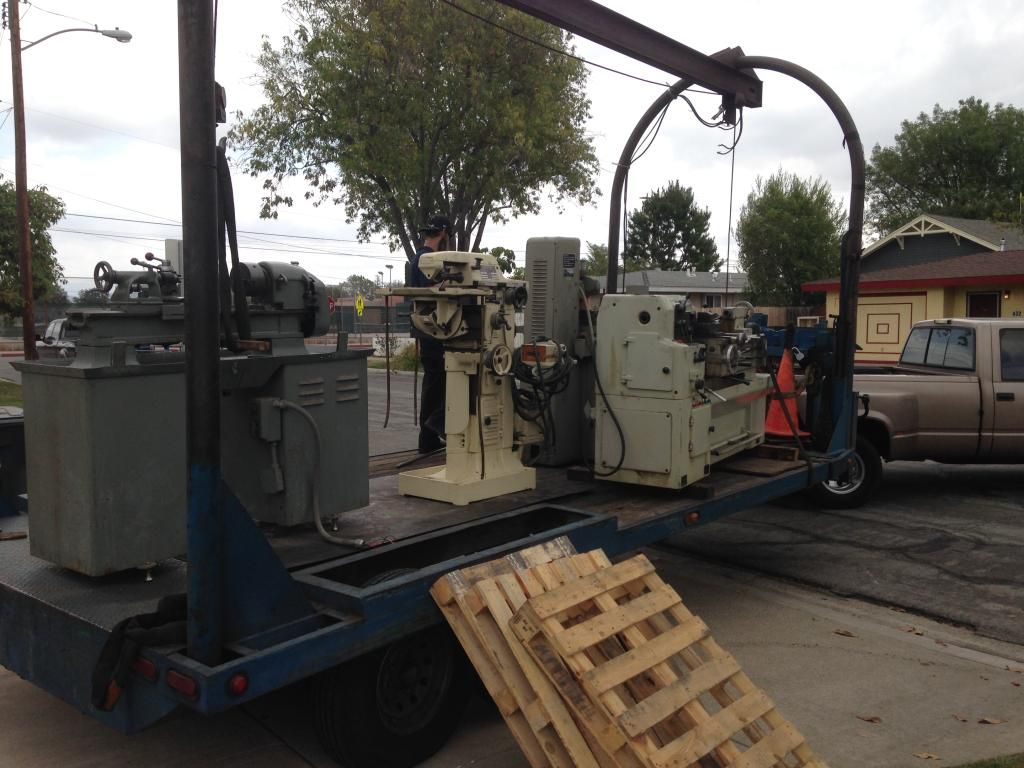
This is the best pic I have of it right now, when I was having my machinery moved to my new place. I need to take some better ones. The one thing I need to figure out is how to replace the missing handle. I can't even figure out how the damn thing mounts, never mind trying to find one.

 
A bromance made in heaven ;)

:vomit:

kazlx,

That looks like one hell of a score if you got all that stuff.

Curious, is that Dunkel Bros. in SoCal that was the rigger? I ask because I've used Dunkel Cousins in the past, who are related to the SoCal folks, and they had a similar trailer with lift that looked almost identical.

Cheers,
Alan
 
T

The danger is if you grab the top of the draw bar, and loosen the draw bar with a 12mm wrench, in many cases the tool bit will drop out...and therein lies the reason I now have a ding on one of my calipers where a carbide end mill dropped on the glass... :( (live and learn) I'm a bit more careful about that now...but you really need 3 hands for that operation...or place a board under the bit and/or place something soft so the bit doesn't crash on the tooling/table/work. :rolleyes5:

Cheers,
Alan


Don't understand this statement......Not sure why you need 3 hands?
Shift your machine to a low gear...that in effect locks the spindle. Put the wrench on the draw bar ..It will just stay on the square....
Loosen with one hand while holding the tool with the other....Turn the wrench till it ejects the collet off the spindle taper....You can literally spin the
wrench between the initial loosen of the draw bar tension and where the collet is ejected off the taper...Pretty much the same drill
as removing any tool holder/collet from any mill. Nice thing about the Deckel draw bar is that it both
pulls up the collet/holder and ejects same when loosened, no need for a mallet to breakl the holder off the taper.
Cheers Ross
 
Don't understand this statement......Not sure why you need 3 hands?
...
Shift your machine to a low gear...that in effect locks the spindle.

Not entirely for me, just been a bit cautious about the gears and how much force I put on it. I will try that in the future, I know the gear is big on the spindle, just that it would suck to damage a tooth in either of the gears. Even in low gear the spindle turns when I loosen a collet.

I notice there are normally 2 levels of loosening and after the first one, it then resists to push the collet out. At least that is how it seems to me, one level frees the drawbar, and another to push the collet out.

I understand it was my fubar for letting the end mill drop, what can I say...$#!T happens. That doesn't happen on the ER40 as the bit is still fixed in the collet chuck securely. :)

From your comment I'm guessing you've never dropped a tool bit out of the spindle while loosening one. You're better than me if that's the case. :bawling:

Cheers,
Alan

PS - I already know you're a much better machinist than I will most likely EVER be, so I'm not feeling too bad for dropping an end mill. ;)
 
:vomit:

kazlx,

That looks like one hell of a score if you got all that stuff.

Curious, is that Dunkel Bros. in SoCal that was the rigger? I ask because I've used Dunkel Cousins in the past, who are related to the SoCal folks, and they had a similar trailer with lift that looked almost identical.

Cheers,
Alan

I can't remember if he knows Dunkel or is related or something. The same guy has moved every piece of equipment I can't or don't want to move myself. Great prices compared to the bigger outfits. He always comes prepared and moves everything manually, no fork or anything. I think I got a fair deal for everything I got. I don't think I need to dig into the the machine all that much, but non-factory paint bugs me, just not sure how much of the machine I want to take apart. My problem is I have stuff I already need to work on and don't need to be adding to the project list. I just need to put the Deckel to work, so I'm hoping it works well for what I want. I do need to get a vise for it, torn between a Kurt 4 or 6. I had a D688 on my BP that I sold. The one thing I liked about the BP was being able to put large work on the table...but the every direction easy power feeds and speeds seems like it might trump that with the Deckel.

Do you happen to know where else to oil on the Deckel besides the head? I'm getting a squeak on the screw on the main table, but only when I feed in one direction....

I'm sure I'll be posting up some questions when I start digging a little more. I've found some good info in this forum, but the machine is definitely more involved than the plain Jane BP that it replaced.
 
Do you happen to know where else to oil on the Deckel besides the head?

I know some, but there are people with way more knowledge of the Deckel than me, maybe they will chime in.

Headstock drains on left side of machine, wicks (inside headstock, top area has some shelves with the wicks) feed the splashed oil to the front ways and the level glass (which on mine is not very visible) is bottom left of the horizontal spindle. I'm assuming you are talking about this as the head. The drain is on the left side, about 8"-12" from the sight glass. Unscrew the nut and the tube pulls out to drain. This is for the spindle gears and front ways.

On the right side, inside the door where the coolant pump is, oil is filled on top, drains on bottom. This is for the feeds.

Both the above need to be filled.

Right side of X table (joy stick side) Top by the table has a zerk that you need an oil gun to fill. They look like a grease gun with a straight tube and you pump them. If you don't have one, I use this type for my Nichols and it would work, but I bought one for a Deckel from a guy here, it is made in Switzerland and nicer than this plastic one:

Push N Lube Oiler- Bridgeport Oil Gun

I'm getting a squeak on the screw on the main table, but only when I feed in one direction....

When you say main table, the table feeds X and Z. Which direction does it squeak? When I first got my mill I made sure the screw was always wet until I could figure out where the oil was located.

The Z is filled from the bottom right side of the vertical mount which the table mounts to. You need to remove the cover to get access to those a couple screws hold the cover in place and on the right side around the top of where the cover is there is a fill and drain below it.

Under the vertical mount on the left side there's an oil cup, that needs to be filled.

Those are the main ones.

If you do not have the DVD with the Deckel manuals, contact username wrench, and you can purchase one from him. Well worth the cost, IMO. He put it together.

The gear oils should get Mobile DTE Med/Heavy and the ways should get Mobile Vactra #4. In general slidy things get Vactra #4 and roundy-gear-things gets DTE Med/Heavy, AFAICT.

This thread has some info: http://www.practicalmachinist.com/v...anging-oil-what-s-trick-speed-gearbox-292031/

HTH

Cheers,
Alan
 
Alan:
Don't think you will hurt anything using the gearbox as a brake via low gear.....that is unless you are hammering on the wrench....Apply pressure in the direction needed (OFF or ON), and give the wrench a
push..sort of accelerating so the motor/gearbox won't catch up....Use the ratio and motors resistance.

My comment was relating to the "Three hands" need.... Have dropped a tool or two usually not from wanting more ways to hold the cutter....usually when i came to a machine i had not run with the tool still in the spindle...
and finding that it was relatively loose and the tool dropped out as i set the wrench on the draw bar before any real rotation was applied....and before i was ready to hold the tool....Or just not paying attention.....

Not so much now...CNC's set tools off the machine so that becomes a moot point...
At any rate just thought you might have missed the low range shift thing and were trying to hold too many things at once.
Cheers Ross
 
Alan:
Don't think you will hurt anything using the gearbox as a brake via low gear...

I know you have said that and I have done that previously when I was trying to get the sleeve out of the spindle, that sleeve was locked in there hard.

But I always feel uncomfortable in doing so on a machine. I think this is because of my little South Bend 9A, people screw the gears up using the backgear to remove a chuck. I know the Deckel is a different beast, just that I somehow feel guilty about doing such... :o

What I have been doing recently is loosening the initial drawbar thread, and then moving my left hand down to the collet and using the gears to pop it out of the spindle with the wrench. That seems to work. There seems to be those 2 levels of resistence when removing a collet. This works well if I don't gorilla tighten the drawbar. Otherwise I can make it not so easy to remove. I think I'm learning that the collet doesn't need to be as tight as one would think, it seems to hold fine without trying to crank the drawbar down with a cheater bar. (no I haven't done that, just exagerating the description)

I should say this...this thread was titled appropriately, and not just this project but a few of my recent projects have been using the Deckel and I'm getting more comfortable with it, and learning the idiosyncrasies of how it operates. Being able to change tooling is one of those issues. Maybe I'm creating the need for a third hand, and with time hopefully that will iron out. At least speaking for myself I seem to go through the same thing with each machine in my shop when I get it and start using it.

At least I'm using mine, I see many people get machines and let them sit in the corner. ;)

Cheers,
Alan (has a lot to learn about Deckels in general)
 
Alan:
Your caution on tightening the collet/holders is a good practice...The Morse spindles are sensitive to running up the draw bar too tight as you have better advantage
on the tool owing to the shallow taper.
Further one should use caution when fitting a cold (from the drawer) collet to a Morse spindle machine if it has been running long and the spindle has gotten warm from use....
Large spindle bore, small collet once inserted will go in deeper than if everything is cold....May have great difficulty removing that collet/holder once it warms up to the spindle temp.

Cheers Ross
 
Alan:
Your caution on tightening the collet/holders is a good practice...The Morse spindles are sensitive to running up the draw bar too tight as you have better advantage
on the tool owing to the shallow taper.

A definite advantage to the SK40, having the wide taper...

Further one should use caution when fitting a cold (from the drawer) collet to a Morse spindle machine if it has been running long and the spindle has gotten warm from use....Large spindle bore, small collet once inserted will go in deeper than if everything is cold....May have great difficulty removing that collet/holder once it warms up to the spindle temp.

That is something I thought of in the back of my mind as when I was using it I usually wil make sure the spindle taper is clean by running my finger in there, occasionally adding a drop of oil. Not sure if that will help it to free more easily or not, but I figure it can't hurt...but I do notice the inside of the taper gets warm, I wouldn't say hot nor would I say really warm, just noticable that it is warmer than the cold tooling (Winter is noticable for me).

Maybe a good use for that cold spray? I have a can I got upon your recommendation to free the stuck collet. It didn't work but it does cool things down for certain.

The best thing is just to not gorilla tighten the drawbar.

FWIW, the original nut on the sleeve is a spanner type nut. I have some spanners that are close, but none seem correct. I bought a hex nut from Bruce, ironically he had listed it on ebay.de and I purchased it Buy-It-Now for about 5 euros. That nut is much nicer than the spanner nut with a large crescent wrench. Oddly, I can still remember going to Harbor Freight upon someone's recommendation to find a cheap wrench, and that is what I use it for...this also reminds me how f#@$ing bad it smells inside Harbor Freight, gosh do I hate that place...and despise their tooling...just that the $25 wrench is kinda useful if one can hold their breath long enough to find it in the store and check out...before breathing... :)

Cheers,
Alan
 
I know some, but there are people with way more knowledge of the Deckel than me, maybe they will chime in.

Headstock drains on left side of machine, wicks (inside headstock, top area has some shelves with the wicks) feed the splashed oil to the front ways and the level glass (which on mine is not very visible) is bottom left of the horizontal spindle. I'm assuming you are talking about this as the head. The drain is on the left side, about 8"-12" from the sight glass. Unscrew the nut and the tube pulls out to drain. This is for the spindle gears and front ways.

On the right side, inside the door where the coolant pump is, oil is filled on top, drains on bottom. This is for the feeds.

Both the above need to be filled.

Right side of X table (joy stick side) Top by the table has a zerk that you need an oil gun to fill. They look like a grease gun with a straight tube and you pump them. If you don't have one, I use this type for my Nichols and it would work, but I bought one for a Deckel from a guy here, it is made in Switzerland and nicer than this plastic one:

Push N Lube Oiler- Bridgeport Oil Gun


When you say main table, the table feeds X and Z. Which direction does it squeak? When I first got my mill I made sure the screw was always wet until I could figure out where the oil was located.

The Z is filled from the bottom right side of the vertical mount which the table mounts to. You need to remove the cover to get access to those a couple screws hold the cover in place and on the right side around the top of where the cover is there is a fill and drain below it.

Under the vertical mount on the left side there's an oil cup, that needs to be filled.

Those are the main ones.

If you do not have the DVD with the Deckel manuals, contact username wrench, and you can purchase one from him. Well worth the cost, IMO. He put it together.

The gear oils should get Mobile DTE Med/Heavy and the ways should get Mobile Vactra #4. In general slidy things get Vactra #4 and roundy-gear-things gets DTE Med/Heavy, AFAICT.

This thread has some info: http://www.practicalmachinist.com/v...anging-oil-what-s-trick-speed-gearbox-292031/

HTH

Cheers,
Alan

Thanks. The table was squeaking in the X, but only feeding towards the operator. I thought it was the screw, but it was the opposite side hand wheel. A little drop of oil solved that problem. Runs very smooth now. I think I'm going to take off the main table and clean the whole thing out and try to replace all the oil cups/fittings. On the back of the X table, right by the joystick, I didn't have a zerk, I have this weird little oil cup looking thing that has a shell that spins around to, what I would guess, would be to keep stuff out of the hole. So you could basically just spin it around to access the hole and dribble some oil in there. I can't tell if someone put grease in there or it's just crusty stuff that has collected over years. This machine looks like it was routinely use with coolant. I rounded off one of the allen bolts on the operator side end cap of the X table.

I was able to get a manual from online that seems pretty complete and is for a lever machine. Definitely worth the $30 as it covers most of the info I wanted. There are a few little idiosyncrasies though that differ between the pics/descriptions and my actual machine. The manual mentions a gear lube point on the left side of the machine about half way down, which I found, however there is one sight glass and two separate fill ports. I think the left port is for the gear oil, but not sure where the right port goes.

There's also a description in the manual about being able to drain them all from the bottom and the plug creates a vacuum seal or something. I will have to read the manual again more carefully. Overall, I'm happy with it so far and have a cool machine with accessories that looks like it can handle some creative setups pretty easily. I have a few projects in mind that will be simple on this compared to using a standard BP style mill.

I'm going to try to get all my stuff together this weekend and take some pics of the machine and things I have for it. I know I have multiple duplicate collets.
 
The manual mentions a gear lube point on the left side of the machine about half way down, which I found, however there is one sight glass and two separate fill ports. I think the left port is for the gear oil, but not sure where the right port goes.

I think those might be overfills, but not positive. From what I could tell, the oil goes in the headstock and drains out the tube which pulls out. The other 2 are for overfill I think, but not positive.

I might be talking about something different. Do you have an English or German manual?

The DVD is a better deal, much more info, and various bits of very useful info.

There's also a description in the manual about being able to drain them all from the bottom and the plug creates a vacuum seal or something.

That sounds like the tube that pulls out for draining.

FWIW, I ran mine with kerosene and drained at least twice, as I did put the wrong oil in the headstock being confused by the manual. Some of the translation and/or terminology used by the Germans is not completely clear in all cases, IMO. The lubrication chart is one such example.

I'm going to try to get all my stuff together this weekend and take some pics of the machine and things I have for it. I know I have multiple duplicate collets.

If you have any dupes that you are willing to part with and sell, I would be interested in sizes I don't have.

Cheers,
Alan
 
I will have to clean mine with kerosene and refill. I originally intended to buy it and use it, but there are just a lot of little things that bug me. The drive train seems ok and everything works, so I just want to clean out all the ways and make sure the oiling parts are clean and/or new. So far, I pulled everything up to and including the X table. I had to drill out an Allen bolt off the table cap since it was stuck in there and I rounded it off trying to get it out.

I know for sure I have duplicate collets. I'm guessing some are Deckel (they are stamped with an 'F' on the nose) and some look like they could be imports. I probably have two dozen collets.


Back
Top