What's new
What's new

Graziano SAG14 Compound

jwaud

Plastic
Joined
Nov 21, 2022
Graziano SAG14 Compound

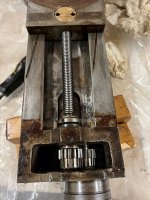
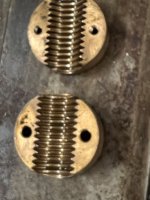
I'm a brand new machinist and this is my first lathe (so excited!!). The carriage and cross slide move smoothly and freely. However, the compound was very rough and binding, to the point of totally locked up. I took it apart, and originally thought the problem was in the bronze (brass?) lead screw nuts. However, they seem to move smoothly along the lead screw. However, if I put even a small amount of radial force on the lead screw, it binds and won't rotate. My conclusion is the lead screw bearing is toast, probably from lack of lubrication.

Is there any advice on how to proceed? Should I just remove the pin on the gear and remove the lead screw? Are bearings available? Any advice is greatly appreciated.

Thank you!

Jim
 

Attachments

  • Photo Nov 21 2022, 8 37 46 AM med.jpg
    Photo Nov 21 2022, 8 37 46 AM med.jpg
    411.7 KB · Views: 30
  • Photo Nov 21 2022, 9 41 59 AM med.jpg
    Photo Nov 21 2022, 9 41 59 AM med.jpg
    401.3 KB · Views: 29
  • Photo Nov 21 2022, 9 50 11 AM med.jpg
    Photo Nov 21 2022, 9 50 11 AM med.jpg
    470.3 KB · Views: 28
  • Photo Nov 21 2022, 9 50 43 AM med.jpg
    Photo Nov 21 2022, 9 50 43 AM med.jpg
    246.5 KB · Views: 27
  • Photo Nov 21 2022, 9 56 38 AM med.jpg
    Photo Nov 21 2022, 9 56 38 AM med.jpg
    387.5 KB · Views: 26
its premature to conclude anything. just take it apart and clean, inspect.
there is obviously congealed/oxidized coolant or cutting oil present from the amber varnish in your pics.
that has to come off before it can be properly evaluated.
its been a while since I did mine, but I don't recall there being anything difficult about it.
congratulations on getting a SAG as your first lathe!
 
Hi Jim,

There are no bearings as such in the compound, the steel shafts run directly in the cast iron end housing.

You can adjust the end play of the screw, but that's about it.

You could try spraying some WD40 or similar into the bearing area and see if it frees up. However it really needs to be dismantled to lube it probably with oil.

I had some difficulty removing one gear because of some previous butchery (sheared taper pin, re-drilled etc). I think someone had been in there with a angle grinder! Yours looks tidy by comparison.

The gears are fixed to their shafts with taper dowels.

I guess the two halves of the bronze nut have to be matched correctly.


Sag 14 compound parts 01.jpg Sag 14 compound parts 02.jpg Sag 14 compound parts 03.jpg
 
Last edited:
Thank you Peter! That is so incredibly helpful.

Was your compound also binding badly? Did you find the cause?

How did you remove the taper pin from the gears? I'm having difficulty with that.

Jim
 
stop guessing, take it apart and clean it!
(and yes, the taper pins need to come out, and the gears need to come off to properly clean it)

ok, on taper pins, first, once clean enough to inspect, determine which is the small end, and which is the large. obviously it's the small end you drive it out by.
if it is clean and unmolested this is a simple matter of visual inspection (be careful its the pin dia. you are seeing and not the chamfer).
magnification helps, if in question I use a 10X loupe.
if it has been messed with, usually by someone bashing on the small end with the wrong tools and not getting it out, the small end can be mushroomed out and appear the same size or bigger than the large end. this will usually show as that end being flattened and there will usually be signs of such bashing around the pin. good taper pins have a low dome on the ends, familiarize your self with what that looks like on good ones in order to "read" them properly. techniques to remedy this include drilling a shallow hole to cut away the mushroom, followed by flattening the bottom of the drilled hole with a burr or end mill before driving out carefully.
next, the part(s) must be properly and firmly supported. solid hardwood, steel bench blocks, sometimes custom supports, but solid, solid solid and don't mangle your surfaces.
then you will need the proper tools to drive them out. at least two punches, and just the right weight hammer. the first punch you use to break it loose is a stout punch with a short taper down to a little smaller than the small dia. and very important, it must have the same contour as the pin. if the pin has a low dome,, a low dome concavity to match, if it's flat, flat. if you hit a low dome with a flat punch, it might mushroom. that concavity can be made easily with a carbide ball burr in a flex-shaft, Dremel or die grinder. use sharp blows with a decent weight hammer, don't be shy, but stop short of "moving metal around" or permanently deforming things.
next is a straight punch of that small dia. to drive it the rest of the way out, which "should" be easy.
if its not responding to the above, stop and consider if it's been sheared. I learned this on a B&S #21 milling vise that really had me stumped, the pin was sheared off clean leaving the ends of the pin still intact. knowing where the collar should be and finding it inexplicably shifted is a clue, but you may need to start drilling out the pins to find out what is really going on.
sometimes, you hit the jackpot and the pin is internally distorted without shearing, damaging the shaft and the collar or gear in the process. careful exploratory drilling and inspection under magnification is called for.

remember, 98% of the time it's actually easy, and no need for extreme measures, so don't worry, good luck!
 
OK, good progress:

I was able to remove the gears. I was going at the "wrong end" of the tapered pin, as Cyanide suspected. Thank you Cyanide for the direction and encouragement, it helped immensely! Along with the proper tool, both pins came out easily (the first a little tougher due to my original abuse).

So, now you can see the galling on the lead screw's bore. Is there any advice on how to proceed and maybe improve the condition of the bore? The shaft looks reasonably ok to me.

I will be checking the oil pathways to make sure there are no obstructions.

The nut (for setting the bearing "gap") is really tight. Other than using the lathe chuck to hold it, with thin copper or aluminum to keep from damaging the threads, I'm not sure how I'm going to get it off. I guess another option is the pin the gear back on, and use the gear to keep the shaft from rotating.

Peter, did you notice that your compound has feature, at the end of the lead screw, that mine does not? Interesting. What does that do?

Thank you again for all the help!

Jim
 

Attachments

  • Photo Nov 22 2022, 2 43 23 PM med.jpg
    Photo Nov 22 2022, 2 43 23 PM med.jpg
    391.9 KB · Views: 17
  • Photo Nov 23 2022, 8 24 56 AM med.jpg
    Photo Nov 23 2022, 8 24 56 AM med.jpg
    186 KB · Views: 17
  • Photo Nov 23 2022, 8 25 09 AM med.jpg
    Photo Nov 23 2022, 8 25 09 AM med.jpg
    201.8 KB · Views: 17
  • Photo Nov 23 2022, 8 26 00 AM med.jpg
    Photo Nov 23 2022, 8 26 00 AM med.jpg
    256.6 KB · Views: 18
  • Photo Nov 23 2022, 8 35 31 AM med.jpg
    Photo Nov 23 2022, 8 35 31 AM med.jpg
    376.4 KB · Views: 18
  • Photo Nov 23 2022, 8 36 09 AM med.jpg
    Photo Nov 23 2022, 8 36 09 AM med.jpg
    321.9 KB · Views: 16
  • Photo Nov 23 2022, 8 38 04 AM med.jpg
    Photo Nov 23 2022, 8 38 04 AM med.jpg
    288.9 KB · Views: 16
The nut (for setting the bearing "gap") is really tight. Other than using the lathe chuck to hold it, with thin copper or aluminum to keep from damaging the threads, I'm not sure how I'm going to get it off. I guess another option is the pin the gear back on, and use the gear to keep the shaft from rotating.
Jim, good work getting the pins out.

The adjusting nut is self-locking, so it will be stiff to turn.
Maybe you can hold the shaft end (where the gear fitted) in the chuck?

Peter, did you notice that your compound has feature, at the end of the lead screw, that mine does not? Interesting. What does that do?
I'm not sure which feature - do you mean the large bolt head/stud that holds the toolpost? I think American lathes might have a tee-slot on the top side of the compound slide? I think lathes for other parts of the world don't have a tee-slot, just a bolt or stud.

Regarding galling to the bores, maybe an adjustable reamer to carefully clean it up? Otherwise, a half round needle file to remove any obvious bits. I don't think it is critical to have a perfect bore.

I often use stones to clean up surfaces, for example, 1/2" wide x 1/8" thick x 6" long stones (but anything around this size, thicker is less fragile) can be run over the shaft or flat surfaces to clean up high spots. You can feel (and see) when the stone hits a burr. Toolmakers use stones a lot to check and clean up surfaces.
 
Last edited:
My advice would be to avoid the adjustable reamer. We bought one and found it did more damage than good. Remember too that this is not a quickly rotating shaft/bearing situation; the compound screw is turned very slowly.
 
Triangular scraper for the bore.

A couple of those pic's really got me confused. Why are there degree markings on what looks like the bottom of the compound? Am I looking at the cross slide?

I guess it's just staining from sitting in one place for years and using coolant?

I've got a 12S, and one of my 'someday' projects is to make a gear drive for it to get the handle clear of the large cross slide dial. But that requires an idler gear to keep the rotation the same, which seems easier than converting to a left hand screw.
 
yea, stay clear of a reamer or scraper.
stone flats, polish bores with a piece of 600 wrapped around a dowel, and shaft ODs with said 600 while spinning it in a drill or lathe. stone ODs only if they have really significant dings, yours don't look like it. the less you take off the better. happy you got it sorted out!
hey, what do folk think about putting the taper pin post in a sticky? mods, what do you think?
 
I think (unless anyone advises otherwise) I will proceed with scotchbrite and WD40 or brake cleaner and just do as little as possible ("do no harm approach"). I will also use stones as you recommended Peter. I've been intending to get them anyway. At least now I know I can relatively easy take it all apart again if I'm still having trouble and can do a deeper dive into the bores. As 706Jim stated, this is not a high speed rotating shaft, I should be able to get smooth motion out of it.

@wesg Yes, that's the bottom of the compound, the degree marks transferred! Interesting idea on the idler gear.

@peter Ah, that is so interesting about the tool post! I had no idea. Yes, mine is a dovetail.

Thank you everyone for the great advice, and Happy Thanksgiving!

Jim
 
happy thanksgiving!
just a note on sotchbrite, it releases abrasive particles like crazy, and cast iron in particular has lots of nooks and crannies it can lodge in, so I avoid it like the plague on CI.
600 wet or dry doesn't release nearly as much loose abrasive, so use it instead. don't get me wrong, I use the crap out of all kinds of SB products and love them, but just not on cast iron machines. good work so far and cheers!

P.S. before any abrasives, soak parts in ZEP industrial purple degreaser, about 4/1 in hot water. it just makes old coolant and oil disappear.
forget that wd40 crap,its a waste product with perfume added. no pro uses it for anything unless desperate.
 
Last edited:
Thank you Cyanide for the advice...I'll steer clear of Scotchbrite for this project.

Are the rectangular stones on this page suitable? Any particular grit(s) recommended? I've seen videos where the stones are rubbed together, to ensure they are flat, before using on machine surfaces. So maybe get them in pairs?


Thanks!

Jim
 
again, stones are for flat surfaces, and the occasional big ding on shafts. the need for "precision" stones is limited. the nature of the use of them is they tend to average out irregularities. just use the principle of doing the least harm. start with a finer grit, less aggressive process, and go heavier as needed.


Back
Top