WizardOfBoz
Diamond
- Joined
- Sep 30, 2006
- Location
- SE PA, Philly
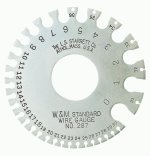
The wire gauges, IIRC are hardened after fabrication, correct? If so, doesn't that imply some grinding or lapping after HT? Maybe not for -0.000/+0.001? In the higher quality gauges I have that are similar to the OP's picture, the faces of the gauging mouth seem to be awfully smooth and precisely flat and parallel. So the process would be
1) Progressive Die:
a) Cut out disk with hole in middle
b) Punch out holes corresponding to slots
c) Punch out slots
d) Stamp with mfr name and indices
2) Heat Treat harden
3) Heat Treat Temper
4) Lap each slot flat and parallel
5) Test each slot for tolerance
Your specs are essentially +/- 0.0005" for each slot. Unless you can allow a high scrap rate that means you need to shoot for +/- 0.0002". I don't see any way around doing some fine lapping work and testing if you want an accurate gauge.


