What's new
What's new

Measured Thermal Expansion of a 1.25" dia by 10" long Steel Bar in Response to Bare Hand Contact

dgfoster

Diamond
Joined
Jun 14, 2008
Location
Bellingham, WA
I am going to violate a double-posting "rule" of internet etiquette as I think this topic is worthy of a more general discussion. My reasoning is that this seemingly generally useful bit of information is buried in a relatively obscure and barely related thread and will not be seen by many.

For as long as folks have been interested in metrology/precision scraping there has been discussion in general terms of the thermal expansion of steel or iron as a result of handling it. But, I can not recall any actual linear measurements of the effect of handling having been been posted on this forum. I can recall plenty of general reports of straight edges, and machine parts distorting and in some cases distortion measured. But actually measuring linear distortion due to handling has seldom (probably has occured) if ever been written down.

In another current thread (Original Post) the question was raised concerning of the degree of distortion one might expect due to bare-hand contact with an iron strut. Since the linear coefficient of thermal expansion of steel is nearly identical to iron, it is practical to use an iron bar to model the behavior of cast iron in this respect.

So, I thought about how to go about making a simple measurement and recording the effect. (This was just one measureemnt under one set of conditions on one bar of circular cross section. More measurements under various conditions with bars of varying cross sectional shape and dimension would certainly be interesting, but a bit tedious.) In a chat with Forrest, I brought up the measurement idea and he quickly suggested a method simpler and more rigid than what I was originally considering. So, credit to him.

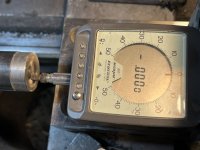
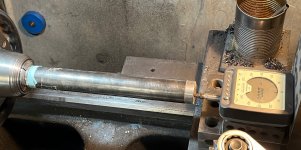
I did the test with a 1.25dia by 10" long steel bar that was at thermal equilibrium with the 58 degree F environment of my shop. I simply chucked it up in the bar in the headstock of my EE and placed 2-4-6 and 1-2-3 blocks on the saddle to align my Federal gage with the free end of the bar. I used the tailstock to "block in" the gage. I zeroed the gage and then with my bard hand firmly gripped the bar in its mid- section and kept an eye on the bar. I was surprised to see that the gage didn't flicker up a tenth for 100 seconds. Then I took my hand off and within a few seconds it cooled enough to read .0000" I took the rapid return to ".0000" not to mean that the bar had suddenly returned to its pre-contact length, but rather that the gage had tripped just as the length excursion made the last few hundred thousandths change to .0001" and then again read .0000 as soon as the excursion slipped a few hundred thousnadths less than .0001.

How much net distortion of a casting or weldment surface might occur would clearly depend on how much such a change might be amplified (or minimized) by the geometry of the part in question. A simple braced angle plate tends not to amplifiy the effect, but a long- bowed classic camelback would tend to exaggerate distortion much like a bimetal thermostat distorts disproportionately in response to small temperature changes as the two parallel sheets of metal struggle to accomodate a slight change in the length of one of them.

So, by posting this information I am in no way sugesting that careless handling of reference equipment is OK. Virtually everyone knows the real-world trouble cased by parts are equipment distortion due to a lack of thermal equilibrium. I did find it interesting and potentially informative to make the measurement, however.

Here is the setup used.
Testing Thermal Expansion2.JPG
DenisTesting Thermal Expansion3.JPGTesting Thermal Expansion.JPG

Comments welcome.

Denis
 
Last edited:
I trust you do not own a Mikrokator. Place a .00001 reading Mikrokator on the end of a 4" long gauge block and watch the needle move fast!
Your Workholding is absorbing some heat through the collet so it's not going to move a lot. 1-1/4' is a thick section, i would not think it would move much. Try the same test with a micrometer calibration rod.
One of the most heat sensitive things I've scraped is a 15" precision level, the cast wall thickness is like .15" If you touch it the hinge changes instantly. Those .15" thick walls expand fast and move the levels base.

I would like to see your test at 70 degrees and with a finer indicator. Your indicator may not be performing well at 58° the indicator might be sticky and not record a tenth or two of movement.

If you want to measure a tenth, you'll need a gauge with an extra decimal place of resolution. I used a Starrett .0001 test indicator for years and thought I was doing good work. I compared the Starrett to an Intrepid and noticed the Starrett didn't move unless it was moving more than a tenth.
 
It's a bit tough to tell, but the third pic (the close up) seems to show the indicator contact resting on the edge of a "hill" cut into the bar end.

If that's correct, you can have an offset load going into the contact point/indicator shaft, possibly binding it a bit. That, along with the low temps as mentioned above, could have compromised the reading.
 
I trust you do not own a Mikrokator. Place a .00001 reading Mikrokator on the end of a 4" long gauge block and watch the needle move fast!
Your Workholding is absorbing some heat through the collet so it's not going to move a lot. 1-1/4' is a thick section, i would not think it would move much. Try the same test with a micrometer calibration rod.
One of the most heat sensitive things I've scraped is a 15" precision level, the cast wall thickness is like .15" If you touch it the hinge changes instantly. Those .15" thick walls expand fast and move the levels base.

I would like to see your test at 70 degrees and with a finer indicator. Your indicator may not be performing well at 58° the indicator might be sticky and not record a tenth or two of movement.

If you want to measure a tenth, you'll need a gauge with an extra decimal place of resolution. I used a Starrett .0001 test indicator for years and thought I was doing good work. I compared the Starrett to an Intrepid and noticed the Starrett didn't move unless it was moving more than a tenth.
No I do not own a Mikrokator but I have used the Federal quite a bit and do trust it not to be sicky or perform poorly 12 degrees less than 70. Obviously, to truly measure a dimension, a measuring device with a decimal place at least one greater than the desired measurement is needed. The test I did was to answer one specific question---will the bar of similar dimension expand enough with casual handling to throw off a measurement enough using the angle plate to matter in normal (not research lab) use. I think the time it took to move a tenth is surprising to most people. I poled a couple folks on the question and they guessed only a few secons might cause enough distortion to complicate work being done.

At a higher temperature, say 70, I would expect less rapid deviation as the differential between my closed fist at 84 degrees and the bar would be less at environmental 70 degrees than the tested 58 degrees.

I very seriously doubt that conductiivy into the collet is a significant factor here. That just does not make sense to me. But if you wanted to test that, simply wrapping the chucked end of the bar in card stock and using a larger collet or a 3-jaw would demonstrate how much difference conductivity might make if you did the test both ways. If you are truly interested, duplicating the experiment would be very easy. That is why I posted photos of the actual setup and chose this setup for its simplicity. Raising theoretical questions is easy. Testing takes a little more investment.

It would be a service to the group if someone has the interest to test various diameters of material and cross sections and even produced graphs of results. That is more than I care to do as this provides, for me, data to answer the question I set out to explore. Just replicating the test in someone else's shop and showing comparable results or blowing these results out of the water would be a service.

Denis
 
Last edited:
It's a bit tough to tell, but the third pic (the close up) seems to show the indicator contact resting on the edge of a "hill" cut into the bar end.

If that's correct, you can have an offset load going into the contact point/indicator shaft, possibly binding it a bit. That, along with the low temps as mentioned above, could have compromised the reading.
Those are reasonable concerns that might make a small difference. One reason I chose to do the test at 58 is that my shop had been roughly at that temp for a couple days. So the supporting lathe, bar stock, indicator and general environment were at equilibrium. I was not very discriminating about the barstock chosen. But obviously machining it would have heated it locally, And, deep down, I doubt the end surface (surface irregularities always being exaggerrated in photographs) is a make or break issue.This was intended to be a "quick and dirty" but reasonably representative test.

It would not be hard to put a cleaner face on the stock.

Maybe someone with a better setup will do a couple simple measurements to see if they are in the ballpark or not. Right now I need to get some work done in the shop and, with a nor'easter blowing, have to fire up my wood stove. Then all bets are off as the lathe castings are massive compared to bar stock and the environmental temps will be swinging wildly.

Thanks for your comments.

Denis
 
The thermal expansion is very small in absolute terms and will probably require some sort of differential measurement to be meaningful. Not sure how this would be achieved but Harrison invented bimetallic gridiron compensation based on the difference between the thermal expansion of brass and steel which doesn't actually work that well because of stick-slip between the stacked layers of rods and the bars holding it all together.
 
I had wrongly assumed this was a general metrology question vs a product application question.

I don’t think your angle plate will move much after grabbing it. If you are concerned about heat transfer simply wrap the handle with three strand and whip the ends off, much like the dressing found on a classic sailboats tiller. You’ll have a nicely dressed angle plate and you’ll have a wrap of three strand between your hand and the iron. I wrap most of my camel backs handles before using them.
Yes, what actually got me interested in making the test was someone suggesting that I alter the design of the strut to facilitate application of wood insulation to the strut. That intuitively seemed like overkill and I said so. But I also did not fully trust intuition. So, I decided to actually see how long it would take to increase a roughly similar-sized bar .0001 realizing that in most practical use even that amount of movement would not matter. I was really surprised that it took fully 100 seconds for that to occur.


So, yes "serving" the strut with cordage would make a nice looking and feeling strut. HOWEVER, and all-important ;-) ) it would cover the logo I plan to put on the strut. And, based on testing, for all but the very most critical work, is likely unnecessary.

Denis
 
You could change the plan such that the strut is a plain finish, and you make a 3D printed plastic overlay that goes around it with your logo. But it might need a "stop" designed in so it doesn't slide up the taper.
 
You could change the plan such that the strut is a plain finish, and you make a 3D printed plastic overlay that goes around it with your logo. But it might need a "stop" designed in so it doesn't slide up the taper.
You have come up with a creative way to preserve the logo and make a cover. I had not thought of this option. So, props for that.

The first strike against the printed part is that it is indeed plastic. And almost no plastic part has good durability over many years' time. They seem to often get brittle, or craze, or powder or somehow manage to deteriorate. Printed plastics are generally less optimized for durability than injection molded parts and all the non-PLA filament printed plastics are harder to print with good dimensional results than PLA.

The second strike is that I just don't like the idea of plastic on a quality metrology or setup plate.

And the call "you're out!" occurs because the cover for the handle would have to be made in two parts and then joined together and fastened. Maybe it could of a snap-on design. Either way----uggh. If I had to make a printed cover, then a snap-on design would be the better option in opinion.

Using Plasti-Dip on the handle and masking off the logo would also be a possible solution. It would provide excellent insulation, is fairly tough, and easy to replace as needed. I still really don't like the Dip idea.

But, then I come back to, really, why do that? I think I have shown to my satisfaction that if a person doesn't hang onto the strut with a full grip for more than 90 seconds, that no significant distortion of the plate would result. In actual use, I'd b surprised if a person would actually hold onto the handle for ten seconds at a stretch. If a user were down to splitting tenths with the plate, then wear a cotton glove or wrap the strut with a rag or serve it with cordage for that last little fiddly bit.

Denis
 
I'm not familiar with what debate led to this test, nor have read every reply, but a hollow (or smaller diameter) tube would show more thermal deflection, faster in the same conditions since the ratio of area of contact between hand and part to thermal mass of the part is less favorable. But maybe a hollow or smaller diameter tube isn't relevant for the debate that inspired this experiment.

Additionally, some geometry can be very, very sensitive to minor thermal gradients. For example a large I-beam style parallel straightedge needs very little temperature difference between the top and bottom soles in order to generate a large change in bulk straightness. This burned me while trying to grind an 18" I-beam style parallel a while back. Even with flood coolant and tiny, <.0001" passes I couldn't keep the heat into the ground surface down low enough to prevent it from grinding ~.0002" concave, even though the grinder cuts straight to 50uin.

Anyways thanks for posting and I certainly agree with the inclination that it's better to do a real test than spend hours debating the theoretical result.
 
The shape of the bar used may affect the rate of heat transfer quite a bit too. I would expect that round is slower to heat than a thin rectangular bar, since the heat can soak the thinner material faster. I have a ½ μ Mahr, maybe I can dig up a similar piece of material and try a couple tests.
 
The shape of the bar used may affect the rate of heat transfer quite a bit too. I would expect that round is slower to heat than a thin rectangular bar, since the heat can soak the thinner material faster. I have a ½ μ Mahr, maybe I can dig up a similar piece of material and try a couple tests.
Seems like you could change that first sentence to "Without a doubt the cross section and overall dimensions will have a major effect on temperature change rate due to hand contact." A 10" tube 1.25" diameter with a 1/16" wall would likely move a tenth in a matter of 5 to ten seconds I would hazard to guess based on the performance of the solid one. (Me making rash statements like that should be like holding up a a giant target inviting [gasp] a test/tests to prove it wrong.)

I really do hope you dig out that .00004" Mahr and do some more testing. One test of considerable interest and simple to do would be to replicate what I did to either strengthen its validity or disprove it. And then just wrap the bar in parachute cord or similar and repeat the same test. But there are enough relevant-to-scraping variations to keep a person busy for a while! Getting a handle on the magnitude of dimension change vs duration of hand contact based on measurement and not just conjecture seems like it could be helpful to a lot of people.

Denis

That's a little under .00002", not .00004" - and I meant a rectangular bar with even near the same cross sectional area, not a thin walled hollow bar. Say ½" by 2½" rectangular bar rather than 1¼" round. The heat needs only penetrate ¼" to soak through rather than ⅝". Plus more surface area in contact to transfer heat.

I will see if I have a 1¼" steel round and check the movement against what you saw tomorrow.

The one I would like to see is how much difference the "white cotton glove" that everyone always mentions using makes to the heat transfer.
 
Given you have maybe 20 degrees of temperature swing from your shop to hand skin temp the most length gain is .0001. (.000005 x 20). That is most, being the iron will not dissipate heat back into the shop (which is violating all sorts of rules).
Now if you change the hypotenuse of a right angle triangle (6 inch sides) by said tenth the angle will be out sub 3 seconds, assuming no resistance in the 90 structure and leg tension resistance.
It’s cool to actually measure that small.....
I work in climate controlled by central standard weather shop- my results will might vary (100+ summer, 20’s winter).
 
The engineer will ask what the story is about. Do you have mating parts that must maintain dimensions together? Is it about gears with very precisely made tooth shapes? Bearings that heat up? I find the experiment pointless. Temperature expansion coefficients can be looked up in tables.

For measurements parts need to have standard temperature which is 20 degrees Celsius or 68 degrees Fahrenheit. Me as a practical machinist tell you that you can win or lose a tenth over a grain of dust in the comparator gears or some dirt between the part and the tip of the instrument or the lathe bed bending while you lean on it. Duh.
You find the discussion pointless, perhaps, becasue you missed the point.

Indeed, everyone interested in metrology should know that CTE for iron can be looked up, and many folks wouldn't need to do so as they have iron's coeficient memorized----6 millionths of an inch per inch per deg F. But if someone were to ask you how much a 10" iron bar of, say, 1" diameter will lengthen due to handling it for,say, 30 seconds, exactly what temperature change do you use to calculate the length change? If you know that number, you will impress us all. That's becasuse the graph of the dynamically changing bar temperature vs its length will look something like a one-hump camel's back. So, to answer the question you have to be able to, first, generate that curve and then integrate the net change over length. Impressive!

So, that is the point. Hundreds of vague discussion about the need for standardization of temperature and the need for insulation on handling surfaces have occured over the roughly ten years I have followed this
forum. But not a one has measured such a response to quantitiate it in a real-life circumstance. Need I say it? That is the point.

Denis
 
I admire what you are doing, and whatever your logical reasons are valid enough because it is just cool.

I think what you have shown so far is you need finer resolution measuring device. And the point is your hand temp does not move a 1” bar very much.
 
I admire what you are doing, and whatever your logical reasons are valid enough because it is just cool.

I think what you have shown so far is you need finer resolution measuring device. And the point is your hand temp does not move a 1” bar very much.
To satisfy my intellectual curiosity, having a measuring device with greater resolution would be interesting and fun to play with. And to do a serious investigation based on large numbers of precise measurements of varying cross-sectional bars and shapes, such a device would be essential. If I really felt I needed one, I'd buy one. But, to learn the practical information I have needed to know so far, the instrumentation used has given an order-of-magnitude answer. And that was the original intent. Secondarily, it has started some discussion that I think has broader useful application. And that hoped-for outcome is even more valuable.

Denis


Back
Top