What's new
What's new

New Machine Day - Robot Invasion!

I'm sure that it all depends on how it is coded, but I would like to think that you should be able to swap parts and all that jazz while the machine is running w/o stopping anything. There should be no reason for the mill to stop just b/c someone opened the cage door. As long as you git'r done before the milling cycle ends and you have Wally back engaged before end of program....

???


One bad thing about a light curtain, is that if you trigger it while it is in between cycles, you could put it in alarm state as you go by, and not realize it. Then 2m later, when you expect that it will start it's cycle, and it just sits there.

BTDT


-------------------

Think Snow Eh!
Ox
 
Last edited:
Looking good Russ!

But man, my O.C.D. couldn't take that huge tall fence for long...haha

In my bizzaro world, once out of warranty the fence would be gone, and then I would rig up some type of light curtain on the ceiling that creates a safety zone around the bot...or similar?

There is a little robot about that size that doesn't require shielding, upon touching something that isn't suppose to be in it's path, it instantly stops.

Keep us posted!
Yeah Greg, I thought that very thing, "Why so high?".

Now that it's been in for a few weeks I don't even notice the enclosure being there at all. The path around it has become ingrained in everyone, and honestly, don't even give it a second thought anymore.

Funny how we adapt.

Later,
Russ
 
The cage could be much smaller if the panels swung open to give access. By the way, I think cobots, as in robots with force sensors on all joints, can only run at 50%-ish rapids in cobot mode.

It's actually a good thing there is lots of real estate inside. Now that we're learning how to use this machine with this robot, the possibilities for pick up stations and drop off locations in the enclosure do make it necessary for the size it takes up.

The loading station on the robot cabinet is very small. We plan on putting a 30" x 72" bench in there to use as a loading station, and another 30" x 36" bench as a drop off station. We'll just stack parts 2pcs high on the drop off side of things.

Later,
Russ
 
Yeah, that little loading station looks way too small. Can you stack the stock pieces at all? Please update as much as you have time, I am sure many of us are very interested in this. I have a family of simple parts that I make about 15,000 a year and adding a robot to my new Brother is definitely on my mind.
 
Ok guys, sorry for lengthy delay between posts. You know me, I typically like to get these things posted and finished up pretty quickly, right? :D

With the 3rd quarter in full swing here, it seems everyone wants everything and they all want it now! Doing our best to stay ahead of the curve, but the road is slippery for sure!

Well, back to the install!


Finally, everything is set up and the install is complete!

Now, if we could just figure out how to make it work! lol

20220804_062008.jpg

20220804_062026.jpg


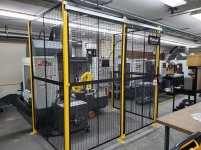
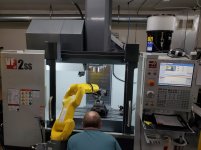
As mentioned and discussed previously, the enclosure does take up a fair amount of real estate, but seeing it now completed and up close from different angles, you get the true perspective and can see it is necessary in order to have some room inside to not only move about, but also for loading and unloading tables which we will add once we get it into production.

I am still baffled though as to the overall height, but ok, it is what it is.

The loading template they provide with the robot is basically useless, well actually, it is "completely" useless! The templates have 3" dia. cutouts in them. Fine if doing lathe work under 3" dia., but come on guys, WTF?, this is a mill. Give us something we can work with right out of the gate! And yes, regardless of the application for the robot, this is the template provided for either mill or lathe.

The gate has a locking interlock system which must be closed, locked and activated in order to run the machine in production mode. The remote touch screen control with jog handle is hanging on the right side of the machine so you can control the machine from outside the enclosure if necessary.


20220804_062145.jpg


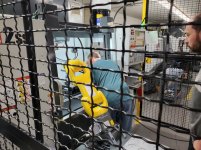
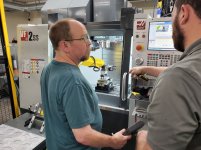
Here you see Andrew, familiarizing himself with the remote touch screen control and moving the robot around for the first time.


20220804_112334.jpg


That look says it all! Andrew working with our new employee, Wall-E.
He is thrilled to the point of not being able to contain himself over this new direction the shop is heading in!

20220804_112348.jpg


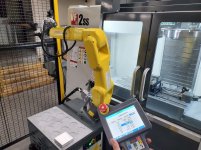
Here's an up close look at the remote touch screen control for controlling the robot.

I have to admit, it's a bit intimidating when you first see the control. Each axis (called a "Joint") on the robot is assigned a number and to be honest, I have no idea what that screen is currently showing other than the fact the highlighted "J3" is referring to "Joint 3" and that is the axis he is moving at that very moment the picture was taken.

Now that I've seen this pic it really pisses me off that Andrew spent 3 days working with the robot trying to get it to move in and out of the machine without issues, only to realize that when the tech came in to do the training, he noticed the robot is actually not oriented correctly on the base.

In that configuration shown, (angled towards the control and not the doors) it is set up for loading a lathe, not a mill. Poor guy. He struggled for 3 days with this and kept insisting something was not right as he worked with the robot.

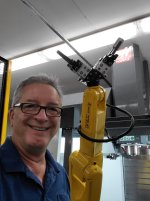
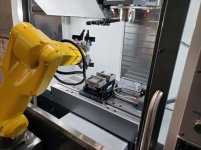
By the way, the entire gripper you see here which is noted ay the (1 and 2) at the end of the arm, is an option. The robot only comes with a single gripper configuration. Pick up a piece, put it in the machine, machine the part, take it out, put it down, grab another piece, load it in the machine,etc.

With the dual gripper, it's take the finished piece out, indexes to the blank piece gripper, drops it off in the vise, comes out, drops off the finished part, and go get the next blank and wait for the machine to finish, etc.
20220804_112400.jpg


Since he is just in a "learning as he went along mode" so to speak, he was simply using the grippers already mounted on the robot rather than trying to change them out to "mill" grippers". Once again, how stupid is it they leave us with the robot set up for a lathe and even have round stock grippers mounted on the arm. Needless to say, at the very least he was becoming familiar with the control, the "joint" movements, and the set up screens on the machine control.

20220804_125625.jpg

20220804_125636.jpg


Here's Wall-E giving you the Peace sign!

Know why?


That's right folks, "I'll be back!" :D

20220804_130111.jpg

To be continued................
 
Last edited:
It's hard not to contrast this with Wheelieking's robot integrated Brother experience. Seemed like Brother has this stuff down. Brand new machine setup and spitting out parts in a couple days iirc.

Haas sure doesn't seem to be winning it with any of the new things they're trying in recent years.
 
Yamazen did a LOT of work on Wheelie's set up before it was delivered, it was a turn-key to make a specific part vs new machine and robot. Still, considering how big the parts can be it seems that Haas is quite wasteful for that application. An S300 would use a lot less space and energy and be plenty big enough for that vise.
 
Maybe built some vertical, multi-level racks to hold blanks and finished parts (similar to Erowa's system)? Have slide-in/out trays pre-loaded with blanks....

I'm assuming you teach the robot, then it remembers the moves? Automatically advancing a programmed amount to the next blank/empty drop spot?

Or does the robot have canned cycles, and you just input a set of specific locations/dimensions in XYZ?

ToolCat
 
Yamazen did a LOT of work on Wheelie's set up before it was delivered, it was a turn-key to make a specific part vs new machine and robot. Still, considering how big the parts can be it seems that Haas is quite wasteful for that application. An S300 would use a lot less space and energy and be plenty big enough for that vise.

If a shop was dead hard against switching away from Haas seems like adding a spindle gripper and putting the parts trays inside the machine might solve the load/unload part, eliminate the big cage and eliminate the whole learn the robot part.
 
Put blanks inside the work envelope?
Covered in chips?

What you're saying works well for EMAG, but I'm not seein' that here?


------------------------

Think Snow Eh!
Ox
 
I now have an R650 and I can't imagine getting a spindle gripper for my simple parts. It might work for one op parts but what about that second op to finish the part??? Sure a robot costs more and is far harder to program but the speed and freedom it provides seems to me to be light years ahead of a spindle gripper.
 
Ahhh....the wonderful sound of "Saturday"!

Nothing like two full days of the weekend to just do as I please, which means........another update!


Training day has finally arrived, and man, do we need that!

After Andrew spent a few days on his own familiarizing himself with the robot and APL (Auto Parts Loader) software, the applications engineer was scheduled to come in for one of the two days of "in house training" days I included with the package deal.

The in house training does not come cheap! At $3,600.00 for 2 days of in house training you better believe I had both of my top guys paying 100% attention to the training and not worrying about keeping machines running in the background.

For that, we kept the new guy which is our co-op student from February who became a full time employee upon graduating in June, running production jobs in the other two VF-2SS machines during the training session, so at least it was not a total loss of production for this day.


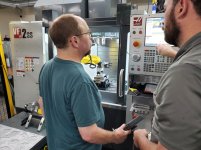
Here you will see the applications engineer (on the left) working with Andrew (on the right) and with Doug using the remote touch screen control (centered) teaching the robot to load the part into the vise.


20220811_134433.jpg


In this picture, we see Doug again getting the blank in the robot grippers positioned into the machine and into the vise.

You'll also see, the robot is now mounted and oriented correctly on the base. It was initially set up incorrectly and angled towards the machine control rather than how it is now which is angled towards the machine.

That was causing Andrew fits as I stated in a previous post, because the robot would run out of travel range.


20220811_134446.jpg


In this picture, Doug is still working on positioning the blank into the vise. You'll also notice the correct grippers are installed now on the arm. Life is good!

To the right of Doug, you can see on the machine control the APL template for positioning the robot. There are two critical positions and four intermediate positions you need to set to get the blanks from the table to the vise.

The first critical position is picking up the blank off the table and having the array of blanks on that table set up and measured from centerline to centerline in both columns and rows. This is necessary to get repeatability for the vise location of the blanks.

Next, there are four waypoint positions that need to be set during the travel of the blank from the table to the vise. Those are positioned via the remote touch screen jog handle and pressing one of the 6 buttons on the machine touch screen control to lock in that position which you can see to the right of Doug. The last critical position is the drop off location in the vise.

Once all those waypoints are entered into the APL control, the robot connects the dots so to speak and links together the moves from start to finish in one smooth motion.

OK, so that is just the basics dumbed way down. It really is not as simple as it sounds, but just like any other job, the set up is key to getting good parts made efficiently, and the set up for the robot can be pretty complex.

Keep in mind though, the statement just made above is based solely on this being our very first attempt at setting up Wall-E.


20220811_134458.jpg


The applications engineer Dan was very knowledgeable, thorough and patient during this whole machine package training session.

20220811_140202.jpg

20220811_140205.jpg

20220811_134709.jpg

20220811_140156.jpg


Here again is Doug, getting the blank positioned between the vise jaws (by eye) for the drop off location. With the vise being self centering, you have to have the blank positioned centrally within the jaws.

If not, when the jaws close with the blank in the grippers it could move the robot arm out of position enough to throw a servo overload alarm. There is enough leeway in that motion however that "eyeballing" has an acceptable allowance, within reason of course.

You could simply lean into the machine from the front to check the location, but Doug felt more comfortable doing this from outside the machine as his height doesn't allow him a good vantage point by just leaning into the front.


20220811_140059.jpg


Doug changes the jog handle feed rate for making his final waypoint positioning location.

20220811_140115.jpg


And there it is! Down onto the step jaw, and positioned between the serrated jaws.

20220811_140124.jpg

Happy Saturday people.

To be continued...................
 
For anyone looking into similar systems I would encourage you to look into this system


I spent an hour yesterday doing the demo online. They preteach the robot locations and they have graphical software to define depths of parts in the gripper, vise, etc. You do not teach a single path for anything. You define a simple 3d shape in their software of the blank and the finished cut part. The software automatically configures how many blanks can be loaded on the tray and shows the operator a 3d view of the table and where the locating pins need to be installed for each blank.
They have the grippers premodeled in the software and they show up in a 3D cad view. You confirm or adjust the position to grab raw stock, load stock , take out part, and what kind of air blast you want. The software takes care of all the robot teach points and you never use the pendant at all.


Not sure how much the HAAS system cost vs this though . ~$140k installed with auto door.
Budgetting for install on my NTX1000 early next year
 
$140k includes the programming software, arm and safety hardware as well?
How do you define the spatial relationship between the robot/machine?
 
Not sure how much the HAAS system cost vs this though . ~$140k installed with auto door.


The Fanuc Robot Loader from Haas is approx. 50K for the Robot Package 1 system, which is the one I have married to the VF-2SS. The machine with the robot loader you see in all the pictures in this thread came in at 151K. The machine has many options I added to keep it in parallel with the existing VF-2SS' I have in the shop with regard to capability. This ensures any job can be run in any of the 3 VF's without having to change programming.
I also, opted for the dual gripper on the robot that allows it to pick and place in the vise in one entry.

We have it running now making parts, and it's amazing to watch! Even have the tool break detection all figured out so running lights out will be happening soon.

More to come.

To be continued..................
 
You will start thinking about how to do this on all your machines now...

I'm just getting into part loading but have about 350+ pallets spread throughout the shop / 5 axis cells. We put our first piece of automation in the shop 2016 and ever since its all we can discuss. "How can we get this to run with less labor / get more spindle hours"
 
Progress update.........


The in house training proved to be a HUGE value, and quite honestly, not sure how long it would have taken us to learn even the basics without it. To anyone going this route with an auto parts loading machine cell, I would strongly recommend going this route!

The robot, from an "outside the box" standpoint (or cage for that matter), seems fairly simple to program when you stand outside the cage and watch it run. The reality of it is, it's a fairly complex set of routines that must be done in a certain manner to get to those end results.

YOU must have the robot motions planned out with regard to angle and rotation for every move from table to vise, and more importantly, from vise back to table, or it will alarm out with limits reached for the previous mentioned.

As the applications engineer stated, the robot will ONLY do what you tell it to do. It will not move any axis or rotation that you have not programmed it to do. Every clockwise move of the grippers must be followed up with a counterclockwise move or you will run out of rotational travel for that axis if it tries to go past 360 degrees.

In its essence, it sounds extremely simple, and I'm sure you're thinking to yourself, duh, of course you have to do that! When in reality though, you quickly realize when you have finished your waypoints for the travel path you command it to move yields unexpected results, because you simply did not plan a few steps ahead and counter existing moves with offsetting moves of the same degree.

Yes, duh, you should know this when setting it up, but the fact is you don't know it, nor do you even fathom it being an issue until you realize you messed up a couple moves ago, and now you're left with travel limit and rotational alarms.

This is why, when you watch the upcoming video I will be posting, you will see rotational moves that really make no sense at that very moment in time, but now after reading this, you will understand the reason why it has to be done that way.


After the first day of training, Doug respectfully tapped out.

We talked about his reasons why, and it made perfect "business" sense to me after hearing them. Don't judge the man either. I consider him to be a far smarter man than I am out on the shop floor, he was after all a general manager at his previous job running a small shop of 16 men. That shop is no longer in business due to several factors none of which had to do with his managerial abilities, more so due to the shop having to move from the 2nd floor of an industrial complex due to a lease expiration and the lease holder selling the building for redevelopment.

The move cost them a fortune, and in more ways than one!

Coupled with the fact covid hit and nearly everyone suffered a downturn in business, it did not take long for the owner to sadly go belly up.

To make matters worse, Doug had a medical emergency that not only brought him literally back from the dead, but also had him out of work for nearly 18 months.

He has worked for me now for 18 months and loves it here. He lives 12 minutes down the road, has little stress and is a very valuable asset to the company.

His roles now are basically the same as his previous job, but a MUCH smaller scale compared to before. He manages nearly everything out on the floor, and does quoting and programming for all our military work, and fills in as needed on machines. This has allowed me to focus primarily on the biotechnical side of our business, and enables me to have time off and vacations without worry.

So, when Doug came to me after the 1st day of training and stated to me, it's way over his head, and he feels he would need much more than 2 days of training, we both agreed it best to have Andrew be the primary focus for the training and Doug could learn at a much more leisurely (and less costly) pace once Andrew has it mastered and then teach Doug.


The weirdest part of this whole endeavor though is that this is the 1st time as an owner of my business, I have not taken the lead and felt like I needed to learn everything there is to know about this robot and machine cell, and pass along my knowledge to employees to get the job done.

More importantly though, I have also learned for the VERY first time in my career.............I am perfectly fine with it!


To be continued.................


Back
Top