What's new
What's new

Pratt & Whitney 12C Restoration Pictures

This is the Pratt & Whitney with the DRO, the steady rest stored on the back, and the new carriage stop.

Below is a list of what was done to this Pratt & Whitney 12C – at least what I can remember.

New needle bearings in apron clutch
New guide bushings in apron ends
New clutch rod
New feather key in worm and handles
New thrust bearing for worm
New bushing in feed rod leadscrew end bracket
New needle bearings in cross feed screw
New compound screw and nut
New meter valves in saddle
Ground and scraped cross slide and compound
New angular contact bearing cross feed screw
New bearings in taper attachment and new wipers
New handle made for taper engagement
Taper lock pin reworked
Tailstock taper reamed
New key for tailstock
New screw and nut in tailstock
New base roller bearing in tailstock base
New dab oiler tailstock
New felts for oil pumps
Complete new bearings for feed boxes
Repair pump fork
Replace needle bearings in rocker lever
Clean and paint all badges and info plates
Meger tested motor and replaced bearings
New belts
Cleaned and flushed all piping
Reservoirs filled with new oil
New way wipers everywhere
Cleaned and dressed starter contacts
Cleaned wiring and painted inside of electrical cabinets
Modified and added bracing to back splash and added light
Replaced end gear bearings
Repainted Glyptal inside feedbox and apron
New sight glasses and targets for all gear boxes
Cleaned, filled and painted machine and all parts with four coats of Anchor Safety Guard with urethane converter

Extras…
Pratt & Whitney steady rest 2 sets of fingers with solid and roller ends
Set of metric change gears in original box
Made new carriage stop with dial indicator in addition to micrometer stop
Added DRO
 

Attachments

  • IMG_0473.jpg
    IMG_0473.jpg
    809.6 KB · Views: 81
  • IMG_0472.jpg
    IMG_0472.jpg
    883.8 KB · Views: 74
  • IMG_0471.jpg
    IMG_0471.jpg
    817.4 KB · Views: 73
  • IMG_0470.jpg
    IMG_0470.jpg
    801.8 KB · Views: 82
  • IMG_0469.jpg
    IMG_0469.jpg
    884.6 KB · Views: 84
Your new pics on the new forum format look great on pc and on my phone. What a fabulous machine. You really set the standard on your rebuilds, a high standard indeed. Excellent work.

I've placed this thread in the "Major Rebuilds" sticky in this section as well. The first Pratt & Whitney added there. Anyone looking for this thread in the future can find it easily.

I appreciate the effort you put into this thread as well. Sometimes it can be real work. I'm sure the entire community would love to see your other work too as time prevails. Thanks for taking us through the journey.
 
I think the OP was right in describing this procedure as a “ restoration “. A “ rebuild “ would involve bringing the alignments back to factory standards. Having said that it really is a beautiful job. The paint work is particularly impressive.. I said earlier that I normally prefer machines to be left in the factory paint but I’d make an exception in this case. Congratulations on a job really well done. That’s a professional standard piece of work.

Regards Tyrone.
 
That is drop dead. Unfortunately I'm to the age where this stuff replaces the SI bathing suit issue.

What tolerance can you hold ? Dave
I shared the Pratt & Whitney’s tolerances in an earlier thread. (Link to that thread: https://www.practicalmachinist.com/...-12c-restoration-pictures.402002/post-3926060) After I moved it into place and did a good long term leveling, the machine is probably a little better than I stated there – something in the range of .00015 to .0002 over about 8-9” or so and something similar between centers.

The tailstock points up a couple tenths and towards the operator a couple of tenths. For these reasons and others, I decided it didn’t need a rebuild. So, I called it a restore. I know the terms mean different things to different people. About the only part of the machine as far as alignment that needed attention was the compound – which I did find odd.
 
Your new pics on the new forum format look great on pc and on my phone. What a fabulous machine. You really set the standard on your rebuilds, a high standard indeed. Excellent work.

I've placed this thread in the "Major Rebuilds" sticky in this section as well. The first Pratt & Whitney added there. Anyone looking for this thread in the future can find it easily.

I appreciate the effort you put into this thread as well. Sometimes it can be real work. I'm sure the entire community would love to see your other work too as time prevails. Thanks for taking us through the journey.
Thanks for your encouragement for me to do this post. And also for your advice and commentary along the way.

It has given me a new respect for those that rebuild machines and document it in this forum. There is more to it than I would have guessed.
 
I said earlier I would talk about painting, but I’m not sure how much interest there is in that or how much detail to provide. But I’m willing to respond to any questions there are about it.
 
I shared the Pratt & Whitney’s tolerances in an earlier thread. (Link to that thread: https://www.practicalmachinist.com/...-12c-restoration-pictures.402002/post-3926060) After I moved it into place and did a good long term leveling, the machine is probably a little better than I stated there – something in the range of .00015 to .0002 over about 8-9” or so and something similar between centers.

The tailstock points up a couple tenths and towards the operator a couple of tenths. For these reasons and others, I decided it didn’t need a rebuild. So, I called it a restore. I know the terms mean different things to different people. About the only part of the machine as far as alignment that needed attention was the compound – which I did find odd.
That tailstock is probably just as it should be. If you look at the “ Schlesinger “ charts he recommended that the tailstock should point upwards and towards the operator by about 0.0005”. That’s to counteract the weight of the work, when you’re working between centre of course, and to counteract tool push off in the horizontal plane respectively. That would be with a 10” test bar in the tailstock barrel.

Regards Tyrone.
 
The tailstock points up a couple tenths and towards the operator a couple of tenths. For these reasons and others, I decided it didn’t need a rebuild. So, I called it a restore. I know the terms mean different things to different people. About the only part of the machine as far as alignment that needed attention was the compound – which I did find odd.
This Pratt& Whitney lathe may have done repeat jobs that used the compound more than carriage travel or needed tailstock use. Wear often tells a story.
My 32" A. Pacemaker has little compound screw or cross feed screw wear, but the tailstock hand crank gear shows heavy wear. I'm guessing heavy deep drilling use on my lathe. Sometimes machinery had very specified repeat jobs in a workplace.
This isn't something that you guys don't already know but I don't see
it discussed much.
With the attention to detail this lathe was given it will live another long life.
Weather its A restoration or a rebuild with machinery that's in very good condition to start with the line between the two is fine. Thats if it's done to these standards. You repaired everything that needed attention and more.

Tyrone
I like buying a machine with original paint. It tells the story of how it was used or abused. Often, it's a good look but I always screw that look up by painting it. :sick:
Although my paint jobs aren't sloppy.

Tailstocks paint mimics an original paint job. It's not so thick and shiny that it looks like plastic. I think that's the difference. It's not a trailer queen show car but it's beautifully done.
 
Last edited:
I said earlier I would talk about painting, but I’m not sure how much interest there is in that or how much detail to provide. But I’m willing to respond to any questions there are about it.
I think there would be a lot of interest. Most of us can't reproduce the look you seem to do regularly. :D

I know I put a lot of time into machines that I'm either getting up and operational, or some rebuilding. Including a pretty fair amount of time on prep and paint. Looking at your work, I'm thinking I'd have to multiply my time by 4. And historically, I'd say that's a truism on any kind of paint or finish work. Its mostly about the prep work, and how far, or how much time you want to put in.

But maybe you have some tricks, or updated materials like the thick filler primer we don't know about. I'd be real interested to know what processes or routines you do in getting that new machine look you get.
 
The topic of how I paint machine tools including the Pratt & Whitney is lengthy, but it’s the details that make a difference. I’ll break it into multiple posts to try to make it more readable.

I’m not a professional painter or paint expert. However, one of the reasons I decided to post this is that I figure many who are interested in this subject on this forum aren’t either. I generally get decent results, and I’m confident that others can too.

First thing to remember is that I consider a good paint job to be a byproduct of a refresh or a rebuild of a machine. What I mean is the quality of the paint job is proportional to the amount of disassembly done. It is easier to prep and paint small individual parts than to try to mask a large machine made up of intricate parts. When you paint a machine that is not disassembled, it can wind up with too much paint in some areas and not enough in others. This is how you get runs and overspray.

I’ll divide this into three sections: 1) Materials and tools, 2) Machine preparation, and 3) Painting.

1) Material and Tools

I’ve included some pictures of the materials I use. Through the years I’ve tried several paints but finally settled on Anchor Paint’s Saf-T-Gard I or II with a cyanalite hardener. This paint seems to be durable, relatively low cost, and easy to touch up or repaint. The hardener I use is Anchor’s Polyurethane Converter J1100. Using a hardener allows me to change ratios from an 8:1 full strength which is very hard to a 16:1 half strength which has more chip resistance.

I know some people are reluctant to use cyanalite, but if you are careful about ventilation and safety equipment, I’ve never had a problem. The one thing to keep in mind is if you miss a little part and you’ve already taken your mask off, don’t think “I’ll just shoot the one little part without a mask.” You cannot do that. Always use an appropriate respirator. I use two North half-mask respirators. One has a P100 cartridges which is used only for sanding. The other has a P100 cartridges with charcoal which is only used for painting. The reason I use charcoal version is that it removes the paint odor. If you smell paint, you’ll know you have a problem with your filter. I also use a Tyvek full white suit with hood and nitrile gloves that I get from Harbor Freight.

I use Evercoat Rage Gold filler. It is easy to sand, relatively soft, and sticks to about anything. I experimented with harder fillers, but they are harder to sand and if you drop a crescent wrench it chips it regardless of the type of filler used.

For sandpaper I use Indasa Rhynostick Rolls which I buy from Eastwood. I use 80, 120, 180, 220 and 320 grits. This sandpaper has a sticky back which can be folded over on itself making it easy to hold. It’s expensive but cuts quickly and lasts a long time.

I use either Evercoat Feather Fill primer or Eastwood High Build Self-Etching primer in aerosol cans and by the quart applied via a spray gun depending on the size of the part. This goes on after the filler work is done.

The other primer I use is Anchor Quick Dry Gray Primer which goes over the feather fill coat. This is important because the feather fill primer is porous. I use the Quick Dry Primer not only because it dries quickly, but when you paint intricate parts, it is easy to get too much primer in small areas which causes cure problems (i.e. it leaves it soft). If you spray over an uncured soft primer, you’ll get peeling or cracks. This primer helps you avoid some of those problems.

I use is Anchor J1131 Synthetic paint thinner. It works well in a variety of different temperatures and works with the primers and paint.

When I mask parts, I use low stick masking tape, box of razor blades and a full bucket of rubber and cork plugs ranging in size from about ¼” to 2” in diameter. I use these to plug holes and bearing bores. It is important to keep this paint off precision surfaces as it can be difficult to remove when dry. Also keep several rolls of round foam weather insulation. This can be put in bolt holes and cut flush with a razor blade.

The spray gun I use is a 3M Accuspray. For general painting I use the 1.4mm head and the larger heads for primers and fillers. The heads are plastic, come in different nozzle sizes and are disposable (i.e. pitch instead clean). The gun also has liners and strainer built into the disposable cups. This makes clean up very easy, requires very little solvent and allows for quick color changes. The gun is very simple to adjust. It has a fan control which I use one turn open; fluid control with 3 turns open at 20 PSI trigger down and hold. It does a remarkably high-quality job for being mostly plastic and disposable.

One other tool… Most machine tools have metal tags that are held on by little brad screws. These can be difficult to remove without destroying the tag. I use a wood chisel that has been ground down to a long, thin wedge with a small square notch in the center (1/8” x ¼”). The leading edge is sharp. This allows you to get under the tag’s edge and pry up the brad without damaging the tag. If you don’t want to damage existing filler and paint, stick a piece of poster board under the heal first. This always works. These metal tags should be removed because they are harbinger of oil, the nemesis of a good paint job.

There are four power tools I use which are a belt grinder with a medium Scotch-Brite belt, a buffer which I use with only two compounds that I keep separate on two different wheels, and a two wire buffers which I keep very soft wire wheels on. I keep all of these away from precision surfaces, but there are many other places these can be used. The power tool is a power washer as mentioned in an earlier post. I use it on bases, chip trays, beds and columns – things that all moving parts can be removed first. I usually keep it away from headstocks, saddles, aprons, those kind of things.
 

Attachments

  • 0194.jpg
    0194.jpg
    302.7 KB · Views: 22
  • 0195.jpg
    0195.jpg
    273.6 KB · Views: 19
  • 0196.jpg
    0196.jpg
    355.4 KB · Views: 17
  • 0197.jpg
    0197.jpg
    341.4 KB · Views: 18
  • 0476.jpg
    0476.jpg
    356.6 KB · Views: 18
  • 0477.jpg
    0477.jpg
    313.7 KB · Views: 17
  • IMG_0478.jpg
    IMG_0478.jpg
    928.1 KB · Views: 18
  • IMG_0479.jpg
    IMG_0479.jpg
    867.9 KB · Views: 21
2) Machine preparation

First thing I do even before I disassemble anything is to give the machine a good cleaning using lacquer thinner with white rags. I then break the machine into subsections. For lathes this is headstock and bed, apron and saddle, pedestals or base, tailstock, and taper attachment. Each section is its own project. Mills, drills, grinders, and jib bores are sectioned in the same general manner.

If possible, I use a degreaser and power washer on the bases. On more sensitive parts I use lacquer thinner and brake cleaner. I remove all old paint by either lacquer thinner and/or sanding. I try to leave the original filler intact wherever possible. Oil contamination will of course require you to go to cast iron.

One word of caution… Many of these old machines used asbestos as a binder in the filler. It makes for a hard filler that is easily sandable. If you must sand these machines, it is best to do it by wet sanding. I found many of the old fillers are better than anything you can find now so try to leave them.

Next, I begin filling with the Rage Gold and sanding with 80 grit. Then sequential filling with less material and finer papers. When finally satisfied, I will spray the High Build primer. If you have any oil contamination, it may take 24 hours or more to appear and will often appear as a slight wet or dark spot. Draw a circle around it with a magic marker about 4 to 5 times larger than the spot, dig it out and start again.

When everything is covered with the primer and sanded with 320 grit paper, the High Build primer will fill in any fine scratches left from sanding. From there clean and remove all dusts with lint free rags and shoot your Quick Dry Primer. I usually wait 24 hours to make sure all areas are dry. You should not be able to dent anywhere with your fingernail. Any areas that feel gritty or over sprayed should be sanded with 400 grit wet/dry paper. Sand it dry. Then clean again. Any place you might have that has not cured, take a white terry cloth and lacquer thinner and gently remove some thickness of the primer. When it dries, sand with 400 grit paper and spray that spot with a good quality quick drying gray aerosol can primer. We are now about ready to paint

A pallet jack and a couple of pallets are helpful items to move around parts. You can also rig 2x4 frame with arms for hanging small parts. I use aluminum electric fence wire. It is cheap and pliable.
 
3) Painting

A few words about mixing paint, hardener and thinner. An example, put in 16 ounces of paint. In this case I need 2 ounces of hardener. I’ll pour the hardener in clear, disposable cup and mark a line at the 1 and 2 ounce mark. I’ll mark up several of these disposable cups this way. This makes it quick to mix up additional batches minimizing paint waste. Leave enough room when mixing paint for the hardener and thinner. When it is cold, you’ll add more thinner to avoid orange peel. But too much thinner will cause runs and thins the paint too much. You have to find a happy medium somewhere in between.

I usually apply 3 to 4 coats. When applying the first coat it is important to ensure complete coverage of the part hitting all of the nooks and crannies. You are not worrying about thickness of this coat. After each coat, let it dry until it becomes tacky to the touch. This is very important.

The second coat is the first wet coat. This means heavier application of paint until you get a wet appearance. Let it dry until tacky. If the fourth coat is the finish, then the third coat would be a repeat of coat #2. On the fourth and final coat, I usually back up a little bit and spray more broadly until the paint has a wet sheen.

A brief word about potential problems.

I paint outdoors or in an open door with a slight draft pulling outside. Bugs, occasionally drifting cottonwood tree seeds, etc. can happen. Two things I always keep handy. A pair of long nose tweezers and small foam brush. If you get a bug that decides to take a swim, you can pluck him out while the paint is still wet, dip foam brush in a small out of thinned paint and carefully pull it over the blemish. Then recoat with one more spray. If you’re lucky, you won’t be able to find it back. If you’re not lucky, you may have to wait 24 hours, sand and recoat.

It is important to get the masking tape off within about 24 hours. As the paint dries, it tends to grab it. One of the pluses of this paint for machine tools is that it can be carefully handled in 24 hours, assembled in 48 hours and rigged on in about a week.

The reason I apply the next coat to a tacky surface is if you paint too many coats too quickly, the paint will begin to run in a “curtain” fashion.

The time between coats varies with temperature. In hot weather you can apply the next coat almost as you can get done shooting the previous coat on several parts. In cooler temperatures you may have to wait up to 10 to 20 minutes. One tip is if you have less experience painting, don’t try to paint too many items at once. With more experience, you can manage more items in one session.

In 24 to 48 hours you can use polishing compounds to remove any overspray if needed.

This paint tends to need a little temperature to start to harden. At least close to 70 degrees. If fact both hardener and mixed paint can be kept under refrigeration for up to a week with no issues. The paint will eventually turn solid.

I know this is a long and perhaps too many details, but good paint results are about details. And this is the kind of information I wish someone had shared with me when I got started.

I've included some pictures of other machines I've rebuilt and painted.
 

Attachments

  • IMG_0480.jpg
    IMG_0480.jpg
    87.8 KB · Views: 53
  • IMG_0481.jpg
    IMG_0481.jpg
    92.6 KB · Views: 55
  • IMG_0482.jpg
    IMG_0482.jpg
    88.6 KB · Views: 58
  • IMG_0484.jpg
    IMG_0484.jpg
    83.6 KB · Views: 59
  • IMG_0483.jpg
    IMG_0483.jpg
    89.2 KB · Views: 56
  • IMG_0485.jpg
    IMG_0485.jpg
    89.1 KB · Views: 53
  • IMG_0486.jpg
    IMG_0486.jpg
    105.4 KB · Views: 52
  • IMG_0487.jpg
    IMG_0487.jpg
    82.7 KB · Views: 53
  • IMG_0488.jpg
    IMG_0488.jpg
    102.5 KB · Views: 52
Last edited:
Great write up and pictures. How did you do the covers for the Moore? Dave
Thanks.

The way and the dial covers are rubberized vinyl. They are attached by a two-piece frame inside and outside with the cover material sandwiched in between and fastened together with screws. At the bottom of the brackets on each side there is a screw that holds the frames to the saddle. This was Moore’s original setup – I just changed the material. Originally, I tried Buna-N sheets, but this attracted dirt so I settled on the rubberized vinyl.

I also made a cover at the very top of the machine for the open slot in that top cover. It just helps keep out that much more dirt in the gearing up there.
 
Thanks so much for sharing the journey on this. You did a remarkable job on this machine. I just picked up a P&W model 12c, (same color and everything) and am planning to restore it as well. I'll definitely be referring to this along the way. In regards to one of your first posts, with the scale while lifting the machine, am I correct to assume these are all about 3,400 lbs instead of the listed 2,600 lbs that the manual states? Wouldn't suprise me nonetheless.
 
Thanks so much for sharing the journey on this. You did a remarkable job on this machine. I just picked up a P&W model 12c, (same color and everything) and am planning to restore it as well. I'll definitely be referring to this along the way. In regards to one of your first posts, with the scale while lifting the machine, am I correct to assume these are all about 3,400 lbs instead of the listed 2,600 lbs that the manual states? Wouldn't suprise me nonetheless.

I know that the longer beds would of course weigh more. And I think in the Pratt & Whitney brochure they list those weights. How accurate they are, I don’t know. I do know that I weigh all of my machines and many of their parts, and I have stated somewhere in an earlier post that at least among the machines I have, the old American machines tend to be heavier than stated. Possibly because they weighed them without the electrics or motors. There may have been other reasons, too.

Congratulations on your 12c. How about some pictures?
 
Last edited:
I know that the longer beds would of course way more. And I think in the Pratt & Whitney brochure they list those weights. How accurate they are, I don’t know. I do know that I weigh all of my machines and many of their parts, and I have stated somewhere in an earlier post that at least among the machines I have, the old American machines tend to be heavier than stated. Possibly because they weighed them without the electrics or motors. There may have been other reasons, too.

Congratulations on your 12c. How about some pictures?
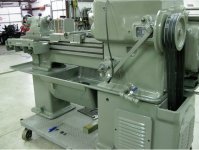
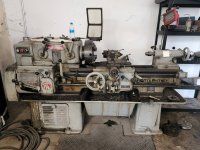
Thanks, I haven't got it in its final resting place, but it was hooked to power when I bought it, so I was able to try everything out. This is the day I bought it, just before loading it up. Came with a really nice condition 12" 4 jaw bison chuck, and an older 9" Burnerd 3 jaw chuck, but no adapter for the 3 jaw. I got a good deal on a Pratt Burnerd 12" 3 jaw super precision chuck though, model 1223500 so I will probably never use the old Burnerd chuck. This lathe was used in a diesel machine shop, and they apparently used it for working on pistons. They were moving the shop and needed it out of the way, so I got it for $1,000. I feel like I got a heck of a deal on it, and everything seems in great shape, just dirty.
 

Attachments

  • Compress_20220809_143837_7120.jpg
    Compress_20220809_143837_7120.jpg
    937.3 KB · Views: 36
Last edited:


Back
Top