What's new
What's new

Restoration of Gaertner Toolmaker Microscope

Thornewmexico

Aluminum
Joined
Aug 11, 2011
Location
SW, USA
I have wanted a toolmaker microscope for a while. Mitutoyo toolmaker microscopes always went for too much to interest me at auction. Specialty Screw Machine Products in Lancaster, PA was auctioning off their toolmaker scopes, and the first one went for a relatively low amount of money. I bid on this one which looked pretty complete, and was successful for a bid of only $100. The shipping agent charged me about $250 for shipping because it was much heavier (85 pounds) than I would have ever guessed from a web picture, and it was somewhat larger than I would have thought at 13" x 17" x 19". The resulting box and padding was quite large. The scope was packed with foam padding about 2" thick on all sides and arrived undamaged. This is what it looked like in the auction pic:As purchased.jpg

Survey of the scope showed that there was the expected XY movement table, with a means for limited rotation around the Z and X Axis. Including the focus mechanism (Z axis), I count five degrees of freedom of movement. As far as function, the X axis moved okay, but the Y axis was virtually frozen in place. It was very dirty and sticky, apparently covered with dried coolant residue and lubricating oil. It also had none of the three lights it should have had.

This is what I have learned to this point:

Gaertner Scientific Corporation has been around for a long time. They are still there in the Chicago area, but have changed ownership over the years. Their current model of toolmaker scope was about $19K, with all sorts of bells and whistles included at no extra charge. I called them, and was somewhat disappointed when I was told that the scope I purchased was no longer supported by Gaertner in anyway. There was no information available regarding this scope, not even a manual. All the people who knew about this scope were dead. Then the person I was speaking to abruptly hung up. Well! I might as well have bought something from China. I decided to continue my quest despite the shocking degree of rudeness I had just been subjected to.

At first I thought the scope while at the factroy was merely placed near a place where coolant was used. However, when I started disassembly, I found just as much dried coolant inside the scope as on the outside. In addition, while not covered in chips, it had a had a small amount of chips, some inside. Also, there were tiny parts found inside. Some of these parts had diameters of 0.025". The auction also sold a bunch of tiny watchmaker lathes. I suspect this scope was used to visualize parts during the machining process, which would account for the chips, parts and coolant residue. A representative picture of the base after disassembly showing dried coolant inside the scope base:
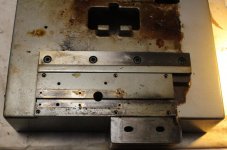
Dirty Base.jpg

As I was disassembling the scope, I realized this is a very complicated device. There were eight large iron castings with at least two smaller ones made of bronze. The XY axes move on individual cylindrical roller bearings. The XY movement action when freed up from the dirty /stuck micrometer screws and cables was very smooth with almost no effort required to move it. There is a cable system which can be adjusted to permit automatic return to a starting XY position. There is an option of measurement with gage blocks on the X axis. I didn't find a means of measuring angles yet. I might be missing a reticle, or perhaps the scope was too dirty to see it. I'll know more when I get this thing reassembled. This scope has +/- 300 parts. Construction techniques include casting, pressing, stamping, peening, soldering, and machining (EDIT: also grinding, heat treating and scraping). I originally heard this description applied to the Hardinge HLVH lathe, but I think it applies to this scope also: It was made to a specification, not a price point. I have not seen everything by any means, but I would say this is one of the most complicated measurement machines I have ever seen, certainly the most complicated one I ever took apart.

These are pictures of the cleaned parts.

Cleaned up iron castings, some partially assembled:
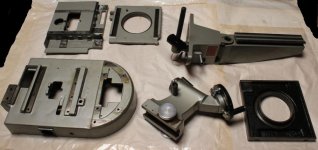
Castings Cleaned Up.jpg

Smaller Parts, some partially assembled:
Smaller Parts.jpg

The fasteners, bearings, and other small parts. Red lid has parts found loose in the scope.
Fasteners, Bearings, Etc..jpg

I am hoping I took enough pictures during disassembly to reassemble this thing. Just to be safe, I was at an estate sale (described recently in a different thread) where there was a similar Gaertner scope for sale at a bargain price, so I bought that one also. It should help with reassembly. Since both of these are missing a few parts, I might use it as a donor for this one.
 
Last edited:
Gaertner Toolmaker Microscope is a great instrument and it is nice to see it restored. Please show us the finished project.
At one time I've performed a similar rebuilding on a Leitz toolmaker microscope. I am using it quite often in my shop and it is a pleasure to use. By the way, I've replaced the original illumination light bulbs with LEDs.
 
Questions

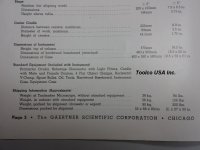
I have searched for an instruction, parts diagram, sales brochure, etc. for this scope. I have found an icon showing a sales brochure, but the link it lead to was broken. I found a spec sheet, but suspect it is for one of Gaertner's more modern scopes as the listed X Axis movement is 4 inches, and my scope would only have a max of 2.5 inches, probably less when assembled.Gaertner Spec Sheet top.JPGGaertner Spec Sheet bottom.JPG Does anyone have more written information about this scope, or know where I might find it?

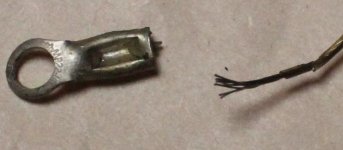
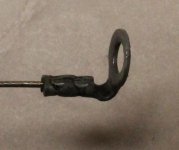
So far I only had one part self disassemble (break). It might have been destined to break when looking at the end of the cable. This is the end of a cable that functions as an automatic return mechanism for the table. It would normally move an inch or two at slow speed, and be subjected to low forces directed along the axis of the cable during movement. The connector broke off of the cable. It looks very much like a ten cent electrical connector. The first two pictures are of the cable connector top side and bottom side. The third picture is of the unbroken connector. Is it really as simple as an electrical connector crimped on using the usual crimper? Or, is this a specialty connector requiring a specialty crimper? IMG_4217.jpgIMG_4216.jpgIMG_4218.jpg I found a few hints that the scope had been previously opened, so maybe the broken connector is really a cheapo ten cent connector, and the unbroken one is an original as they appear somewhat different.
 
Questions about lubrication.

There are four oiling spots. But there seems to be a requirement for lubrication in other spots.

There are two micrometer type screws for the XY table. Each end of the screws with a simple plain bearing would receive oil in the spots labeled oil. However, the micrometer screw also almost surely requires lubrication. I doubt sufficient lubrication would reach the screw from the nearby oil ports. What would be good to use? What would be best to use? I have white #2 lithium based grease and suspect this would work fine, but is there a better choice? The attached picture shows one of the two micrometer adjustment screws. The hole in the brass piece with two nearby screw heads is where oil would go. IMG_4221.jpg

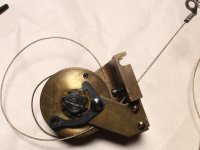
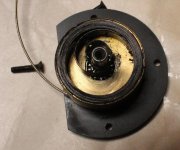
There are two cables with spring actuated cable retraction mechanisms. I opened one of them up, and there is a long watch type spring inside. It had some hardened grease along with some still soft grease. I removed as much as possible without removing the spring. I attach pictures of both spring devices. Is this another job for white #2 lithium based grease.IMG_4220.jpgIMG_4219.jpg Would a #1 grease be better for this?

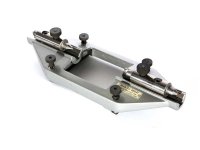
There are four sliding bearings of this type: IMG_4226.jpgIMG_4225.jpg Is lithium #2 a good choice for this also?

This scope is very difficult to disassemble, and likely harder to put back together. I hope to never have to do this again. I want to do something that lasts for the next thirty years at least.
 
Electrical crimp does not have much pull holding force. For similar applications I find jagwire cable crimper as used in bicycles much better. The tool and hardware are commonly available. I do not know the size of your cable, but if it thinner than bicycle, best are proper steel cable crimps that exist in many sizes.
 
Thornewmexico --

Be wary of white greases, as some of them harden almost like concrete. In my experience, Pennzoil 705 has been the most prone to petrification, but it's certainly not the only one that hardens. That said, I've used Lubriplate 105, a very soft (NLGI #0 if I'm remembering correctly) calcium-soap thickened grease that's commonly used as an automotive-engine assembly lube for decades and never noticed it hardening. Incidentally, Lubriplate is a brand name, and not all Lubriplate-brand greases are white greases, nor are all white greases Lubriplate products.

I'd also suggest that you hesitate use any grease stiffer than a NLGI #0 grease on the roller bearings or retraction springs, and that an "aircraft instrument oil" meeting MIL-PRF-6085 (Aeroshell 12 or equivalent) might be a better choice than the grease. The best way I've found to procure a small quantity of aircraft lube is to visit the Fixed Base Operator (FBO) at a local airport, but your chance of success is VASTLY increased by taking a small scrupulously-clean lidded container, an equally-clean spatula if you're after grease, and a pair of disposable nitrile gloves. I always take a cold six-pack of Dr. Pepper and offer a few bucks, but the FBO folks have been so happy that I bring the container, spatula, and gloves that they've always refused any payment beyond a single can of soda. If MIL-PRF-6085 isn't available, a light spindle oil such as Mobil's Velocite 6 or 10 would be a reasonable alternative.

It's worth mentioning that the MIL-PRF-6085 is a fully-synthetic oil that will attack some rubbers and paints.

John
 
I've got an earlier black wrinkle finish version. Great scopes but I've never found docs of any type. I'd lube everything with Superlube oil or PTFE grease. They don't migrate much and have a low evap rate. The coolest feature, IMO, is the tilting nut support so you can calibrate the lead screws to near zero error. Most of the thing is common sense. The illumination of old is near to useless, so convert it to LEDs or add a different light source.

Ha! I also discovered the Pennzoil 705 epoxy secret at a place I worked for years ago. We lubed some products with it and they came back years later impossible to disassemble.
 
The broken one is an electrical connector as evident by the hollow tube with a dent in it.

The non broken one has fingers that are rolled over the wire.

Also may be electrical but different type.

Google wire rope hardware or visit someplace that works on aircraft.

The broken one had fail of cable likely due to shearing of crimper or from previous repair.

Light crimp and epoxy is one option too.

Sent from my SAMSUNG-SGH-I337Z using Tapatalk
 
Thank you for documenting the rebuild! That's great to see the pieces.
I have an early Black wrinkle model scope as well. I was lucky to get the table v block and centers attachment. I called Gaertner a few years ago and got a cold shoulder. The gentleman i spoke too did say my model was built in the early 1940,s for a cost of around $2,500. The fit and finish on the scope is impeccable, it is a work of art.
It is also extremely accurate, i believe within a tenth.

I did buy a manual from an Ebay seller that had the same model. I'll try and get it scanned soon. It states to oil the ports every six months, no type specified. I would suspect a fine instrument oil or spindle oil would be fine. Over oiling may just attract dust.

I do need to convert the lights to something modern, i would like to see if anyone has an example of a conversion.

Scope.jpg
 
Progress is being made.

Many fine posts have answered some of my questions, but more have been raised.

I read the applicable parts of Precision Measurement and Gaging Techniques by William Grohe. In it he describes the basic workings of the scope, and confirmed some of my suspicions about the mechanism of operation. I have been having problems with the eye piece protractor systems, which I will discuss after a bit more work.

My concerns about oils / greases are will they stay in place,separate, gum up / become sticky, harden, be overly viscous (cause excessive friction), be reasonably available, creep onto optical components, cause damage to metal or other surrounding structures such as paint, stink, and probably more. I checked into Aeroshell 12. Amazon sells it in a gallon size only at about $130 plus about $30 shipping, which puts this into a not realistically available category. I haven't made the trip to the Albuquerque Sunport yet. I guess I would go to the general aviation section of the airport, but have no idea of how to find a 'Fixed Base Operator' without running afoul of security. More research here is needed. Lubriplate 105 is only about $10 at O'Reilly Auto Parts, but several others warned against white lithium grease. Maybe only the higher number NGLI grades harden? I'm still reading about this lube issue.

The pictures posted by jhruska and MCritchley both show a device mounted on the stage of the scope which functions as a set of bench centers. I found a separate picture of this device: Gaertner toolmaker microscope centers.jpg . This device appears to have built in T-slot nuts for extra ease of use. I was thinking about the degrees of freedom that this scope would have with the scope centers in place. The scope would have X and Y micrometer / X axis gage block capabilities, the stage would rotate on the Z axis, the upright portion of the scope would rotate on the Y axis and the Centers would permit part rotation on the X axis. Z axis linear movement would be limited to focus. So within the limitations of the scope, there is XYZ linear movement, and Pitch, Yaw and Roll. Could one ask for any more?

Well in case you did want more than six degrees of freedom, the chapter section by Grohe mentions at the end several attachments besides the scope centers. If I understand him correctly, there is a something like a rotary table, hold down clamps, V blocks, a spotting attachment for making punch marks, a camera adapter and a device to convert the scope into an optical comparator. I am not sure if this is a standard feature or an option. (EDIT: In the picture on page 109 of the book by Grohe, he has a diagram showing two colored lights being used to light up a work piece. This might be sort of easy to do with LEDs having color options to them.)I saw a Gaertner scope with a projection device, but didn't download it. If I find it again, I will post it. If anyone knows anything about these other attachments, or has pictures, please post them.
 
Eye piece and protractor system

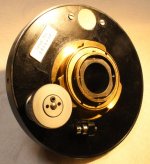
The eye piece / protractor system is made can be used as normal ocular in a microscope to view the object of interest. It also offers two angle measurement options. The quick angle measurement system consists of two reticles. One reticle has a single line line down the middle, and the other has a similar line down the middle with a scale around the periphery labeled in degrees. The dial on the front face is turned which moves the one reticle with respect to the other and a measurement is made. This is accurate to about 1 degree or perhaps a half a degree, which should be good for measuring relief angles and such. The other angle measurement system is more accurate but takes longer. One of the reticle lines seen in the ocular is aligned with the proper feature, and the silver colored knob on the back of the dial is rotated to align with the other chose feature in the work piece. Having previously used the small eyepiece to know the starting position and the finishing position gives the desired angular measurement. This is supposed to be accurate to about 1'. Like all measurements, I am sure practice and consistency contribute to accuracy. Here are some illustrative pictures:

IMG_4227.jpg IMG_4228.jpg The first picture shows the central usual ocular, the eyepiece for measurement of angles using the more accurate system, and hides / protects the glass plate with the engraved 360 degree protractor. The second picture shows the rear of the eye piece system. It has a part of the reticle suspension system in the center, the silver wheel rotates the hidden 360 degree protractor wheel, and the white plastic disk at the top is the light admittance portal for the 360 degree protractor wheel.

This picture shows the ocular parts. IMG_4229.jpg The two optical elements screw into the silver barrel, and slide in the black barrel. Focus is achieved by pulling or pushing on the eye piece, not by turning it.

This shows the reticles. IMG_4236.jpg They are hard to photograph due to the small size of the engravings and skill level. The two lines are on separate pieces of glass, but they abut one another near the focal plane of the eye piece shown above.

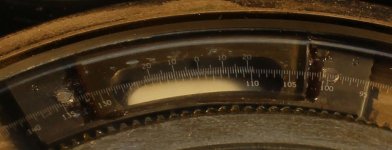
The next two pictures show the larger protractor wheel. IMG_4233.jpg (second picture in post below) The first picture shows a 15 tooth gear which meshes with a gear of approximately 180 teeth. The silver knob on the back is directly connected to the 15 tooth gear which turns the larger 180 tooth gear which directly turns the protractor wheel which is made of glass and engraved as shown in the first and second pictures. There is also a presumably made of glass engraved Vernier scale used to read degrees to 1' shown in the second picture.
 
Eye piece problem

I think I am just going to have to figure this one out on my own unless someone else has encountered this specific problem, and remembers how they fixed it. The picture two posts above with the reticles with one line on each of the two reticles is the most relevant. The two lines are supposed to be able to be rotated with respect to one another by use of a black dial which surrounds the eye piece and is shown two posts above. It is down close to the large black disk. When I first started to explore the scope, I think this rotated the expected 90 degrees. Now after having disassembled it, cleaned it and reassembled the unit,it is nearly impossible to turn the black dial the way it is supposed to turn. When I put some effort into it, the rotational force is transmitted to the large gear and the two reticles do not turn with respect to one another the way intended. I don't think I have a misunderstanding on this point as the text by Grohe describes this action in the last paragraph on page 107. My ideas so far are that I may have had some grunge get into the mechanism and selectively freeze this portion of the mechanism, or that because of close tolerances something that should be coaxial is no longer coaxial and binding. The most likely thing to be successful in my mind is to apply a spanner to the brass piece shown in the second picture of the second post above and loosen it a tiny bit. Fooling around too much here seems to be risky. I am going to leave it for now and think about it and hope for an answer from a member. Of note, the second Gaertner scope I have does not have the correct action of the two reticles either, and I have done almost nothing to this scope to cause the same problem. Therefore, I suspect this is a common problem or there is a coincidence of bad luck. Hopefully there is an easy solution. It should be noted that this whole scope was covered in greasy residue, and that included multiple ocular surfaces. How oil / grease got so far into the scope is a mystery to me. It was so bad that I could not see any of the reticles or graduated protractors when I started. I thought I might be missing pieces, but they were just hidden. I have no idea how the scope was usable given all the grease it had.
 
You want a grease with very little volatility; both to keep it from seizing and to keep optics clear. You can check the microscope forums for suggestions. I recently cleaned and replaced helical focusing grease with MicroLubrol Helimax XP upon such a recommendation. Amazon carries a small tin for $6.95 as well as Molykote and other light greases.

With respect to another question -- in replacing tungsten bulbs with LED for microscopes, the main trick is to get the LED diode array at the same place as the original tungsten filament.
 
Don't overthink lube, this is a simple mechanical device. The Superlube is easily available and should work fine. I like it because the evaporation rate is low and it doesn't seem to creep as badly as some other oils. The only thing I found difficult was replacing the rotary table. The clearance is near zero and it has to drop perfectly straight on. Don't force anything! As for the reticles, the rotating part should turn freely, almost loose. If it doesn't, there's some clearance problem or something's gummed up. Unless somebody else has had it apart, then all bets are off. I would be extra careful of the markings, as I don't know what they used. Probably not durable chrome on glass, but something lower tech. Maybe etched and filled?
 
Coincidence...OMT

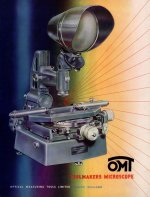
Your Gaertner is similar in many ways to a British OMT toolmakers microscope. I have one of these and use it fairly frequently. You might be interested in the old OMT/Newall catalogue
http://www.newall.org.uk/files/2016/03/OMT-Inspection-Equipment-catalogue-IG-63.compressed.pdf
I just happen to have had on my desk the full catalogue for the OMT when I read the above. I'll scan it at high resoltuion and put the whole thing here: should be ready in a couple of hours from now: http://www.lathes.co.uk/omt
Hopefully it will provide a little more information.
Tony.OMT-001a.jpg
 
Reticles of that era are most likely etch and fill or photographic, a very light wipe with alcohol should be safe.
For crosshairs Gaetner often used "spiderwebs", actual hair like filaments cemented at each end.

For micrometer leadscrew lube, stick with what the micrometer mfgs say to use: light machine oil ( ie: Starrett Tool and Instrument oil)


Back
Top