What's new
What's new

Resurrecting 1960 10EE with 460V Sabina drive

Rob: excellent idea.
Allows for a solution with no permanent modifications - as long as I can still align the gears.

Funny - that is exactly who they install windows.
Waterproof 3 sides - but know that water may sneak in somewhere - so leave the bottom open for drainage.

Crafty solution.
I like it!
 
While I wait for the control assembly board to be tested by Sabina, I figured I'd knock off a few minor fixes that are on my list.

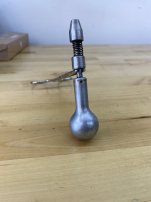
When I bought the machine, there was no knob for the tumbler gear changing lever.
Broken off.
271674-f7db623d9738fd2b26fa17416d08b4d4.jpg
While I did a bit of clean up for the older gentleman that sold me the machine, I came across the knob.
Seemed like a lucky find - he said it had been that way "for a long time"...

Since the machine is currently down, and I had a little spare time, I decided to take a closer look.
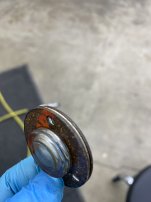
It appeared to me that someone had previously attempted a fix.
I suspect the knob was pulling off of the spring loaded stem.
Someone had crossed drilled and pinned the knob to the stem - and the stem had dutifully snapped in half right at the point where the cross drill and pin went though it.

The pin is visible here, if you look in the bore.
IMG_1919.JPG

Considered removing the pin, tapping and pulling out the broken off stem, and welding it back - but then realized that with all this surface area - some epoxy would likely do as well or better a job.
I used some acetone and a q-tip and then bonded it up - applying the epoxy to both surfaces.
Here it is drying - after a bit of cleaning.
IMG_1924 2.JPG
Put it back on - and it works very nicely.
The spring is not much stronger than a Bic pen - so I highly doubt it will overcome the epoxy.
IMG_1928.JPG
Question on knobs and handles: I am aware that the 10ee used a number of different materials over the years. Mine is a '60 model.
The dials and knobs appear to be factory plated with a low sheen silver of some kind. I can see a coper or brass undercoating where they wear (visible in the above picture). is there a "best practices" for polishing these without removing the plating? Can anyone educate me on what they are plated with? Thanks.
-CM
 
Last edited:
While I am waiting for my control board to be tested, I am starting on some of the maintenance work.
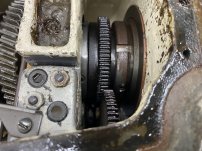
Drained oils today, and had a look inside the headstock.
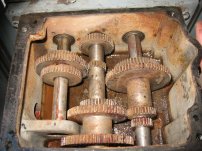
Was surprised to find - some not so nice oxidation on some of the gears.
The worst of it was the back side of the front spindle bearing and on the reverse shaft EE2891 I believe.

Here are some pictures.
Few questions to anyone who wants to give their POV.
- Is the light colored paint likely original - or from a rebuild? This machine was "remanufactured" in the 1970's for what ever that's worth.
- Besides the obvious muck - does anything stand out to your eyes? Were the original bearings that color?
- Are there any sealed bearings in this? I am aware there is some form of sealant between the front/rear spindle bearing reservoirs and the main reservoir. I was considering the effects of filling the center and or the sides with evapo-rust and letting it soak for a night - before flushing and scrubbing what I can reach with a brush. Suspect I could remove most/ all oxidation. Only concern would be that sealant. Thoughts?
- Best guess on cause? Water/condensation in my oil?

Thanks,
-CM


IMG_2065 2.jpg
Reverse shaft appears to also have some surface oxidation. IMG_2071 2.JPG
 
I am still considering how I want to tackle the rust that is on the top sides of my reverse shaft and the components on the spindle towards the nose, visible in the first picture posted above. Welcome any thoughts.

In the mean time - I'm cleaning out the headstock cavities.
To avoid oil running everywhere when removing sight glass - I used a power brake bleading kit through the fill point.
Worked nicely.

IMG_2098 3.JPG

In the mean time - I am cleaning out the head stock and sight glasses.
I know there are many posts on sight glass removal - however - they seem mostly to focus on the bezels.

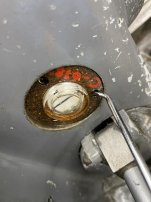
In my case, I was struggling with the actual sight glasses themselves.
The bezels came off fairly easily - using the soft punch/spinning method.
I was able to remove them in the end by using a bent pick tool, and rotating it so it was picking up the sight glass flange.
IMG_2105.JPG

The full sandwich then came out as one - without tearing any gaskets.
IMG_2114.JPG

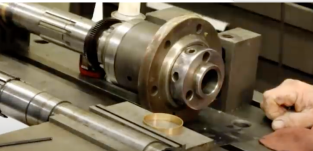
Having seen some corrosion in the main headset cavity, I wanted to look inside the other cavities.
Used a endoscope and got some pretty good results.
Short video of it here - kind of an interesting view I thought.

 
I think
While I am waiting for my control board to be tested, I am starting on some of the maintenance work.
Drained oils today, and had a look inside the headstock.
Was surprised to find - some not so nice oxidation on some of the gears.
...
I was considering the effects of filling the center and or the sides with evapo-rust and letting it soak for a night - before flushing and scrubbing what I can reach with a brush. Suspect I could remove most/ all oxidation. Only concern would be that sealant. Thoughts?
- Best guess on cause? Water/condensation in my oil?
...
Thanks,
-CM

...

Reverse shaft appears to also have some surface oxidation. View attachment 390365
I think that Evapo-Rust would be OK in the center headstock cavity and the QC gearbox, but I wouldn't use it in the spindle bearing reservoirs.

The idea that some sort of sealant was used around the forward and reverse clutch gear bushings is just a theory at this point. I don't think anyone has found any residue that proves it was actually used. The clearance of up to 0.0006" shown on one drawing suggests that sealant was needed, but that's it.

Your bushings appear to be correct. Round-dials used mostly cast iron bushings with splash lubrication. Lubrication problems with the clutch gears was apparently an ongoing problem that was finally solved by the oil lines found in square-dial 10EEs.
 
Evapo-Rust is water based. After you use it, the metal will rust immediately unless you coat it with some rust preventative like oil or paint. It will also distribute the rust particles all around the gear box. You will have a hard time cleaning it out. If you use Evapo-Rust on something oily, then the oil will keep the Evapo-Rust away from the rust.
I can't think of a way of getting rid of the rust without taking it apart.
 
I've used Evapo-Rust on a lot of things. It works by selective chelation. Essentially, the iron oxide would rather go into solution with the Evapo-Rust than stay on the metal. I DO NOT believe that it will spread the rust around in the gearbox; the rust stays in solution. Nor is it my experience that things treated with Evapo-Rust are prone to rapid rusting.

I've used it on gearboxes before. Here's a before and after photo of the feed gearbox on a Van Norman No. 12:
IMG_8924.jpg
IMG_9002.jpg
According to Evapo-Rust's FAQ it will work on oily parts, just not as well, which is consistent with my experience.

I would proceed as follows:
  1. Drain old oil
  2. Fill to the fill mark with kerosene (used kerosene if OK here). Use a hand pump to pull kerosene out of the bottom and direct it onto upper surfaces. Drain and repeat as necessary to get any sludge out.
  3. Fill with a solution of Simple Green or other degreaser. Use hand pump as in step #2. Do not let the degreaser sit.
  4. Immediately drain and flush with distilled water. This step helps reduce contamination of the Evapo-Rust, so that it can be reused.
  5. Immediately fill as full as possible with Evapo-Rust, staying well below the bottom of the spindle. Know that Evapo-Rust only works on things that are immersed in the solution, pumping it over upper surfaces won't work very well. It may take up to 8 hours to remove heavy rust.
  6. Drain, filter and keep the Evapo-Rust for your next project. I use old Evapo-Rust for heavy rust and keep fresh solution for delicate things.
  7. Immediately rinse with distilled water.
  8. Immediately rinse with fresh kerosene.
  9. Fill with inexpensive gear oil. Uses pump to circulate.
  10. Drain and fill with DTE Heavy Medium
Note that where you have heavy rust the metal will probably be pitted.
 
Last edited:
Gents, thanks for giving this one some thought.
Cal - I appreciate the detailed process suggestions.
As everyone can imagine - I've been having my own internal dialog on options/trade-offs/order of operations.

First - the head stock:

I have some experience with Evapo-rust - it can be exceptionally useful, but there are some things to watch out for.
As noted - it's water based.
Also, the dreaded "etch" line that occurs if things are partially submerged.
That's pertinent here - because at lease one of the most affected gears is EE1121 and EE1151 (I believe) is on the spindle shaft itself.

That said, my experience with Evapo-rust is minimal flash rust, and coating/bathing in WD40 or oil after rinse gives the parts good shelf life before assembly.
Seems like we are all on that page - but the question is what would be best process.

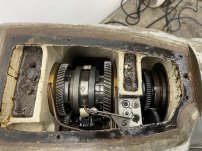
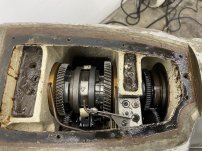
Below is my headstock (distant shot to orient - close up to see gear condition)
IMG_2065 4.jpg

Close up
IMG_2066 3.jpg

The rust affected components can be seen.

To attack these, Ive been considering filling the machine to a level that just submerges the cog depth, but sits below the bearing height, and having the machine rotate very slowly to bathe these parts.
(how I would rotate it - at this juncture - is a different topic...)

I've wondered if the Evapo-rust would run past EE-1124 (the copper colored spindle "race" (not sure its name), and into the front reservoir?Screen Shot 2023-03-17 at 11.22.51 PM.png
I also considered filling it lower, and using a fish pump and circulating the Evapo-rust - and "bathing" the affected gears with the recirculation hose.
Not sure if this will or won't have the desired affect.
Cal - sounds like you've had some less than successful experiences with it.
I've seen it done with success but on longer cycles with under body of automobiles.
However - some liquid would probably find its way into the bearings...

I understand everyone's reticence with putting water anywhere near the bearings.
With that said, its possible those bearing already have rust on them - and would benefit from a thorough bathing in Evapo-rust while slowly tumbling.
A lemonade from lemons opportunity.

My experience with bearings in Evaporust is quite good.
That said - even if my intention were to go ahead and submerge the bearings, then rinse and coat them (as per Cal), I'm not sure I could do it.

Reason: If the level in the main reservoir was filled to the top for example, wouldn't that liquid just run out the front and rear bearings and leak out of the machine where the spindle exits at the nose and rear?
I don't believe there are any rubber seals on any of the shafts as they pass through either the bearings or the headstock itself?

One possibility would be this bath method, followed by something like Cals rinse and coat method - but filling the kerosene all the way to the top of the reservoir - letting it spill/rinse out any areas that the evap-orust may have found its way to - then following that with the same treatment using oil.

Welcome feedback even if it's just to throw tomatoes...

Gear Box

Here - the gears and shafts look quite good to me overall.
There is some corrosion - but it seams to be at the castings - rather than the internal components.
I assume the same issue exists - if I were to try and completely fill this - the Evapo-rust would likely just flow out the bearings where the shafts penetrate the gear box castings?

Unless I plan to remove the gear box in total - I might not be able to attack the corrosion that is mostly high up.
So perhaps it's either remove and service or flush with kerosene, add fresh oil, and move on.
I am considering.

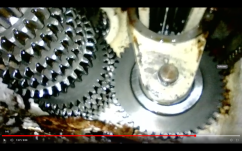
Stills from my video below showing gear box current condition.
Again - welcome critiques/counter points to what I am seeing.
(Video link here for convenience)
Screen Shot 2023-03-17 at 10.59.19 PM.png
Screen Shot 2023-03-17 at 10.59.57 PM.png
Screen Shot 2023-03-17 at 10.59.30 PM.png
 
Last edited:
I read the article on chelation, very interesting. I had assumed that the iron went into suspension and would therefore settle out over time. With chelation the iron is absorbed into a molecule which will stay in solution. However, the problem with getting water in everywhere remains, and the "etch" line issue makes that particularly tricky.
That said; if this is a "what have you got to lose" situation, then you have to weigh the effort of complete disassembly against the possibility of ruining some very expensive bearings. A third possibility is to leave the rust in place. It seems that no wearing surfaces are rusty, which is good.
 
That said; if this is a "what have you got to lose" situation, then you have to weigh the effort of complete disassembly against the possibility of ruining some very expensive bearings. A third possibility is to leave the rust in place. It seems that no wearing surfaces are rusty, which is good.
^ This, as the kids say these days.
The headstock may be best left with just a flush and perhaps brass brush treatment.
I don't love that - but it's on the menu as an option.

Still working to get my head around what the full assembly is.
Have looked at Cal's post here: https://www.practicalmachinist.com/forum/threads/10ee-rear-bearing-diagrams-changes.406274/

Cal - is there a document somewhere that shows the part names that aligns with the part numbers from the operators manual or your drawings?

It also appears that the spacer EE 2624 has a hole in it - for filling presumably from the reservoir.
Can someone educate me on how that is clocked when installed?
Facing down?
Screen Shot 2023-03-18 at 10.30.49 AM.png

One consideration I am pondering:
Fill the main cavity with kerosene and see where it flows to.
If this flows only to front and rear reservoirs, without spilling out of the rear and front of the machine at too high a rate - its feasible I could recirculate with fish pump, soak for 8+ hours, while the machine slowly rotated.

Sounds more complicated than it probably would be, to set up.
Long bath would wipe out my rust...and likely clean up and spot rust that may be inside my bearings.

Suppose I have to determine if I am creating more trouble then I'm solving for...
Thanks.
-CM
 
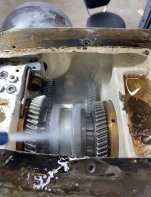
I decided to go after it the old fashioned way: brushing and scrubbing.
This is what it looked like before - you can see some fairly heavy corrosion on the revers gear shaft.
IMG_2154 2.jpg
I used a very soft wire long handled brush about the same as a toothbrush head in sized.
On the worst area - I used a scotchbrite wheel on a Dremel extension - very judiciously.
IMG_2155.JPG

I'm aware the scotchbrite can leave abrasives behind - so the next thing I did was get aggressive with rinsing it all down. Here I used a spray bottle so I could generate a little pressure to rinse.

IMG_2161.jpg

I put a jack under the tailstock end and lifted it to create some tilt for drainage - and then just sprayed and sprayed and sprayed - using a brush and paper towels to aid in wiping everything down.

After the kerosene spray down, I moved to WD40 in the same type bottle - and again sprayed everything down generously - engaging and disengaging the reverse gears to make sure I got it everyehwere.

I don't want to refill it yet with oil.
Need to make some decisions on any refinishing I will do before I refill it with oil.
WD40 is there to preserve it.

My plan is to do another kerosene bath and rinse, before using a cheep oil to rinse that, and then moving to the medium light circulating oil; when I'm ready to run it.

In the end - it won't win any concourse awards, but I did manage to clean out the reservoirs nicely and remove a significant amount of corrosion.


IMG_2165 2.jpg
 
...

Still working to get my head around what the full assembly is.
Have looked at Cal's post here: https://www.practicalmachinist.com/forum/threads/10ee-rear-bearing-diagrams-changes.406274/

Cal - is there a document somewhere that shows the part names that aligns with the part numbers from the operators manual or your drawings?

It also appears that the spacer EE 2624 has a hole in it - for filling presumably from the reservoir.
Can someone educate me on how that is clocked when installed?
Facing down?
View attachment 390558
...
Sorry for the slow response. The parts pictures and associated parts lists in the round-dial 10EE manual can help you figure out what most of the parts are called, but there's no publicly available cross reference between EE-nnnn part numbers and the part names.

The front bearing spacer is oriented with the opening at the bottom to allow oil to circulate from the reservoir to the bearings. On the rear, at 9 O'clock, is a slot that clocks the spacer, via a dog-point setscrew that comes in from the back of the headstock. The hole for the setscrew is usually painted over and hard to find, but it's there. New machines use a long screw that's flush with the back of the casting. Older machines usually have two screws, one that secures the spacer and one that's driven flush with the casting and acts as a plug.

If I had as much rust in the center headstock cavity as you have, I would pull the spindle and make sure that the corrosion didn't find its way in there. It's really not that big a deal to pull the spindle.
 
Cal - quite alright.
Appreciate your continued input.
The round dial documents are significantly better than the square dial - for images. Thanks!

I would pull the spindle and make sure that the corrosion didn't find its way in there.
I've been considering just that.

There is a lot of "new to me" here - though its getting more digestible as I handle the machine.
I've been reticent - concerned that perhaps spindle removal was sacrosanct.
Been watching videos where I can find them, and ended up handling it quite a bit this week cleaning.
Spindle doest seem so intimidating now.

So, agree with your suggestion - perhaps more a question of when, rather than if.
Two things holding me back.
1. I would like to get my control board back from Sabina - and ensure I have it all working.
2. I am warming myself up for a larger tear down and paint/refinish job.

Is there a particular thread that comes to mind on spindle removal?
( I've found the gear box removal how to that was written up by Dave907 https://www.practicalmachinist.com/forum/threads/square-dial-gearbox-removal.172793/ )

Thanks.
-CM
 
...

So, agree with your suggestion - perhaps more a question of when, rather than if.
Two things holding me back.
1. I would like to get my control board back from Sabina - and ensure I have it all working.
2. I am warming myself up for a larger tear down and paint/refinish job.

Is there a particular thread that comes to mind on spindle removal?
( I've found the gear box removal how to that was written up by Dave907 https://www.practicalmachinist.com/forum/threads/square-dial-gearbox-removal.172793/ )

Thanks.
-CM
You don't need the spindle to exercise the motor.

Grant's thread, Full tear down and Rebuild of a 10EE Round Dial, has a very detailed series of posts about removing the spindle. His machine is a round-dial, but most of the spindle details are the same:
Spindle removal starts here: post #453
Spindle bearing removal: post #580
The late Harry Bloom's square-dial 10EE rebuild is recommended reading for all 10EE restorers:
 
Thanks Cal.
I’ve been following Grants epic ride.
I’ll have a look at what Harry was so kind to have created.
Much appreciated.
- CM
 
Update: got my board back from Sabina.
Well, actually, what I got was a replacement board.
They had a new(ish) old stock on the shelf - and rather than pay to test and fix my old one - they sold me the existing.

They also said the SCR on the heat sink I found the bad diode on - was also bad.
I had tested that SCR on my bench with 12V - tested ok.
Suspect it was no good at full voltage.

It wouldn't surprise me if I find out in the end, my existing board is good.
I've put the new one in - and it behaved just as the old one had.
Did a bit more visual checking and found a broken capacitor - looks like it caught on the internal casting cross member when I slide the drawer out.
IMG_2374.JPG

Luckily - there was a matching one on my extra board - so I swapped it in.
Still wouldn't run for me tho.
Got on the phone with Sabina and they walked me through some additional tests.
We discovered low voltage on one of the legs - and I found a bad fuse.

Swapped that out and... Houston we have ignition.
Lathe is spinning again - and I am a happy camper!
Moving on to other fixes and repairs on the lathe - knowing I have it operational again.
Feels good.
-CM
 
Thanks.
Ran some tests with it.

The good news:
The concentricity/accuracy is remarkable.
Spindle bearings seem in good shape.
No visible leaking of lubricants when filled properly and leveled.

Areas that need addressing:
Some lag in the motor occurs under load/ taking big cuts.
There are some trim pots on the control board.
I am going to play with those as per manual to see if I can improve.

Additionally - there is some bearing noise coming out of the back gear box here:
IMG_2392 2.JPG
Will have to decide how to deal with that.

Would also like to get my old board back together as well.
Looking for a bit of help on ordering the right part.
Believe it is a capacitor.
Marked "0,47 uF/K 250V"
Believe there are a few different types of capacitors though.
Mr. CNC - can you help me identify the right one/type to replace with?


IMG_1742 2.jpg

Intend to strip the machine down starting in a couple weeks.
Clean, paint, service some key areas that need attention.
Will document here.
 
That looks like a typical film capacitor. This one should do;

However, those type of caps are generally long-lived. On old equipment, I am suspicious of all electrolytic caps. They contain a liquid that evaporates out over the years. Sometimes they blow out, which is obvious, but other times they just slowly loose capacitance as the electrolyte evaporates.
 
That looks like a typical film capacitor.
That was the term I was looking for ("film type").
Since the ones online didn't match the exact shape - I was cautious they might be different.
Thank you.

It didn't blow.
It scrubbed - against the casting inside the main body of the machine.
When my drawer closes - it would scuff - but I hadn't noticed.

There were scratch marks all over it - from past opening and closing.
This time - it must have caught the edge - and just ripped out.
Once I saw how close it was - I went in with an angle grinder and received the raised casting area a touch.

Read the Sabina manual - and played with the trim pots a bit today.
The machine felt like it wanted to run away on me if I turned the speed control too quickly.
Compared new board's settings to my old - and saw that the "taper" was set to 0 on the new board.
Spun it to the approximte position that the old board was at - and its much better.

The I.R. drop compensate is supposed to help with the slowing under load.
Didn't have time to cut anything - but now that I have the taper calming the motor - I will experiment with the I.R. compensation to see if I can tune it in a bit.

Feeling more confident in the workings of the unit.
Will be interested to see how well it controls the speed under load.

Curious - do the original Monarch controls maintain a highly regulated/steady speed when the machine experienced cutting loads?


Screen Shot 2023-04-02 at 5.53.16 PM.png


Back
Top