What's new
What's new

Rivett 1020S Restoration

Jon, regarding spare 6r collets, please take a look at my post where I list my extras and what I'm missing to see if any I need any of your extras.

Jeff in long beach

Ps. I thought you got a mix of hardinge and rivett?

Sent from my SM-G998U using Tapatalk
 
It looks like all the collets in that drawer are Rivett. There were several boxes with collets, the tool box also had randoms in it, I’ll have to get an inventory.
Jon, regarding spare 6r collets, please take a look at my post where I list my extras and what I'm missing to see if any I need any of your extras.

Jeff in long beach

Ps. I thought you got a mix of hardinge and rivett?

Sent from my SM-G998U using Tapatalk
 
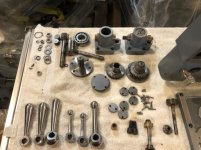
I made some headway on assembly of the headstock gearing, the previous owner replaced all the bearings and oil seals with new - pictures to come. It looks as if he was planning to paint the spindle front cover, top covers and then assemble them. Is that typical for a new machine? Or are they assembled and then painted?

Jon
 
I paint before assembly if possible. It might require touch up after but at least the screw heads are painted with the machine and the edges get paint. I usually paint color and then clearcoat so hopefully the color stays protected. Dave
 
Nice lathe and looks like a very fun project. Best of luck with the rebuild, you'll have a gem when finished.

A few things from a fellow Rivett (1030F) owner (apologies in advance for the essay, but I've been meaning to document some of this somewhere for ages):

1. They don't come with way wipers on the cross slide, I strongly recommend adding your own while you have it apart. I threw some together in CAD and machined them from aluminum, however I'd do them in brass today (looks better and brass isn't as abrasive as aluminum oxide). Luckily the boxy cross slide block is easy to hold for adding the relevant tapped holes.

2. On the F series (this might differ from your machine), there is a small gear for supporting the leadscrew to the right of the half nuts. This gear was clearly added as an afterthought; it is actually the component that limits the maximum carriage travel when it crashes into the end of the threads on the leadscrew. I took my leadscrew off and chased the threads farther to fix this (the leadscrew is unhardened and the halfnut can't reach these chased threads, so it's an easy-ish job). Check if your machine has this gear and be careful running the carriage to the limit of its travel at the tailstock end for the first time.

3. At the cost of a small reduction in spindle bore, you can adapt the Rivett to take 5C collets natively, without any major mods to the machine (you make an extension for the collet draw tube, remove the collet key in the spindle, then install a custom pressed in spindle taper adapter). I did this to mine (since I have 70+ 5C collets and no 6R) and it's great and easy to use, but I sometimes wonder if it was a mistake and I should've left it 6R and just used a 5C chuck instead.

4. VFD retrofit: I swapped mine to a VFD because my clutches were worn out and I don't like the vibration of the Reeves drive or waiting for it to shift RPM. I was just barely able to fit 2x 5.5kW metric frame* motors (I think I used 1800RPM). Larger wouldn't fit side-by-side, and I didn't want to deal with shifting the clutch if I kept just one motor. I added a microswitch to the headstock shifter knob and repurposed the FWD/REV contactor to switch the VFD between the open belt and backgear motors. This means the machine automatically swaps which motor is driven whenever I shift the back gear. Speed is adjusted via potentiometer, which as another 10ee owner testified is much more convenient. I added a bike disc brake to the back-gear motor pulley to allow me to lock the spindle when changing L-0 tooling. I've never had problems with the motors lacking power except in open belt and very low speeds, though my VFD doesn't enjoy running them past ~3000RPM so that's what my redline is. Hardware mods were simple; a couple custom pulleys, a couple custom motor mounts and a brake mount, and various drilled holes in the motor baseplate. Most of the work was wiring, which I've learned I hate. There's another use, Rusty Tool I believe, who has posted photos of his beautiful VFD retrofit, which more conventionally reused the original clutches.

*note if you do things my way, you need to use metric frame motors since those are the only ones which allow the wiring box to be repositioned into the necessary orientations.

5. You'll want to make a silly 3/4" NPT adapter to allow you to add oil to the gearbox once it's reassembled. Shame on Rivett for the inaccessibility of this fill port.

6. Be careful when reassembling the gearbox; one of the shifter knobs (lower left, I believe?) needs its gears properly timed with the shaft it controls, otherwise it disengages a control arm inside the QC gearbox, which requires you to remove the entire gearbox, take off the cover, re-engage the shifter arm, and then reassemble. The prior owner had done this to my lathe (maybe why it had gotten so little use), and it was stuck in only "#1 of 12", no matter which number you shifted the selector to. Sorry this description is so vague, it's been years since I fixed this and disassembled the gearbox, but if you study the mechanical drawings in the manual (vintagemachinery.org has them), you'll understand what I mean.

7. There's a small piece of bent spring steel in the apron, between the oil pump cam hexagon and the oil pump itself. This piece on my lathe was broken, and the corners of the cam hex were damaged by direct contact with the oil pump piston. Getting the cam hex out was a pain, so I fabbed a replacement piece of spring steel and reassembled everything. The oil pump works fine still, but I recommend you check your apron for this same piece of spring steel and ensure it's undamaged. Relatedly, the apron oil pump only works if the feedscrew is rotating. I usually warm up my lathe for a few minutes before use to get this oil circulating. Luckily the oil is distributed to the ways via felt wicks, so nothing runs dry if you don't run the feed rod for a little while.

8. There are O-rings everywhere on my Rivett, I was impressed how thorough they were with them. I replaced most of mine with fresh Viton orings, and luckily every one was a standard size easily available from McMaster.

Okay I think that's it, good luck with the machine and I'm sure someone here can answer if you have any more questions.

P.S. I would paint before reassembly, but I've never painted a machine before so don't trust my judgment there.
 
Halcohead,
Thanks for the advice/tips! very much appreciated. I'll be keeping the machine stock, it looks as if it had very few hours prior to being torn apart. Every bearing, seal and o-ring will be replaced during assembly. Carl (the previous owner) was overly meticulous with labeling and organization, what I've done thus far has been easier because of that. Good tip on the gearbox, that was assembled by Carl, I'll double check the alignment. And will be sure to add the way wipers and oil fill.

I have found one thing that seems odd, the bearings that support the clutches seem to be missing. Pictured below, they measure 25mm ID and 52mm OD, I can find the same size on McMaster, but not with the retaining clip. The fact they are metric was odd to me, was the normal to Rivett at the time to do this?

Bearing.jpg
 
Metric bearings have been almost standard on US machines ( almost is the key word here ) - at least on my 1930's and newer. I've run into imperial on some English machines but even they are mixed with metric. Even though rare, I fear finding imperial bearings as I know they will be difficult and expensive to source. If Rivett used many imperial bearings I would be surprised. Dave
 
Good to know and interesting. Carl replaced every other bearing expect these, it could be dur to the fact McMaster doesn't carry them. Has anyone here replaced these before??

-jon
 
It's not super clear from the drawing if this bearing should have the retaining ring or not, can anyone clarify please?

-jon
 
There are a couple more things that I found helpful in dealing with the Rivett. First regarding the headstock which is where I would start.

I’ve attached a crude drawing of a device I made which made installing the Rivett spindle easier as there are quite a few gears and bearings that install on the spindle as it is going back into the headstock. I hung this device from my gantry and trolleyed the gantry to install the spindle. (Which, by the way, if you don’t have a gantry, it is one of the best things I’ve ever used when working on a machine tool.)

Also, check all the headstock gears for burrs. The gears aren’t hardened, and the edges easily burr which will make shifting hard when they are installed. Also check the direct drive clutch at the back of the head stock for burrs.

I used Glyptal paint on the inside of the headstock prior to assembly. I also heated the headstock over night with a couple of 100w bulbs to ease spindle installation.

The second drawing attached is an end view of the headstock. The 1 through 6 numbering indicate the order of removal of the shafts and gear clusters in the headstock. Reverse this order for the install. Remember that shafts 1 and 2 must be removed before the spindle can be removed or installed.

One more note on spindle bearings… be sure to check their condition as this would be a good time to change them if needed.

If you do install new ones, be aware that Rivett used a custom preload, which means they used a set of non-matched bearings. The front flange bearing in my machine actually had a negative preload ground into this bearing which meant the spacers were .0015 different between the inner and outer spacers. Most of this difference was to deal with this negative preload. I came up with a way to measure the preload by using ground spacers on each side of the inner bearing races, stacking bearings and spacers as an assembly and measuring the difference with gauge blocks on a surface plate. This allowed the assembly to be slightly preloaded and allowed me to measure the difference between the new bearings and the old; therefore, giving the preload that Rivett had used. This gave me the new dimensions for the spacers to be ground for correct preload. There is much more to this, but this is something to be aware of. I can post another drawing of what I’m talking about, if needed.
 

Attachments

  • IMG_0329.jpg
    IMG_0329.jpg
    92.7 KB · Views: 43
  • IMG_0332.jpg
    IMG_0332.jpg
    92.8 KB · Views: 42
It's not super clear from the drawing if this bearing should have the retaining ring or not, can anyone clarify please?

-jon

I found bearings for my Rivett at EZ Bearing LLC. I talked to Darrel. Locate Ball Bearings also has these bearings and can save you money, but I’ve found that you need to be sure to check their condition.

I recommend setting the drive up on sawhorses, installing everything, hooking it up to electrical controls and running it there. It is much easier to adjust brake clearances and clutches while on stands. Also, I ended up having to reface my Reeves pulleys to eliminate a slight warpage. That required rebalancing. When you get everything they way you want it, pull it apart and repaint it. I installed my drive with a forklift.

The magnetic brake can be quieted if you regrind the magnet faces. Also, the Rivett’s Reeves drive is sensitive as to the brand of variable belts. It required four different ones before I found one that was both smooth and quiet. If you want, I can check what I used as I don’t recall it right now.

Darrel had the bearings in stock and shipped to my door a couple days later. I am concerned about the fit, they seem to be a tight transition fit which will make assembly difficult I'm sure.
It seems Carl collected a bunch of spares for this machine, including two sets of handles. Can anyone confirm if the smooth set is Rivett as well? I'm inclined to use them instead of the ball ended version.

Also - there's a lot of space between the clutch eccentric and thrust sleeve (name?) Is that correct? The drawing doesn'tRivett_8.jpgRivett_9.jpgRivett_10.jpgRivett_11.jpg seem to show another part there.

Side note, all of the gears through out this machine look to have very little to no wear, which has me questioning the reasoning for a full disassembly
 
Mine has the smooth handles. Jeff
ece275fd50419914738e1e3a54d21c90.jpg


Sent from my SM-G998U using Tapatalk
 
note, all of the gears through out this machine look to have very little to no wear, which has me questioning the reasoning for a full disassembly

This was Carl Cederstrand's lathe? If so the reason the headstock was disassembled is because the iron casting inside the headstock was broken and he had to repair it.
 
This was Carl Cederstrand's lathe? If so the reason the headstock was disassembled is because the iron casting inside the headstock was broken and he had to repair it.

It did belong to him. I found some pictures of a damaged headstock but can't seem to see where he may have repaired it. He did have two of these at one point, maybe it was the other that he repaired?

Did you know him, seems like he was an interesting fellow.

-jon
 
I didn't realize he had two of them, so yours may be a different one. I knew Carl through cars, not machinery, but we both had Rivetts so we talked about that a bit too.
 
Does anyone have insight on the space between the clutch eccentric and thrust sleeve on the auto feed on the carriage?

Thanks!

jon


Back
Top