What's new
What's new

Single Tooth Clutch repair on Pratt Whitney 12 x 30 model B

I'm sorry, I don't quite follow your descriptions, but are you saying you have a part that you know is removable, but you left it on in order to use it as part of your puller? Any chance it hides a fastener or other feature that would prevent removal of the entire assembly?

allan
 
I'm sorry, I don't quite follow your descriptions, but are you saying you have a part that you know is removable, but you left it on in order to use it as part of your puller? Any chance it hides a fastener or other feature that would prevent removal of the entire assembly?

allan

Actually I see now that the clutch disc I was pulling on is up against a shoulder so it must be assembled from the other end of the shaft. I guess there was no concern of me pulling it off then. From now on though, I'll be pulling on the clamping collar I made to make sure I don't damage that clutch disc.
 
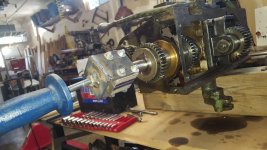
I got it apart! The slide hammer was the trick but it still took a ton of pounding.

Here is my slide hammer setup with the aluminum collar. Thanks Paolo_MD for the idea.

2017-02-02 14.53.21.jpg

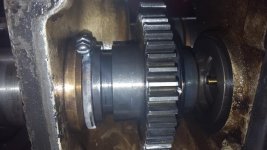
Somebody had been in there before and did a more extensive repair moving the pin 180* on the gear.

2017-02-02 16.00.33.jpg

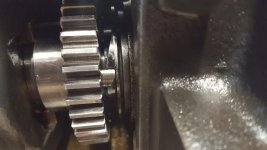
Here you can see the other collar I made to keep the inner edge of the gear from grabbing the housing and damaging the gear.

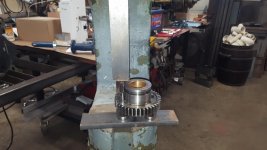
2017-02-01 20.51.49.jpg

The pin I made based off of Carl's dimensions is too large. I don't have another lathe so now I'm trying to decide if I want to cut a new one on the bridgeport with the rotary table or go use someone else's lathe.

The worn pin did pop right out of the gear with a little force on the arbor press. It was nice for something to come apart cleanly for a change.

2017-02-02 16.07.48.jpg
 
I assume it should not have been that tight, do you have a theory as to why it was?

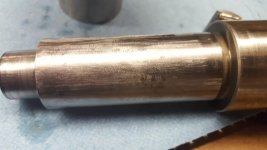
Yea, I miked the shaft and the bore on the dog clutch and there is 0.0025 clearance which seems perfect considering it is keyed. The bearing wasn't actually the problem, instead it was the dog clutch which is behind the bearing that was causing the hang up. But in looking at the shaft, there are streaks of dull finish running axially and my guess is this caused the issue. I think I'll have to find a lathe to use and polish the shaft between centers before I reassemble.
 
So using the rotary table to mill a new pin was a failed experiment. I can hold a diameter for 0.75" depth of cut but I lose 0.005 in the last quarter of an inch. The pin needs to be an inch long. I'm using a 5/8 4-flute HSS end mill to do the cutting. I thought the larger diameter would hold a better tolerance but it's probably my 80 year old mill that isn't up to it.

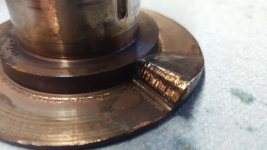
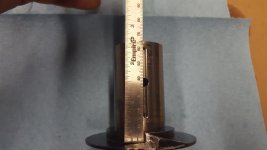
Also, repairing the clutch disc isn't going to be as easy as I thought.

2017-02-02 17.00.56.jpg

That raised inner shoulder seems to eliminate the surface grinder option. Now it's looking more like a cut I'm going to have to do by hand. Unless one of you chimes in with a better answer :)
 
Here is a picture of the rough surface on the shaft. I'm guessing this is what caused the issue.

2017-02-02 19.19.20.jpg

To the finger tip it feels mostly smooth but the finger nail can feel the abrasions.
 
The dog tooth, how was that made originally? The only way I can think of to resharpen that is a EDM sinker.

I don't know much about EDM but since the lathe was produced in the mid '40s I'm guessing it was completely a manually cutting process. Just looking at the piece and the helix makes me wish I could have been there to watch one being made.
 
Well all the parts have been washed in WD40 and are ready for reassembly tomorrow. I made two pins to replace the reverse pin also since I'm in there. They are both tempering in the oven right now.

2017-02-03 15.39.06.jpg

After further inspection, the keyway on the feedshaft is what caused all the trouble. The shaft was bulged out on both sides of the key. I took a file to the shaft to smooth things out and also filed the inside of the dog clutch collar to remove a bur. It fits nicely now. I did polish the rough end of the shaft also while I had access to my friends Logan lathe (that Logan has nothing on this P&W).

My repair of the clutch disc wasn't all I was hoping for but I couldn't figure out any way to grind it square except by hand.

2017-02-03 17.26.14.jpg

I did mic it while it was out so someday if I need to, I could try an machine one before taking the lathe apart. So far it's been a really fun project even though it has taken almost a week longer than planned. My right shoulder and right hand were sore when I woke up this morning from all the slide hammering yesterday.
 
Looking at the photo of the clutch dogging shelf I wonder if the vertical edge couldn't be cleaned up with the shaft horizontal in a Bridgeport type mill with that step at the top, and make it with an undercut on the face with a 1/8" carbide end mill. That radius at the bottom will possibly eventually cause it to revert to the same damaged condition it had.
I hope you can visualize what I'm suggesting, done right it would go straight down to the bottom and have an undercut back into the bottom of that shelf, the dogs would never know about the undercut, but then most dogs don't know much anyway. ;)
The material is fairly hard so I was thinking I couldn't mill it. I only have HSS end mills. I guess I could try cutting it to see what happens.

Sent from my SM-G920V using Tapatalk
 
It may indeed be too hard even with carbide. Not too hard for an EDM though, it might be worth sending a photo to an EDM shop to see if it's worth doing that way.
My fear is that when the dog hits the radius at the foot of that ledge it will be propelled upwards and because of that movement when it finally contacts the flat said flat will wear quickly. OTH you could take a diamond burr in a Dremel and work an undercut so that the first thing the dog hits is the flat, but my experience with diamond burrs is that they cut very slowly and wear quickly.
I'll see how the surfaces mate up tomorrow after I press the pins in and resemble the shaft. I'm not too worried about damaging it because I only shift the clutch at 0 rpm. There are cone clutches in the carriage that I use for engaging while things are spinning.

Sent from my SM-G920V using Tapatalk
 
You can buy 1/8" solid carbide end mills from McMaster Carr for about 12.00 each. I bet one will cut that dog like butter. All that work to get it apart it seems like a waste to re assemble it with that dog in that condition.
 
Well shes all back together and working great! Getting the headstock back on and everything reassembled only took 3 hours. Now that I've done it once, this could easily be a one day job if everything goes smoothly and you have the replacement parts on hand.

I didn't clean up the dog with a carbide endmill because

a) I really wanted it back together today and I couldn't get a carbide end mill on a Saturday morning
b) 1/8" end mill would need to be 4" long to clear the shaft the clutch plate is on.

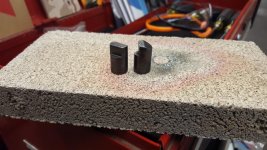
2017-02-04 07.44.33.jpg

I was unable to separate these two on my arbor press. And it almost appears as though they were friction welded together.

2017-02-04 07.45.17.jpg

So I fitted the dog to the pin with more hand grinding. The grinds don't make for the prettiest piece.

2017-02-04 09.11.46.jpg

But in the end the dog and pin fit together nicely.

2017-02-04 10.20.58.jpg

I did notice one issue in reassembly. Since someone moved the forward pin 180* on the gear, the forward and reverse pins are now in line in the assembly. That means when disengaging either, you run the risk of jamming the other pin into it's own helix. If this happens, it will actually lock the gearing up and stall the motor. So in practice now I need to have the spindle turning to engage the clutches. This is easily done by slippling the main clutch slightly while I engage or disengage the feed. I'm guessing it didn't happen with the old pins because they were so nice and rounded off but the square face on my pins allows things to get wedged together. My pins are exactly the same length as the old pins so I can't think of anything else that could have caused this.

Thanks everyone for all the help along the way!
 
Ok, the issue with the binding isn't the opposite pin hitting the helix. It could be a clutch linkage adjustment issue but I haven't seen any adjustment yet. The binding only happens occasionally when engaging the forward feed and the pin doesn't fully engage with the dog. When this happens I can feel the binding when turning the chuck by hand and it only happens at one point in the rotation and then frees up again. It can also happen when dissengaging the forward clutch if the spindle is not spinning.

I've pulled the headstock cover and the ratio box top cover to watch both clutches as I rotate the spindle by hand and engage dissengage both clutches trying to see what's causing it but nothing sticks out to me.

The lathe is very usable -- you just need to engage/dissengage the forward clutch with the spindle spinning and when you engage it, you need to engage it confidently so the pin fully engages the pin. If you engage it slowly, it may not engage fully causing the binding.

I may end up pulling the headstock again someday to see if I can figure it out. In the meantime, I just have to know it's intricacies.

Sent from my SM-G920V using Tapatalk


Back
Top