What's new
What's new

South Bend Micrometer Carriage Stop Overhaul

Kevin T

Stainless
Joined
Jan 26, 2019
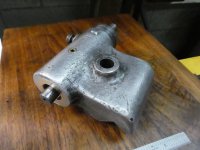
So I took a big chance on this very cheap carriage stop a year or so ago for my lathe. Turns out it was better as a paper weight but I kept it thinking that there would be a time when I might re-build it. The time is now.

P1070923002.jpg

The internal threads were wasted having been crashed-into who knows how many times over the years. Rendered inoperable.

P1070928007.jpg

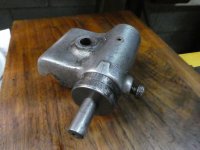
Most of the rest of it is still usable I figure.

P1070929008.jpg

I realized I had a hunk of bronze laying around and I've got a plan to make a threaded sleeve and press it into the aluminum body after I open up the hole. Sort of an ambitious pursuit but I like working with bronze so here we go with a thread...

P1070931010.jpg

I will update this along the way. I already have a couple questions to be in the next post. cont...
 
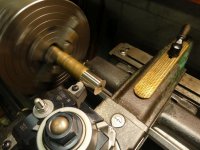
I got started with the sleeve and sized the OD and bored a hole through the center. Next bit of business is to thread the ID.

P1070933012.jpg

I had a small enough boring bar to size the inside for threading. I am presently sifting through my cutters to see if I have what I need for threads or if I need to grind one.

It's a bit early on a Sunday so I'm not ready to start grinding just yet which got me thinking ahead of a question I have.

The main body has an oiler port that I might want to remove. Are these press fit? If yes what's the best way to remove?

P1070947026.jpg

The other thing that comes to mind is the beat up body. Anyone have a good idea how to clean this up a bit? Is there a type of wire or other abraisive wheel that can get some of the gouges out? A friend with a bead blaster would be really useful here but I don't know any.

P1070948001.jpg
 
easiest way to remove the oiler is to screw in a wood screw and lever it out with a pair of pliers. As for the dings in the body, a couple of rounds of high build primer and sanding will cover those up.
 
For the dings, if you were painting it I'd say fill them with body filler.

But i know you prefer leaving un-painted, so thats a tough one. If you grind it, it will look like you ground it.

Pretty sure you painted a chip guard or something, maybe paint to match.

Or might mix black and gray primer, paint with that, then throw it in a bucket of oil or something. Scuff it up a bit.
 
Dremel Tool

I assume you have a Dremel Tool. They make a small 120 grit flap wheel that would work wonders on the body, but will take a little time on your part to finesse it. You'll never get it totally smooth, nor should you try to. You should keep the "character" of the part and what it has gone through. Buff it up on your buffing wheel if you have one; I would not choose a bead-blast finish at all. That would just look wrong.
My opinion only.

PMc

View attachment 333457View attachment 333458


Thanks for the feedback fellas. I can see that it would be really hard to make it look new with my tools so the clean it up a bit approach sounds right. I can't see myself painting it just right now but I could always do that later. I do have some black enamel accents here and there on the lathe so it might look good like that too but that can wait. I got the part threaded through and started the large counter bore that holds the dial. It's hard to get a picture in the chuck and I don't want to remove it till I open up the C-Bore to finished size.

Threads turned out sweet but it seems like all the slop in my compound messes with my head when threading inside with compound oriented thus:

P1070950003.jpg
 
Kevin: I every lathe has slop/backlash to an extent. Your operation (and others) would benefit greatly by having
an external dial indicator (or digital) measuring the actual cut amount on your cross feed dial. I can never trust
the graduation marks on the indicator collar. (I plan on replacing this multi-jointed nightmare rig with an articulated arm).
Snugging up the the screws on the gib plate in the compound can reduce some of the slop motion, but you know that.


In regards to the spring-loaded oiler, if it works, I'd leave it alone, at least until you have a replacement in
hand that is of the exact same size. If you pull it out with a wood screw, consider it toast.
Looks like you are doing a fine job.

PMc

View attachment 333508 View attachment 333509


Kevin: I every lathe has slop/backlash to an extent. Your operation (and others) would benefit greatly by having
an external dial indicator (or digital) measuring the actual cut amount on your cross feed dial. I can never trust
the graduation marks on the indicator collar. (I plan on replacing this multi-jointed nightmare rig with an articulated arm).
Snugging up the the screws on the gib plate in the compound can reduce some of the slop motion, but you know that.


In regards to the spring-loaded oiler, if it works, I'd leave it alone, at least until you have a replacement in
hand that is of the exact same size. If you pull it out with a wood screw, consider it toast.
Looks like you are doing a fine job.

PMc


Oiler noted. I was actually worried that I might hit it when I open up the hole in the casting to accept my new sleeve. That is a good tip on the indicator for critical work. I have all the stuff to do that.

Funny thing is that since I replaced my cross feed with the big direct reading dial I have been feeling like my machine was new again with respect to hitting the numbers on cuts....until i got around to machining from the other side of the center line and using the other side of the slop!

I was threading and it was a long run, maybe 3.75 inches long, so I started with a couple light passes and then double fed a couple to see how much flex I had in the extended boring bar that was only .375 dia. All good and predictable, then I started increasing the cut a little and predictable again, and then same cut depth s second time in a row and all hell broke loose. Clearly I did something wrong or...

QUESTION: When the HTRAL says, "For threads with even number you can use any mark on the thread dial to start"... Do you have to stick with the same mark for each pass?

After that unpredictable chatter I backed off and started again a few thou back and that is what I did. I just re-used the same dial mark for the remainder of the work, where before before I was using "any mark". Of course running slow speed, as I tend to do, with threads this was very time consuming!
 
Just clarifying, i think you are pulling compound toward you, for the interior cut. Not working the opposite side of the hole, is that right ?

If you were on opposite side of the hole, spindle would have to be reversed in direction, or tool flipped upside down. But i don't think you're doing that.

What i really think, exterior cuts the work being round arches away from tool. So tool tip, and the side face could be almost square, and only tool cutting tip will touch.

On an ID cut, the work curves toward tool. Unless you have severe angle on side face, it will touch first, not the cutting tip. So to cut well tool needs to be thin, or angled hard away, so as to not touch before tool tip. This is my guess, not seeing it first hand.
 
Expanding a little from my last post. I had boring in mind, not threading, but same sort of principle.

On working on tighter ID's, once in a while where I intend to take let's say .020", that after the pass and measuring found I removed let's say .008", with a bad finish, maybe chatter.

And that would be with a boring bar that had an angle ground into the side face already. But that angle was not ground at enough of an angle to provide relief.

Solution being to regrind it for more relief, or rotate boring bar so that cutting point is pointed downward some, maybe 15 to 30 degrees downward, then raise holder to get point back at centerline. That usually gets me expected results, as the actual cutting point is more directly contacting.

Ah thanks, I am pretty confident in the geometery of my sharp freshly ground HSS threading cutter that I made to fit in the boring bar. I've had my fun with interference from tool holders too so not an issue this time. It was just the sudden unpredictable chatter that caught me off guard. I've been spending a lot of hours over the machine though so could be user error (hehe..."could" be! ;-)

Feeding the 60 deg tool on a 30 deg angle...I must have met the length of engagement along cutter edge that was not kosher for the bronze and or my set up, but at the time I thought it was the machine.
 
Just curious, as far as machinability, which grade bronze are you using ?

Not completely sure but I think it is 954 from what I have read about (932 vs 954). The chips are coming off like dust but it machines super nice and the finishes with carbide tooling are incredible. Of course I dont have a carbide 3/16's bit to put in long boring bar but I am past that work now.
 
OK 99% done!
These old Mic Stops chuck up nice in a 4 jaw. I flipped one jaw around and Bob was indeed my uncle.

P1070960007.jpg

P1070961008.jpg

I indicated off the stop that goes in the unit. It's long and provided a good surface.

The cast aluminum was no trouble to open up a little so I could use a boring bar to size.

P1070967014.jpg

Bronze sleeve pressed in and faced

P1070975003.jpg

Cont...
 
I still need to make a good key to hold the mic dial in place, the old one is toast. I also need to pin the sleeve to the body with a pressed in dowel. I didn't quite hit the interference I was looking for but then I told myself that I need to stake it anyways in case I crash into it. I don't want the sleeve popping out!

The other thing that I need to figure out is the oiler port. I killed it by opening the ID of the housing. Not a big deal to me but I'll need to figure something out there. Not bad for a third of the price they are going for on ebay. It's very functional.

P1070981009.jpg

P1070982010.jpg

P1070988016.jpg

P1070989017.jpg
 
Real nice. These are one of my most used accessories on a lathe, though I tend to use it more as a stop, verse the micrometer portion. I sort out how far my long travel is, then slide this up to saddle and lock it down.

For the oiler, search "ball oiler" on ebay or other.
 
Real nice. These are one of my most used accessories on a lathe, though I tend to use it more as a stop, verse the micrometer portion. I sort out how far my long travel is, then slide this up to saddle and lock it down.

For the oiler, search "ball oiler" on ebay or other.

Seems like you are trying to get me buy that pack of 20. How many do you need? lol
 
Seems like you are trying to get me buy that pack of 20. How many do you need? lol

Lol, I saw that, but I didn't scroll through every listing. Thought someone might sell just one if you figure out the size.

My oiler looks like crap, I wouldn't mind replacing it, just not a priority for me. Also its a bit of a fine chip collector. . .

150.jpg

The ball in mine is still springy, but at the time I un-stuck it and went through it, the oil can I was using at that time just oozed oil on the outside. I've been using a different can more recently, it might inject oil better, but I have not actually tried. :D

When I went through mine, besides being stuck/froze, I had a mushroomed thread, though I forget which part. Anyway, after sorting and cleaning it up nice, I lubed it real nice when I built it. Never lubed it again, and it still spins nice, been a couple years or so since then.

I use it on virtually every long feed cut I do, but I'm not cranking the threads back and forth either. I leave it pretty much in the center position. There are occasions where I'm dial indicating my travel, and fine tune with the micrometer portion a few thou either way.

I think for maintenance, unscrewing it, blowing fine chips out, and re-lubing every couple years should be good.

Also quite a while ago I mentioned with the star handle clutch, that I never disengage. I instead pull the spring pin handle and allow saddle to bump into the micrometer stop. This pushes the apron lever to neutral, so long as you are holding the spring pin handle out. Anywho, I still run it that way. The spring pin handle must be pulled or you will crash, but its quite smooth and work looks more even in finish, verse turning hand wheel by hand, or trying to feather the clutch.
 
The other thing that I need to figure out is the oiler port. I killed it by opening the ID of the housing. Not a big deal to me but I'll need to figure something out there.

Seems to me that since the ball and spring are gone, the easiest thing to do is to thread the brass hole w/ #10 or #8
and simply screw in a short machine screw that you remove for occasional oiling or just to cover the hole.

Nice job.

PMc
 
Last edited:
OK all done! Looking back I wished I had chosen to machine a shoulder in the ID of the alum housing and a mating one on the bronze. I didn't really consider how the part would be used and so I had to "stake" the sleeve to the housing because it could move if I crash into it with the saddle.

Looks kinda "caveman" but the bronze plug in the housing and sleeve will suit me. It's on the bottom and out of sight! Since I haven't built my slow speed device for my drill press "yet" I had to break out my new fangled lathe-milling attachment. Such a joy to use on small cuts.

P1070998001.jpg

P1070993004.jpg


Back
Top