What's new
What's new

Takisawa Lathe Rebuild Plan

arsenix

Aluminum
Joined
Jul 28, 2011
Location
Milpitas, CA
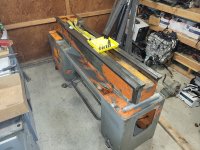
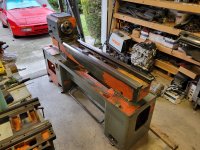
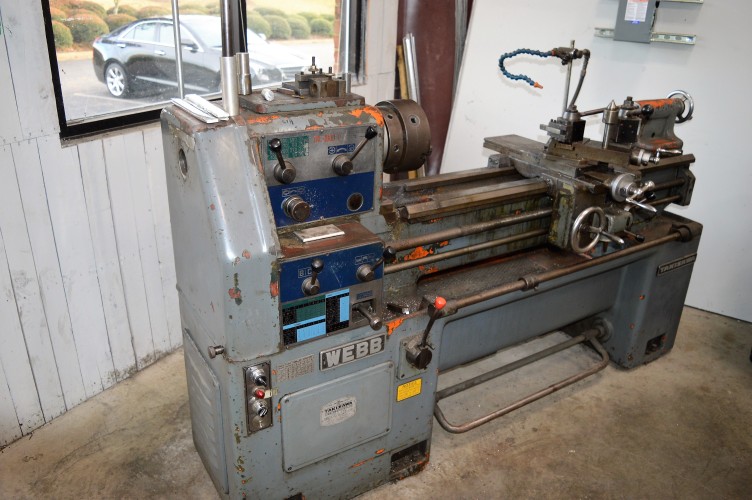
I've posted about this lathe before (https://www.practicalmachinist.com/forum/threads/way-grinding-shop-close-to-bay-area-ca.404912/ and https://www.practicalmachinist.com/forum/threads/reconditioning-my-takisawa-tsl1000.399350/ ). After giving up on finding a local grinding shop I'm going to be driving the bed down to LA in a few weeks to have the bed reground. So I'm planning my campaign to finish and put it back together. For reasons that are unclear, this lathe had the most wear on the hardened bed and the base of the saddle. I believe someone fooled with the saddle, or maybe replaced it with one from another lathe. In any case, after grinding the bed it should be dead flat. I have torn the lathe completely down and cleaned everything for inspection.

I was hoping folks could give some feedback on this plan.
  1. Disassemble, clean up and blueprint lathe (what I’ve done so far)
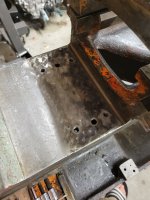
    1. Bed wear carefully measured - wear up to .005” on hardened ways, unevenly on the V’s
      1. The tailstock flat way appears to be ~.006” lower than the saddle flat ways. This seems odd. Maybe a prior repair? I have checked in multiple places and it seems consistent. Given that these don’t appear to be parallel I’m not sure what to use as a leveling reference. Once the bed is ground I suppose I could level with a precision shim on the tail stock way. Due to wear on the base of the saddle I'm not sure what to use as a leveling reference. The saddle cross slide way is about .02" off from level relative to the ways.
    2. Apron gearbox/bearings/seals cleaned and rebuilt. Examined/cleaned up gearbox.
    3. Remove burrs off all machined reference surfaces and way edges.
    4. Check wear on cross way on saddle - .001-.002”. The ways are frosted and the frosting is just worn smooth in some areas.
      1. Need to check dovetail wear
    5. Check wear on cross way on base of cross slide - Seems minimal but will check on surface plate to double check.
    6. Check wear on the compound ways - both ways of the compound seem to be minimally worn. Moves smoothly with no binding.
  2. Grind bed
    1. Remove bed, headstock.
    2. Send bed out for way grinding.
    3. Power wash base and bed
  3. Check/fit the compound/cross slide
    1. Verify flatness and parallelism of the compound base on surface plate. Check wear pattern. Scrape if necessary. I currently believe these ways are pretty much perfect though.
    2. Check gib and scrape a bit to refit if needed.
    3. Verify flatness and parallelism of the cross slide base relative to the compound rotation base.
    4. Scrape this flat if needed until flat and parallel. Q: Given that total wear on both sides is likely only around .005” max, can I get away without turcite? Can the lead screw nuts can take this amount of misalignment?
  4. Realign bed and headstock
    1. Precisely level base
    2. Reinstall bed.
    3. Measure material removed compared to blueprint (shop should tell me, but I will double check).
    4. Check level on bed once reinstalled. If properly ground, should be dead level. Check for twist. Twist can be adjusted if necessary.
    5. Install headstock. Should have maintained perfect vertical parallelism. On this lathe it sits on scraped flat surfaces so it should maintain parallelism to the ways. It is on a pin at the front, and then has screws to shift the rear and align it.
    6. Adjust headstock alignment with bed. Q: Should this wait until I have the saddle running smoothly and trued again to use as an alignment guide? Should I wait until the rest of the lathe is back together and dial it in with test cuts?
  5. Rebuild/refit saddle
    1. Check wear references and level on new ground way surface.
    2. Verify height of saddle relative to lead screws. Unknown how much material was worn off it previously.
    3. Setup on mill to machine the top cross slide ways. Level as best as possible relative to original slide ways and try to get close to the original level. How much material is currently missing? These have about .001-.002 of wear on them. Q: Should I bother machining them or just try to scrape them using the cross slide as a reference? I have a fairly high precision VMC and will use a good carbide dovetail end mill. Is there a chance I can just use this surface as is post-machining?
    4. Machine top cross slide dovetails.
    5. Check level/flatness of top slideways with the counter slide. Scrape to correct for any issues.
    6. Setup on mill to machine bases.
    7. Machine flat and V ways, shooting for about X gap relative to desired height for turcite. Will shoot for some available turcite thickness. Q: How much additional should be left for scraping tolerance? Should I assume I need to machine the turcite or just go right to scraping? I could also use pour able moglice after carefully shimming which would allow for a more precise setup?
    8. Bond turcite onto the saddle base.
    9. Scrape to align/fit turcite to the saddle, verifying that the cross slide is level to the bed and perpendicular to the headstock. Q: What is the easiest way to check perpendicularity?
  6. Refit Slides
    1. Install cross slide, verify perpendicularity relative to the headstock. Deburr and reinstall the gib. Verify smooth movement.
    2. Reassemble the compound, deburr and reinstall the gib. Verify smooth movement.
    3. Recheck headstock alignment.
    4. Go back to step X when I find the mistakes I made.
  7. Reinstall everything else.
    1. Apron, gearbox, lead screw.
    2. Test cuts.
    3. Paint and move into final resting place.
    4. Bask in glory. Maybe use it to finish a project rather than being a project.
  8. Begin designing a large enough mausoleum so that I can be buried with this lathe.
Q: When should I check parallelism on the cross slide dovetails?
Q: What is the easiest order of operations to check/refit the cross slide dovetails? It is clear to me how to get them flat (starting with the surface plate on the base of the cross slide), but I’m not sure the easiest angle.


Would love some feedback on this. As always I suspect there may be some circular work here, but I'm hoping to have a linear plan of attack that hopefully won't fall completely apart once I start!


James
 
Even if there was enough 'slop' (for lack of a better word) in the lead screw/nut you would likely be increasing the wear rate from this misalignment (unless you know there is an alternate way to adjust them.) The risk of damaging the lead screw and/or nut would seem to be a bigger concern than a small upfront investment in the Turcite given the costs you are already sinking, I would think.

You should also wait to see how much material is actually removed before making this decision. You can hope that they only need to take off what you think is required, but I imagine there are a lot of complications that could come up during fixturing and when removing material that result in more surface removal than you currently expect. Better to be pessimistic with these things.
 
The bed tailstock being lower then the saddle isn't an issue to me. Your assuming a lot. Where are you taking it? Shaffer grinding? Hopefully they will check the bottom of the bed for burrs before they sit it on the mag chuck or it could mag down in a twist. I would ask them to indicate it in and then mag it down and re-indicate it to be sure it doesn't twist. I taught a class in Montebello CA about 2 blocks from Shaffer, they are a good shop and should do a good job. I would tell them to grind the flats to clean up and not worry if the flats are the same height. The tail stock and saddle are separate units. As long as they are co-planer

From the spec's your giving us don't sound as if the machine is that bad. Are you a hobbyist or are you going to be working on aerospace parts where your going to have to hold tenths?

I would also make up a sketch showing the spec's and make a copy for the grind shop and tell them to write on it how much they grind off. I would tell them to grind off the same amount of the inverted V ways next to each other. Like I said not necessary on saddle to tail stock. Your right about checking before sending as the operator ay forget to write it down and guess of he dresses the wheel and forgets. I think I told you this in the other thread you had.

You're a bit anal worrying about shimming the level on the bed. As long as the coolant flows toward the coolant pump the bed ways could be out of level (think about a slant bed lathe). On a lathe we are more concerned with twist of the bed then being level. You use a level to check for twist. The lathe has a cross-slide that is flat, you can use it to set the level on to "bridge" the bed. How much did they quote you to grind the bed? The feed shafts that go through the carriage binding up if the saddle goes to low and the rack / rack pinion is the issue. Lets take this one step at a time. When they build lathes new they scrape the tailstock before they scrape the headstock.
Rebuild or building a machine is like building a house. You start at the bottom or footings and build up. You can check parts off the machine on a plate but it has to be "match fit" to make it right. The compound is good, but it can be sraped anytime as it is a unit. You can check the tail-stock top on a plate as the saddle before you put it on the machine to "prepare for the "match fit"

Get the bed ground and then lets revisit this. To long a post makes one fall asleep sometimes.
 
Last edited:
@Bakafish Indeed I guess I won't know until I finish it. Based on my indicator sweeping it seems like this is mostly a touch up but hard to say. The turcite has a minimum thickness though (about .02"?) so of I scrape it in perfect and then have to turcite later i'd have to remachine it and start over? I suppose I could finish one side to see how much material is removed and then machine the other with or without enough gap for turcite?

@Richard King Indeed I am taking it to Shaffer, partially based on your recommendation and partially because they were among the only shops I found that were willing/able to do it! Also indeed it isn't terrible but for some reason the main ways and saddle base are quite wonky. I suspect from a past failed and/or misguided repair. The V is quite out of spec which means the saddle tilts a fair bit during travel. This lathe is already starting out in better shape than my last one, but I'm hoping I can get it dialed in better. I am a hobbyist. Right now a machine tool repair hobbyist. Ie the repair is the fun at the moment. Whether it makes sense to get it perfect I suppose is more a religious question than practical :) Once the bed is ground and I get the saddle refit it is conceivable I might not want to touch much else. My usage is pretty light so once dialed in it should stay there.

I won't stress about the saddle vs tail stock ways. I guess my main hope there was to have a solid flat reference on which to level but I suppose it is all relative. The cross slide does not need to be "level" relative to the bed, as long as it does not twist during the travel of the saddle. It just needs to be flat. This makes sense.

I'm scheduled to get the bed ground at the end of the month. I

Oh one question that is relevant to the bed grinding. This is a gap bed lathe. As far as I can tell the gap has never been removed (there are factory paint joints that are uncracked). I haven't touched it. Should I just leave it untouched before grinding? I considered removing it, deburring, cleaning and reinstalling to make sure it was in a repeatable spot. If it is where the factory put it though it should already be in one.
 
Oh one question that is relevant to the bed grinding. This is a gap bed lathe. As far as I can tell the gap has never been removed (there are factory paint joints that are uncracked). I haven't touched it. Should I just leave it untouched before grinding? I considered removing it, deburring, cleaning and reinstalling to make sure it was in a repeatable spot. If it is where the factory put it though it should already be in one.

Well normally if the gap insert has never been removed, you would leave it in place.

On the other hand if your getting the bed reground, I don't think you have anything to lose by taking it off, making sure there's no burrs etc, that would ensure it goes back in a somewhat repeatible location in the future should it have to be removed.
 
On the other hand if your getting the bed reground, I don't think you have anything to lose by taking it off, making sure there's no burrs etc, that would ensure it goes back in a somewhat repeatible location in the future should it have to be removed.
I'll see if I can remove it. I guess no harm in trying. Chances are I'll never remove it either, but it would be a shame if I ever did and then it shifted after reinstall!
 
If I were you tighten the bolts and leave it alone. They are a pain to get it back in the same place. I suspect the that's all the factory did. I've never seen on that was handscraped fit from the factory. If you plan on taking it off and putting it back on a lot take it out and scrape it in before getting the bed ground.
 
I would fill the bolt heads with epoxy after grinding. There will be zero temptations for a well meaning employee to pull it off.
 
If I were you tighten the bolts and leave it alone. They are a pain to get it back in the same place. I suspect the that's all the factory did. I've never seen on that was handscraped fit from the factory. If you plan on taking it off and putting it back on a lot take it out and scrape it in before getting the bed ground.
My last lathe was a 13" and in ten years I think I turned something over 10" maybe twice. This lathe is 16" WITHOUT the gap. I would be surprised if I ever pull it out. I have a VMC for large flat things.
 
I would fill the bolt heads with epoxy after grinding. There will be zero temptations for a well meaning employee to pull it off.

And then loosing the insert, I've seen that at a couple of auctions, nice gap bed lathe, with no gap insert............................
 
Last edited:
I would not remove and leave the gap out, as the saddle moves into the open spot the underside will drag chips under the saddle and ruin the machine. If you are going to plug the cap screws use Plastic Metal like Devcon or Moglice, or turn some cast iron or Nylon pressed in plugs and have them sticking higher before the grind. Not Bondo as that will wear out fast. This seems so obvious and I hated to even write this one.
 
I removed the gap and cleaned everything up. Both mating surfaces were scraped and it was pinned in place. Cleaned everything, deburred everything, chased all the threads, oiled it all and reinstalled with loctited and torqued bolts. Seems like it went right back where it was but at least now it will be consistently placed. Likely I'll never remove it again but I can rest easy knowing it is put back into the right spot. I am fairly certain it had never been removed although there was a fair amount of oil/gunk in there.
 

Attachments

  • 20221105_164237_s.jpg
    20221105_164237_s.jpg
    483.3 KB · Views: 45
  • 20221105_164237_s.jpg
    20221105_164237_s.jpg
    516.8 KB · Views: 45
Alright. After transporting it via a friends RV down to LA into the hands of Schaffer grinding, then back in a racing connection's pickup... my Takisawa bed is now sitting back on its base, freshly ground. They only ended up taking off .004" which matches well with the measurements I took. Almost all of the wear was on the front V, with nearly nothing worn off the rear flat way. So now I have a flat bed!

I did a fair bit of measurement on the carriage, cross and counter slide pieces. The most wear is on the compound slides, which have about .003" wear on both sides. The cross slide ways are worn about .001" on both sides, which is less than I would have thought given the visible wear pattern.

My plan is to machine the base of the carriage, bond on turcite, then fit it to the fresh bed.

After that there are some options. The cross slide has so little wear I could maybe just touch it up and run it without machining?
 

Attachments

  • takisawa_lathe_ground.jpg
    takisawa_lathe_ground.jpg
    959.8 KB · Views: 51
better rebuild plan...?
clean it, reassemble and cut metal instead of writing "plan" and obsessing over a few thou wear on an old lathe.
Thanks for the vote of confidence! I've had a crappy lathe (several actually). I'm making this one better. Feel free to spend your time on other pursuits. This forum is called "Machine Reconditioning, Scraping and Inspection" for a reason. I don't plan to chase the zeros for the rest of my life, but as I planned I've assessed all the wear in the machine. I will decide how much I want to live with and then fix what needs it.

I completed the marriage of the freshly ground bed, base and reinstalled the head stock. Coarse leveled it with the .005" per foot level. Looks pretty much the same now just slightly shinier bed. I'll let it settle a bit and then tweak it with the more serious level.
 

Attachments

  • takisawa_lathe_married.jpg
    takisawa_lathe_married.jpg
    798.2 KB · Views: 38
Hey I think it's a great way to spend your time, hell of a lot better than watching tv. Great job please keep us posted, I love this kinda stuff!


Back
Top