What's new
What's new

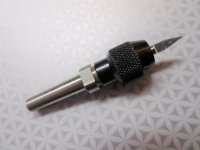
Thread comes out good except for the start and end points. The ends have shark fins?

rons

Diamond
Joined
Mar 5, 2009
Location
California, USA
That's what I'm calling the partial thread at the right and left sides.
The left side is always worse when there is a shoulder that is deeper than the thread depth.
How do you trim the shark fin off. The fin is so thin it bends easily and would break off eventually.
I use a small file with micro pliers. Is there a better way other than applying for a loan to get a CNC lathe?
DSC_1106.jpg
 
The thin area at the beginning and of the thread can be reduced significantly with a chamfer equal to the thread depth at both ends. Just a square undercut at the end of the thread and a square face causes a very thin leading and trailing edge.
 
You could also buff them off with a hard gray wheel on a pedestal grinder.
For the one against the shoulder you may have to undercut the gray wheel so you only get what you want without messing up the OD or other threads. That can be done with an old carbide insert.
Or in a pinch, I've used the tang side of a file.
 
That is a really nice extension. Likely it takes a little care in use so it does not whip at high RPM. I can think of many times that would have been handy.

Some fine threading can be aided with a very sharp cutting edge and some positive side cutting edge or back rake. I like side-cutting-edge positive rake because it is easier to fit into your fish.
Using an insert one made for aluminum is very good/better IMHO.

Every lathe, grinder or machine cam have a little coming up/take-up to cutting force, and then relaxation of forces at the end of work when the stick removal amount decreases.

The rigidity of the set-up and cutting tool geometry have a great influence on this problem. Often the rake attitude and sharpness of cutting tools are big factors.
 
Chamfer at the right end (in the pic) of the threads should be there anyway to help get the nut started. Chamfer at both ends will avoid your problem altogether like Howie said.

A couple licks with a file while the part is still in the lathe is a nicer touch under any circumstances to remove any burrs that might have been thrown up.
 
Start threading with diam. a bit smaller so there is a flat on thread crest. Chamfer end 45 degrees. Finish thread start with file.
 
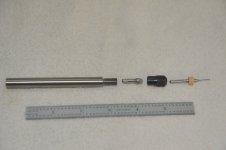
I make a similar product, using the same Dremel collet nut. But my chuck has a No. 1 B&S taper shank with a drawbar thread. I do not trust the Dremel collets to be accurate, so my chuck has a .125" reamed hole for the 1/8" shank carbide engraving cutters and four slits in the taper. The chuck has a long taper, so no need for a chamfer. The nut has a counterbore at the base, so there is no need for an undercut behind the threads. I cut the .275-40 thread with a Geometric 5/16D die head and 1/4-40 chasers with the head adjusted oversize to fit the nut threads.

Larry

DSC02889 (2).jpg DSC02890 (2).jpg
 

Attachments

  • DSC02889.jpg
    DSC02889.jpg
    86.1 KB · Views: 94
I make a similar product, using the same Dremel collet nut. But my chuck has a No. 1 B&S taper shank with a drawbar thread. I do not trust the Dremel collets to be accurate, so my chuck has a .125" reamed hole for the 1/8" shank carbide engraving cutters and four slits in the taper. The chuck has a long taper, so no need for a chamfer. The nut has a counterbore at the base, so there is no need for an undercut behind the threads. I cut the .275-40 thread with a Geometric 5/16D die head and 1/4-40 chasers with the head adjusted oversize to fit the nut threads.

Larry

View attachment 327272 View attachment 327273

When I was in junior high school a tough guy (at least he thought he was) asked me if I was bad. I said no and then he chuckled.

Well, I think that thing you made is bad. Bad means kool ...
 
That is a really nice extension. Likely it takes a little care in use so it does not whip at high RPM. I can think of many times that would have been handy.

Thanks. The post here might be considered hobby grade if there is a Dremel involved. All this because I don't have a 1/8 collet...

Just a 3/8 bar with a hole and a thread on one end. For a Dremel chuck and collet. I actually don't like using a Dremel.
Every time I free hand it I screw a workpiece up. I made this as a alternate to fit in a BP. I inherited a Dremel 212
drill press stand but never used it, I'm not that interested in using it unless the BP way is "not the way".

This is what I'm drilling. A breakout board for a 100 pin LPC1769 micro-controller for motor control. This is the first
board I attempted. The fabric it is resting on is a diaper. Appropriate for first try (a section of copper lifted off at
the top-upper-right). The lines are not that sharp because I used too many passes through a heat seal rolling machine and
the transfer image became too hot and the line edges became uneven. The second one is in progress. I have posted a few other
threads that are all tied to this project.

DSC_1110.jpg
 
If you were making a few of these you could set up a rotary table thing and higbee them manually. If you had a lot you'd want to do something more automatic but for just a few it'd be easy to crank around with a small end mill.
 
I make a similar product, using the same Dremel collet nut. But my chuck has a No. 1 B&S taper shank with a drawbar thread. I do not trust the Dremel collets to be accurate, so my chuck has a .125" reamed hole for the 1/8" shank carbide engraving cutters and four slits in the taper. The chuck has a long taper, so no need for a chamfer. The nut has a counterbore at the base, so there is no need for an undercut behind the threads. I cut the .275-40 thread with a Geometric 5/16D die head and 1/4-40 chasers with the head adjusted oversize to fit the nut threads.

Larry

View attachment 327272 View attachment 327273

Very Kool. Now if I was single pointing the thread I would have a line around the circumference.
But your picture shows an abrupt stop and is much cleaner. I am referring to the thread cutting
on a Hardy using the quick withdraw lever. Nobody exists that can withdraw that fast to avoid the line.

(Is this nonsense speak? Does it matter?)
 
I did cut my threads on a Hardinge, but with the Geometric die head in a lever tailstock. Did you know that you can buy .275-40 button dies on eBay? It is the thread found on type WW 8 mm watch lathe collets. They also have the taps for making collet draw bars. Kind of handy if you want to make more than one chuck with that thread.

Actually, for less money than the die, you can buy a long straight shank ER-11 collet chuck that would do what you are describing.
ER11A-100L Collet Chuck Holder Extension Rod Straight Shank CNC Milling Tool | eBay

Larry
 
A guy in a hurry. How could he resist that price.

I recently bought some carbide drills from the UK. Made in China. I was pleased. :icon_bs:

So how can you resist this takeover?

Pocket book? Not that effective if every choice you see in the store is from China.
Vote? Not that effective because the political system is setup as one party with two factions.
Forums? Just use the word ChiComm all over the place to make yourself feel free ...
 
Last edited:
I take an OD lick with a hard stone or a file before my final pass. I Might do that for a few passes if I see or suspect a build-up OD, Or to see the thread spec OD flat.

Years ago I started using the edge and flat of a mill bastard file with that the 90 degrees cutting both the front and back of the top flat knocks both burs off the tops, then a few years later I started doing that followed by a pass in reverse so the file runs off the front, as it does it cuts away that knife edge bur.
 
I don't want to discourage you from having the fun of doing it yourself, but PCB prices have come way down lately. You can probably have that done with a two sided PCB with plated holes for just a few dollars, including the shipping with relatively fast turnaround. You can get several boards with a minimum order. And the design software is available free. Just do a web search.

As for the threading:

Dead sharp, HSS cutter
A good cutting fluid (I like TapMagic for threading)
Do not use soft, gummy aluminum. Try a T6 alloy.


Thanks. The post here might be considered hobby grade if there is a Dremel involved. All this because I don't have a 1/8 collet...

Just a 3/8 bar with a hole and a thread on one end. For a Dremel chuck and collet. I actually don't like using a Dremel.
Every time I free hand it I screw a workpiece up. I made this as a alternate to fit in a BP. I inherited a Dremel 212
drill press stand but never used it, I'm not that interested in using it unless the BP way is "not the way".

This is what I'm drilling. A breakout board for a 100 pin LPC1769 micro-controller for motor control. This is the first
board I attempted. The fabric it is resting on is a diaper. Appropriate for first try (a section of copper lifted off at
the top-upper-right). The lines are not that sharp because I used too many passes through a heat seal rolling machine and
the transfer image became too hot and the line edges became uneven. The second one is in progress. I have posted a few other
threads that are all tied to this project.

View attachment 327281
 
I don't want to discourage you from having the fun of doing it yourself, but PCB prices have come way down lately. You can probably have that done with a two sided PCB with plated holes for just a few dollars, including the shipping with relatively fast turnaround. You can get several boards with a minimum order. And the design software is available free. Just do a web search.

As for the threading:

Dead sharp, HSS cutter
A good cutting fluid (I like TapMagic for threading)
Do not use soft, gummy aluminum. Try a T6 alloy.

Any references are welcome. But I am doing much better than the wire wrap days.
Wait to you see my 208 pin LQFP socket board.

(It is very hard for a do-it-yourself guy to pay somebody else to do it)
 
OK, good luck!

PS: I also have done wire wrap. It has a place and I made circuit boards that way for professional use. They were totally dependable for years.

As for paying someone else to do it, I look at the price. You can get several prototype boards for less than the cost of the copper clad you are using. But, have fun.


Any references are welcome. But I am doing much better than the wire wrap days.
Wait to you see my 208 pin LQFP socket board.

(It is very hard for a do-it-yourself guy to pay somebody else to do it)
 
I'd typically use a fine grit belt on a vertical sander to remove the shark fin on the outer end of the thread. I do this often to pipe threads cut on cnc. I roll the end of the pipe against the belt, with the belt moving parallel to the thread, so as to not induce a burr on either side of the thread. Fast and works well. Filing during powered rotation on the machine does not work as well.
 
OK, good luck!

PS: I also have done wire wrap. It has a place and I made circuit boards that way for professional use. They were totally dependable for years.

As for paying someone else to do it, I look at the price. You can get several prototype boards for less than the cost of the copper clad you are using. But, have fun.

I looked at pcb houses and have been to conferences and have a folder of business cards and folders. Thing is you have to use their design software which is
mostly free with windows os. I am free a able with geda-pcb. I get gerbers but have not given up hope on my abilities yet. So I don't pass out my gerbers just
yet.


Back
Top