What's new
What's new

what tool do I need to remove pins in a connector?

The pin removal tool will likely be specific to the connector. I suggest you contact Miller.

Absolutely. Not only must the removal tool fit the connector but you will also need to know if it is front or rear locking. Front locks use a tubular tool that is inserted from the front and pushes the pin out while depressing the spring locks. Rear locks use a split tool that slips over the wire and is inserted from the rear until it stops and then the wire and tool are pulled simultaneously to extract the pin.

In many cases a tool meant for one brand of connector will also remove other brands with similar dimensions.
 
Thanks for the replies. I'll check with Miller on Monday unless someone knows the specific tool I need. The pins are 1.5mm dia. and the connector is Amphenol.

I looked on Amazon, there is an inexpensive kit that has tools for 82 different styles of pin connectors, but not enough info to know if it would work for this one:
Amazon.com: Miuwauer Terminal Removal Tool Kit, 82 Pcs Terminal Removal Extractor Set, Depinning Pin Release Ejector Wire Connector Key for Car Auto Electrical Wiring Tool Set : Automotive
 
Standard pin size.
Unless I miss my guess you need this: Blocked
I could loan you mine to try as I am not building any machines right now but cost to ship back and forth and all that but ...hey.. friends and family.
Making your own tool is a real pain in the ass. Very thin sleeve and if the ass end wire broken you will want the push thingie.
Just trying to help if I can.
Failures in theses are rare. That is why I like these connectors.
You are maybe gonna need a new pin to crimp. If the size I think I have some of those laying around.
Bob
 
"Standard pin size"??? I have worked my entire career in electronics and can tell you there is no standard pin size. Even connectors in the same series from the same manufacturer can have different size pins.

Just an example is those ever-popular DA, DB, DC, DD, and DE connectors. There are at least two sizes of plain pins for them and a number of others that include coaxial male and female inserts.

Good sources for the pin extraction tools are the electronic supply houses: Digi-Key, Mouser, Newark, etc. They can help you to ID the connector you have and the tool you need. Most professional connectors will have the OEM's name and perhaps an ID number in the body that holds the pins. Break out a magnifying glass and look.

Those pins look like they have been crimped before insertion. They are almost certainly inserted from the rear. The extraction tool usually, but not always, is used from the front. You could try just rolling up some shim stock and sliding it into the front while tugging at the pin from the rear. An improvised tool like this can also be used from the rear as it can fit over the wire if it is still in the pin. Rear extraction tools will have a slit cylinder construction so they can be slipped over an existing wire.
 
Most pin removal tools are inserted from the front or not the end with the wire

Remember those little displays of hobby tubing? perfect if you find the right diameter

usually the largest that will fit into the hole.
The correct tool will have a plunger to push the pin out.
You can use a piece of welding wire.

Obviously you can turn and drill a piece of brass or aluminum but it is usually tedious
 
You may be able to get by with fashioning some tools to depress the wings or barbs on the pin that lock into the body. I have used paper clips and flattened them out/shaped them to get the job done. If you did this frequently or had many pins to do, I would say buy a tool. You do not need a tool to install the pin later, it just pushes in and the barbs lock it in the body when it is in the correct position. Look closely at the 'pin' side of the connector. You should be able to see the barbs. It doesn't take a lot of force to compress them. Once you have them compressed, you push the pin out or pull it from the wire side.
 
"Standard pin size"??? I have worked my entire career in electronics and can tell you there is no standard pin size. Even connectors in the same series from the same manufacturer can have different size pins.

Just an example is those ever-popular DA, DB, DC, DD, and DE connectors. There are at least two sizes of plain pins for them and a number of others that include coaxial male and female inserts.

Good sources for the pin extraction tools are the electronic supply houses: Digi-Key, Mouser, Newark, etc. They can help you to ID the connector you have and the tool you need. Most professional connectors will have the OEM's name and perhaps an ID number in the body that holds the pins. Break out a magnifying glass and look.

Those pins look like they have been crimped before insertion. They are almost certainly inserted from the rear. The extraction tool usually, but not always, is used from the front. You could try just rolling up some shim stock and sliding it into the front while tugging at the pin from the rear. An improvised tool like this can also be used from the rear as it can fit over the wire if it is still in the pin. Rear extraction tools will have a slit cylinder construction so they can be slipped over an existing wire.

YUP ^^^
And I will add, don't bother making a tool, you need to order new pins anyways, so get the pins & the tool at the same time.
 
The new style automotive connectors look close to moles size but are NOT.

Almost same diameter so the normal tool almost fits.

Then the connector housing is just a bit different so the OD of the tool does not fit.

Local supply house does all things connectors, has everything from connector to tool, 10 bucks for the tool.

Looks similar but the tube wall very thin so it fits...

Contact manufacturer or local place where you can buy the machine as they should sell parts.

If one wire is broken then strain relief not working, you may need to redo all of them and correct tools make life much better.

Sent from my SM-G781V using Tapatalk
 
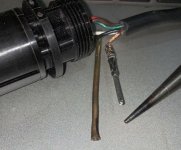
Thank you all for your suggestions. Gustafson's suggestion to use hobby brass tubing was a good one, but I did not have exactly the right size. So some heat and a finish nail set were applied to bell mouth the tubing to match the inside dia. of the pin hole. Worked great. Tony your comment about the strain relief being the cause of the problem was duly noted. I think you were right. The connection was soldered and the cord was inserted into the plug as far as possible before tightening the clamp. Remote is working.

IMG_0191.jpg

IMG_0192.jpg
 
Thank you all for your suggestions. Gustafson's suggestion to use hobby brass tubing was a good one, but I did not have exactly the right size. So some heat and a finish nail set were applied to bell mouth the tubing to match the inside dia. of the pin hole. Worked great. Tony your comment about the strain relief being the cause of the problem was duly noted. I think you were right. The connection was soldered and the cord was inserted into the plug as far as possible before tightening the clamp. Remote is working.

View attachment 347365

View attachment 347366

You might be re-visiting that connector again with the soldered repair.....just sayin'
 
Great Job!

If you can leave it always connected and not forever plugging and unplugging...

Leave it connected and give slack at the machine for the cable.

Put a rugged support on the machine and secure the cable to that support.

Make it so that pulling on the cord puts all the strain on the cable and not the connector and jack.

If you can do that it will last a long time in a working condition.
 
Glad this worked out - for the record I typically make one-off extractor tools like this out of steel. Drill to size, turn the OD. Small chamfer on the OD and ID.
 
YUP ^^^
And I will add, don't bother making a tool, you need to order new pins anyways, so get the pins & the tool at the same time.

Looks like the bother was worth it. At least you tried, again .... (and again and again and....)

Op, don't you like the use of a multi-pin connector where 6 out of 14 are used?
You can slightly bend the two tabs on the pin so that there will not be so much force needed for the next extraction.

The other pins look like they were not crimped properly. Sure, they will work. For a little while.


Back
Top