What's new
What's new

Another veneer resawing post :)

I won't say i am a "convert", but recently did some resawing with the popular 1/2" blades as opposed to my usual 1" or 1-1/4" wide bands. The reason was I had a bunch of NOS 1/2" bands bought on eBay probably 10 years ago and never used except the conventional tooth ones for contour sawing, and for my pool stick joints due to the slightly smoother kerf.

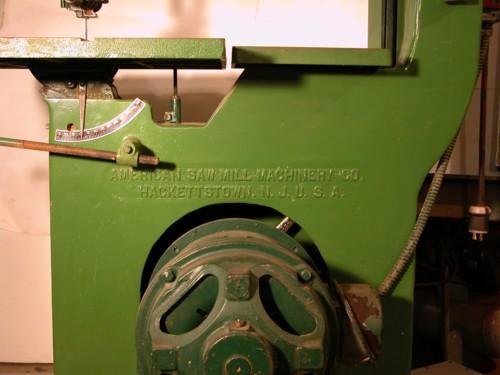
Subject to recent discussions here on PM I dug in the back and dusted off the pile of hook tooth bands and decided to try one since all my large bands are dull, and have been already re-sharpened several times each. The boxes say 4T Reg Skip .025. But they are very definitely hook tooth profile. This is the saw.

smt_veneer1.jpg

I set the saw up carefully and did some experiments. The thin band cut narrower stock with less waste due to thinner kerf. But in wider stock (over say 6" wide) it was a toss-up. The thin band deflected more in the kerf and negated the savings by about the same amount in requiring sawing a little thicker to clean up to the same finish thickness. But my wide bands were dull & hard to feed, as mentioned, and the 1/2" seemed to have some promise. So I switched back to the 1/2", and optimized the saw as much as possible for that.

This fence has a long crown in it lengthwise, to facilitate steering. (If laid on a flat surface, the plywood face is straight across edge-to-edge but has about 3/64" - 1/16" crown lengthwise.)

smt_veneer2.jpg

One of the things I was forced to do is something put off for decades. :rolleyes5: :)
The top jaws of the lower guide was about 3" below the table, so the table can be tilted, but a bit more than necessary even for that. The bracket has also never been satisfactory. I made a new bracket/"dogbone" out of heavier steel, and moved the guides up 2.5". This might not seem like much, but as a percentage it is huge, and getting the jaws near where the band exits the kerf even more important over-all. Some day I'll make a set up like Richard has, with the bottom guide right in a sub-table where the band directly exits the bottom of the work.

My method for sawing veneer is probably a little different than I have read from others.
For very thin veneers, such as feature/face stock, it is pointless to saw off faces from a cupped or significantly warped blank. Either one has to saw too many veneers too thickly to allow clean-up, or one loses veneers in the process as the wood cups or humps. So my first step is to be sure the side of the blank with the long bow in it, is flat edge to edge. I do not worry about the other side at this point, though it usually gets a pass over the jointer as well to remove the most stressed surface. (the pieces sawn for this project were unfortunately received skip dressed to 15/16, reason they look surfaced)

smt_veneer3.jpg

smt_veneer4.jpg

I actually "prefer" a slight long bow since it permits steering the board on the saw.

I mark one edge of the board strongly. Several lines, in case some get splintered or worn off. The angled lines make it possible to quickly match the sequence after all the veneers are sanded and finished. I'm usually sawing more than one board in a process like this, so not only do the individual veneers fall out of sequence, they get mixed with with 25 or 30 others from other boards. Usually length x width allows a quick board (flitch) re-sort. then the lines on the edge make it easier to sort for sequence.

smt_veneer5.jpg

smt
 
I saw a veneer of the flattened side of the board

smt_veneer6.jpg

Then I go back to the jointer (or in some cases, especially in the past, go to a hand plane) and flatten whichever side has the hump in it. This is usually the opposite side to the one just sawn. The board not only bows lengthwise, but cups one side and humps up on the other, edge-to-edge as well. The outer veneers tend to have the most stress, the center of the board usually lays more straight. So it is actually usually preferable to me, to saw each side off as the board and veneers become more stable. When sawn from one side only, the board can bow enough that it becomes problematic to hold to the fence, and that or the cupping require more material to be jointed off, that does alternating sides.

Here is the veneer, sawn at .070" thick. Of course there is some variance over the pieces a little plus or minus from that

smt_veneer7.jpg

smt_veneer8.jpg

smt_veneer9.jpg

BTW, these shown may or may not become face veneers.
I was not willing to stop mid-sawkerf to photo on the more figured material.
These were among the extra material sawn for backsides, to balance panels. OTOH, there is a client preference for more subtle/plainer faces, so anything is possible at this point. :)

After sanding, these came out at the traditional 1/28" thick for the wide veneers, and for the ones saw at 9" wide yielded .050" thick (1/20th inch thick). 30 or so leaves, various boards:\

smt_veneer11.jpg

smt
 
Last edited:
Great write of Stephen! I'll be utilizing a lot of the techniques you posted here during my next resawing session.

A couple of questions and comments.

One brand of band saw is that? I'm assuming it's a 30" or 36" but I can't i.d the manufacturer.
How do sharpen your band saw blades?
Do you thickness sand the same day?
I can't see the first four pictures of your second post.

Glenn
 
Last edited:
American Sawmill Machinery, Hackettstown, NJ.

30"/up to 16" thickness under the guides

2206-C.jpg


Photo Index - American Saw Mill Machinery Co. - 30" Bandsaw | VintageMachinery.org

I have a a box of 7" dia. thin dished wheels for a chainsaw sharpener. For this purpose I dressed the edge thinner & rounded. Essentially gullet shaped. I stand with the saw in my hands and touch under the teeth and just go right around the band focusing on trying to keep the grind square to the band and the tooth travel direction while maintaining the hook. If this were a circular saw, I "gum out" the gullets, first time or 2 of sharpening. Later, I may top the teeth, too. It barely takes a touch. I can go around a 16-6" band with 3tpi in about 15 - 20 minutes. (between 1.5 to 2 seconds/tooth). So it is cost effective. I've never tried any but 2 or 3 tooth blades and don't think it would be cost effective to do smaller ones. For me, bands narrower than 3/4" seem difficult, too.

Somewhere between 3 - 5 sharpenings, the weld usually breaks. Somewhere past 4 or 5 sharpenings, if the band lasts, the set it all gone. As many manufacturers have discovered and now promote, there's nothing bad about variable pitch spacing. But after you start topping the teeth, the uniformity of tooth height begins to degrade more rapidly. When sharpening by hand, though, one is constantly making snap decisions about tooth condition as they go by. So teeth that don't have residue build on them or that are clearly still sharp from last time don't get touched. But with more and more sharpenings, fewer teeth are actually cutting, unless you remember to joint them before taking the band off the saw. If they are jointed with a hand stone before removing, it is easy to re-establish tooth height while sharpening from the size & shape of the bright spots.

I don't always thickness sand veneers the same day they are cut, but that is probably optimal.
Sometimes veneers flatten out by themselves if all packed/wrapped in plastic overnight to equalize. And sometimes they don't. :)

The pictures still don't show even if you click on the "attachments"?
I tried editing, and nothing changed. I can't see the thumbnails, either, but clicking on the "attachment" does show the picture.

Let me know and I'll try something else.

Thanks!
smt
 
Last edited:
When I left or right click the attachments I get:
Invalid Attachment specified. If you followed a valid link, please notify the administrator
I've tried it on Firefox and Safari.

So the dished wheels are in a pedestal grinder? I really like your sharpening method. Sounds like it would do a lot better job than my current method of touching the top of the teeth with a small grinding disk in a dremel. I've had fairly ok results on narrow bands with 3 or 4 teeth per inch.

By plastic do you mean shrink wrap? The kind movers wrap couches in?

Glenn
 
Stephen, show us a picture, or better yet a video of your sharpening method. I used to use a 1" wheel in a dremel, with the blade on the saw. Sometimes I got great results, sometimes not. Then I tried sending them out, back then you could find guys to do this, didn't always work out well. I also tried putting the blades thru steel rollers to take out some set, wanted to minimize the kerf. I figured the set was for contour cutting, and that for straight re-sawing could be much less, but that didn't work out very well

Eventually I concluded it was less expensive to just buy new blades from a wholesale supplier. That was when my time was really worth something, and I was heavily backed up in furniture commissions. Now I have a Powermatic 81 with a welder, I buy coils of blade stock on ebay for cheap and make up my own blades for peanuts. I was surprised at how well the welds hold up, thought one needed a sophisticated machine to do it well. Have done bi-metallics and carbide with it, no problems, but nothing over 1/2" wide.

I'm now sitting on miles of band saw stock I'll never use, enuf to resaw my entire wood stash which I won't get around to using either. If you hear of my demise, don't miss the auction!
 
Stephen, show us a picture, or better yet a video of your sharpening method...

...Now I have a Powermatic 81 with a welder, I buy coils of blade stock on ebay for cheap and make up my own blades for peanuts...

+1 on the picture/video request.

What brand of welder is on your PM 81? Are there any particular brands I should keep an eye out for? Currently I'm using this method:
Bandsaw Blade Soldering - VintageMachinery.org Knowledge Base (Wiki)

I'm sure a welder would do a better and faster job.

Glenn
 
My welder is an Ideal. But I really don't know anything about them, this is just the one that came on my old saw.

That silver soldering looks like a pain in the butt, welding is much faster, less than 5 min including annealing and grinding. But if your blades align well and don't come apart, then your method is fine, just more time consuming.
 
Think I fixed the pictures.

By wrapping in plastic, I just use 4 or 6 mil poly. Generally there's a roll in the shop to wrap stuff (unfinished millwork) for delivery, to use as dust covers on the machine tools in the woodshop such as the (metal working) planer, shaper, and mill; and to cover work in progress. There's always at least one dehumidifier, sometimes 2, going in the summer to keep the shop around 50% RH when jobs are being run. But it is still a good idea to wrap some components of work in progress when they will not be glued or assembled for a period. Stuff like flooring, it is easy if the shop is not paying attention, for outer boards to pick up or loose MC compared to inner boards in a stack; just with a change of weather overnight, or delivery in a van during a period of rain. etc. Then the guys installing have fits, because the parquets or other elements gain or loose space in the layout. Or things like veneer where it is easy for some to vary in MC either because there was a gradient in MC in the board, or again, left in a stack in the shop for a few days while the humidity level went through a big change, usually in the summer. I will say that sanding seems to dry them, though. Thin, lots of surface area, and several progressive "heating sessions" as they go through the widebelt.

Richard, you should bring your new camera down and video me sharpening a band.

Perhaps as we enter our dotage and can't do the work anymore, we can get a income from making silly clips for you tube!

Damn, if this is to be done for public record I'll have to stop doing it freehand on an open wheel with no support, and figure out how to do it on a fully guarded pedestal grinder with an OSHA approved rest. :(

smt
 
I can see all of the pictures now, thanks. Great tips, as usual, about maintaining equilibrium moisture content.
...Richard, you should bring your new camera down and video me sharpening a band.

Perhaps as we enter our dotage and can't do the work anymore, we can get a income from making silly clips for you tube!...

smt

Write a book. I would buy a copy, or two.

Glenn~who would be the first subscriber to your YouTube channel.
 
One of the things I was forced to do is something put off for decades. :rolleyes5: :)
The top jaws of the lower guide was about 3" below the table, so the table can be tilted, but a bit more than necessary even for that. The bracket has also never been satisfactory. I made a new bracket/"dogbone" out of heavier steel, and moved the guides up 2.5". This might not seem like much, but as a percentage it is huge, and getting the jaws near where the band exits the kerf even more important over-all. Some day I'll make a set up like Richard has, with the bottom guide right in a sub-table where the band directly exits the bottom of the work.


smt
would love to see a video too Steve. After seeing richard's table guilds i said that i had to do the same thing too. brilliant idea Richard! here is what i came up with. guild will be Ampco 18 set in alli. the table insert is 5/8" thick in the wadkin and has a pin so it does not turn in the bore. you would grind the leading edge of the Ampco to adjust blade width but i will hardly do that as i re saw with the same size saw blades. might make a few guilds as well for curve work too.

great thread thanks


jack
English machines
 
I had to resaw some veneer for the signature inlay I'm making so I wrapped it in plastic right after cutting it. The next day when it was thickness sanded at a friends house it was still reasonably flat. I was really impressed how the flatsawn sugar maple wasn't cupped. For now on I'm keeping all projects wrapped up whenever I'm not working on them.

Thanks again for the great advice Stephen!

Glenn
 
Here's a little re-sawing I did a few years ago.
Timber is Australia Red Cedar. Size was 3.6m L x 250mm W x 1.0mm thick. The 1mm thickness was 1.0-1.1mm all over measured end to end and edge to edge consistent.
Carbide blade used.
P1040031.jpg
And I have no bottom guides. Only well adjusted top guides.
 
Vesper-

That stuff is less than 1/2 the hardness of maple, so a lot easier to saw but I am impressed. :)
Also, AD stuff will lay flat as it is cut, compared to recent KD. Sawing flat & uniform thickness has more to do with the material, than the saw itself. Assuming of course that the saw is not incompetently set up.

Saw band spec's? (w x t x tpi?)

Why no bottom guides?

smt
 
Vesper's post reminded me it's been a while since this was updated.

The client had proposed the geometry of the layout as follows, so I made up a sketch face using plain sliced veneers from the above assortment to demonstrate the match that would result. (Also made a fan sketch face, not shown, just to be sure). The way this face works is interesting, but very wasteful of veneer. Starting with the outside, to use the best piece of veneer to the fullest, an individual veneer is mitered and folded down each side. The next veneer is done aproximately the same way, but some fudging comes in - the intent is to bookmatch side to side, but keep a plausible end match at the miter. This is where a lot of veneer gets thrown on the floor. The final, inner fold is again the same thing, book match side to side, keep the ends plausible. More scraps and cheating are included. :D

Dveneer1.jpg

The client liked the result, though the plain sliced has an interesting "Cabinet of Dr. Caligari" overall skewed geometric effect. So in the background, the actual inside balance sketch face is made up, ready to veneer the inside of the top.

Top with glue, wrapped with plastic, ready to put in press.

Dveneer2.jpg

In the press

Dveneer3.jpg

top caul in place, air applied. The cauls are really re-purposed curved door forms from a job several years ago, and they are undersize. Hence the extra layers of plywood, and the C-clamps around the perimeter. There is no advantage or purpose to the curved side, they just happened to be handy torsion boxes, almost big enough.

Dveneer4.jpg

finish veneered top, inside surface

Dveneer5.jpg

smt
 
Great thread Stephen -- thanks.

With respect to the 1/2" blade wandering -- do you have a tension gage or ??? to get it as tightly tensioned as practical?
 
Vesper-

That stuff is less than 1/2 the hardness of maple, so a lot easier to saw but I am impressed. :)
Also, AD stuff will lay flat as it is cut, compared to recent KD. Sawing flat & uniform thickness has more to do with the material, than the saw itself. Assuming of course that the saw is not incompetently set up.

Saw band spec's? (w x t x tpi?)

Why no bottom guides?

smt

Hi Stephen,
Yeah I saw the thread somewhere down the list and thought hey why not bump it up with a contribution for a change... Good work on your cuting and veneering.

Maple is a lot harder, but this cedar I cut was some old growth from an NOS flitch that could have been 60-80 years old so its the good dense stuff as far as Aus Cedar goes. And personally I don't consider maple a hard timber compared to many others I work in my toolmaking, I think the same setup would have done the same thing in maple or any other timber about that hardness. Just slower feed needed maybe.
So yes lets assume this flitch was AD, not KD, and it was fairly stable as it peeled off.
I can saw flat and good thickness in KD stuff that moves but the secret to that is having a jointed flat face pressed hard to the fence and NOT letting the sucker push away, which is very hard to do sometimes.

Band used - Carbide teeth, 2TPI, 28mm band, kerf I think 1.2mm or so. Maybe 1.5 I can't remember that bit. I always want thinner kerf though...

No bottom guides because the machine was built in the 1870's. It never had any, I could have retrofit some when I restored the machine, I started drawing them up back then because I thought it was going to be useless without them.... Time and patience ran short so I switched it on and started using the machine without lowers and found negligible difference. And that's how its been ever since.
Only time lower guides would be better is when curve cutting tight to the Rad that the blade installed can cut, it tends to allow slightly more twist than one might otherwise get.
 
Band used - Carbide teeth, 2TPI, 28mm band, kerf I think 1.2mm or so. Maybe 1.5 I can't remember that bit. I always want thinner kerf though...

Interesting. never yet used a carbide blade, but your 28mm is close to my preferred 1" or 1-1/4" 2 tooth bands. The veneers above were experimenting with the 4T 1/2" wide bands that many in the US rave about. Obviously worked, not sure which way I will go when it is time to buy more.

I can saw flat and good thickness in KD stuff that moves but the secret to that is having a jointed flat face pressed hard to the fence and NOT letting the sucker push away, which is very hard to do sometimes.

yep - same method in use above for the various maple veneers. It can be seen that some were not exactly flat after being sawed. Most settled down after a few days bundled up in plastic.

PS, I know hard maple is indeed pretty hard, (Janka 1450lbf/6450N) many Australian timbers are far, far harder. I'm envious, actually. :)

smt
 
Nice resawing job Vesper. Everyone wants a thinner kerf, it really hurts to see all that precious wood go straight into the dust collector!

Here's a guy who does professional resawing of guitar wood - Borson Precision Resaw There used to be more information up on his site, I think he claimed a 1/32 kerf. When I first saw that, I did a little sleuthing and found he used a carbon steel meat cutting band. I have the info at my shop, will dig it up and post it later. Notice he uses a mister or micronizer to lube/cool the blade. I use a Lenox micronizer and get better cuts and much longer blade life with it.


Back
Top