What's new
What's new

removing 10EE headstock reverse shaft

focusrsh

Aluminum
Joined
Jul 30, 2018
I'm trying to remove the reverse shaft from my EE10 headstock. Both of the gears on the shaft have the setscrews removed and they slide easily, so they are not holding the shaft. (Sorry for the blurry photos.)
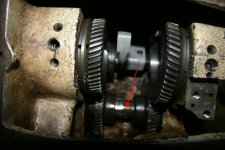
marked IMG_6194.jpg
The only thing I see holding the shaft in place is the left side bearing, which is held in place on the headstock by the "Reverse Shaft Bearing Cap". That is off. You can see the bearing in this second photo.
IMG_6195.jpg
The shaft/bearing have resisted all efforts to pull it smoothly out. (It appears that someone used something orange-colored to retain the bearing.)
It is in a place where it is impossible to place a drift behind it. The manual doesn't show any setscrews or snap rings holding it in.

Am I missing something?

I am ready to try a 5lb slide hammer, threaded onto the end of the shaft, to impact the shaft against the bearing to drive it out.
 
The headstock drawing doesn't indicate that there's anything else keeping the shaft in place. (I sent you a copy of the drawing; did you get it?)

I would try some sort of puller before I used a slide hammer. Thread a long bolt or length of all-thread into the end of the shaft, then use a length of pipe or whatever to support a cross bar and nut that you can tighten to draw the shaft out.

The drawing shows the end bearing to be an ND 3205, double-row, angular contact bearing. They don't appear to be terribly expensive if you damage yours.

Why are you removing the reverse shaft? You should be able to fix the problem with the shifter fork without removing it.

Cal
 
Cal-
Yes I did get the headstock drawing, thanks.

Good idea about using a length of pipe to make a puller. I tried using the Shanky bearing puller that I used to remove the collet closer, by putting a heavy washer and nut on the threaded end of the shaft, but no amount of pushing did the trick. I'll head out to the shop tonight and try your idea.

As to why... I reported in another thread that I found all sorts of bits in the bottom of the headstock, including one of those special setscrews that was suppose to be holding the right hand reverse gear to the reverse shaft. Without the setscrew, the gear had slipped to the left and was only engaging its mating gear by about 2/3 the tooth face. I slipped it back where it belonged and replaced the set screw. But when I turned the gears by hand, I suddenly found they were binding quite a bit. Lots of subsequent investigation showed that are about three damaged teeth on that right hand gear. Not terribly damaged or broken, but enough to cause it to bind. The gear has to come out to stone and polish the bad teeth.

Oh, by the way, there is also an oil seal under the bearing cap. That looked pretty bad so I'll replace it. I guess I should check all the oil seals on that side of the machine while I'm at it, and order new ones. Probably not expensive.

Every job on this lathe is turning into two more jobs! And I haven't even begun to address hooking up a single-to-three phase AC converter. Oh well, at least I'm learning a lot.
 
The near bearing is a ND 3205, it is simply friction fit in place. The far bearing is a ND bearing of normal type but it has a lockring on it so it cannot push too far into its recess, ND 43204, thus providing a rightward limit on movement. LocateBB on Ebay has both bearings. Simply put a spacer behind the gear and tighten the gear nut and the shaft will come out. Then you can put your slide hammer through the other bearing and knock it out leftward. The seal in the bearing cap is a 1 inch id seal, even though the bearing surface is 25 mm. Close enough for a rubber seal.
 
Last edited:
Cal, the right threading gear support has the machined surface/2 threaded holes/2 taper pin holes for the oil well and oil drip tubes. Missing the oil well?

marked IMG_6194.jpg
 
Cal, the right threading gear support has the machined surface/2 threaded holes/2 taper pin holes for the oil well and oil drip tubes. Missing the oil well?

View attachment 262637
That's where the bracket for the tachometer shaft mounts. Here's what mine looks like:

IMG_6195.jpg

One thing that always puzzled me about my headstock is that there's no apparent way for oil to get to the sleeve bearings for the forward and reverse threading gears. You can see oil holes on either side of the SHCS on Carl's headstock, but I got nothin':

IMG_0513.jpg

Cal
 
Cal, The oil holes you refer to on mine (WiaD version) are blocked by the bronze bushings, so those holes may not be significant. Since his bushings have a groove and multiple oil holes outside the casting those holes on his may be blocked as well. Since threading is done at low speeds, Monarch may have thought that the oil that is on the teeth of the gears from the bottom of the gears being in the oil bath, and from spray on other portions of the gears, was enough to wick into the space between the steel boss gears, and the bronze bushings, Probably one drop of oil would be enough for a hundred thread cutting operations between an ultra smooth steel surface and oilite bronze, much less continual spray from regular turning.

John
 
Thanks Bill, I was using oilite as a catchall for bronze bushings. You are right, all the bushings I came across in gearbox and elsewhere were solid bronze.
 
New Departure correction. I remembered that the headstock drawing has a typo for the double row bearing. The left bearing is a ND 5205 double row. The 5 is ND indication of the double row. The parts list over to the left has the correct number.

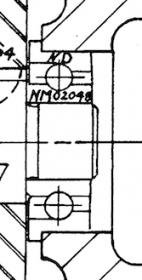
The rightward bearing on my machine is a snap ring bearing, but I noticed that the old headstock drawing shows a flanged bearing with one bearing number written on the bearing ND NM0248, which appears to be a a flanged angular contact; however, the parts list indicates the ND 43204 which on mine is a snap ring bearing.

Screen Shot 2019-08-08 at 3.06.15 PM.jpg


Screen Shot 2019-08-08 at 3.11.45 PM.jpg

I posted this two years ago, but for those who missed it, New Departure catalogue:

New Departure Hand Book ... - General Motors Corporation. New Departure Division - Google Books
 
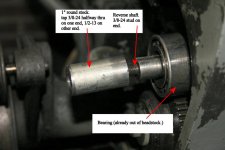
Success, the bearing is out! Cal's idea worked. I made an adapter from 1" round stock, about 2" long, and drilled/tapped a 3/8-24 hole in one end and a 1/2-13 in the other. Got some steel pipe with a 2.5" ID, about 4" long. Made a "cap" out of some scrap 1/2" steel, about 3x3 inches, and drilled a 1/2" hole in it. The adapter threads onto the reverse shaft's 3/8-24 stud that normally has a nut that holds the gear on. The pipe goes over it. A long 1/2-13 bolt and nut go through the cap and into the adapter. I sprayed plenty of Blaster around the bearing, held one end of the bolt with a wrench and tightened nut. It took a lot of torque, but eventually the bearing started to move and eventually pulled out of the headstock. See attached photos.

If anyone else has this job to do and read this...
1. BE SURE to remove the setscrews holding the two gears onto the reverse shaft!
2. You should be able to slide the gears back and forth on the shaft before you attempt to pull it. Make sure they are not stock on the shaft. If you can remove the Woodruff keys, that will help you pull the shaft out of the gears.

I think a person could use a short piece of threaded 1/2-13 rod instead of a bolt, and drive the nut with an impact wrench and a deep socket. That might pop out the bearing easier. Also, my original idea of using a slide-hammer would probably work just as well if you make an adapter like I did.

The bearing I removed doesn't feel bad. It isn't the original New Departure bearing, and it is clear someone has been in there before me. But given the amount of work I don't want to do again, I'll probably just replace the bearing and oil seal.

IMG_6200.jpg IMG_6199.jpg
 
Tonight, with the reverse shaft out and the left/right reverse gears out too, I investigated why the right gear was binding. Some of the teeth showed deep gouges on the tip. I eventually decided that some of the teeth were simply too long and were bottoming in the mating gear. Since I don't have a working lathe...chicken and egg!...I used a file to remove the gouges one tooth at a time. Put the gears back together in the headstock, turn by hand to see if they still bind. Repeat. Took two hours but eventually I ended up with smooth running gears. (In the clock world, this is known as "topping a wheel", and is done in a dedicated lathe-like tool.) The gears are not hardened, thank goodness, so they were easy to file.

So now the question is, why was this gear so bad? I'm pretty sure someone has been inside the headstock before, although I did discover that the bearing I pull in the above discussion WAS a New Departure, probably original. The broken clutch fork was the start of all of this. Maybe something broke and damaged the gear, and then it was replaced. Did Monarch make the gears in matched sets?

Oh well, it is now working smoothly. Time to put the headstock back together and move on to the next problem.
 
A note about the oil seal that is in the bearing cap for the reverse shaft:
The original was a Victor 60250, no longer available. It had a single lip with a metal spring band. Dimension was 25mm ID, 44.5mm OD, 11mm deep, and had a metal outside shell.

The closest replacement I could find is a SKF9805, which also cross references to a Sealed Power 9805, Chicago Rawhide 9805 and a Timkin 712000. These are 8mm deep instead of 11. I don't think that makes a difference, since the only thing that really counts is the lip contact. Unfortunately, these are all in the $25 range.

I also found an AVX #TC25x44.5x6 which is 6mm deep at $4.41 each. It is Nitrile and has two lips. I ordered two of these to see if they fit. Since the bearing retainer cap is .505" deep (12.8mm) you could put two of these AVX seals in the cap.


Back
Top