JasonPAtkins
Hot Rolled
- Joined
- Sep 30, 2010
- Location
- Guinea-Bissau, West Africa
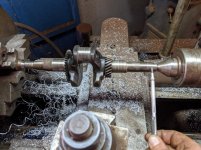
Hey all, rookie question about copying a taper. I have this crankshaft from a small motor, and the owner has found an identical one except on the new part, instead of a taper, it's a straight shaft. They'd like the taper cut into the straight-shanked one.

My basic question: how close is close enough? I have my compound indicated with a good DTI to within .01mm along the length of the 20mm taper. That end (where the live center is) is threaded, and a screw pulls this taper into the mating one. Is .01mm (4 tenths) deviation along taper that's almost an inch good enough to make a good mating taper? Since I have the part indicated on centers, my plan is just to swap the tapered part for the other and start cutting (with the apron locked).
Secondary question: how do you measure figure out the depth of the final cut? IOW, I have the taper set, but where do you put the calipers to know how far to push the cross slide for the last pass? Measuring either end of the taper seems like it could lead to error, because any lateral variation in the location you're measuring also changes the diameter you're measuring (ie, measuring the original right on the small end, but then measuring the copy just to the left of the small end will give an incorrectly large measurement). I suppose you could cut the mating taper in a scrap piece, and then measure how far it goes onto the original and new part - is there an easier way though?
Keen observers will note that my lathe has a taper attachment, so I know I shouldn't be using the compound to do this - but there's some slop in the taper attachment nut, so I'm not sure I can trust it, and this seemed faster than the testing to figure out if I really can trust the taper attachment's motion or not.


