What's new
What's new

First time using a grinder

SirRage

Aluminum
Joined
Sep 18, 2016
Just bought a brown & sharp Micromaster and had a chance to use it at the warehouse where it was being stored. I didn't have a way of dressing the wheel but the previouse owner had one on there so I gave it a shot with vice jaw that was near by. I would have stoned the part and the chuck before starting but there were no stones to be had here.

I'm wondering if the finish looks correct or if there is chatter in it. It sounded fine while grinding compared to some of the videos I've seen, but this pattern left in the part makes me wonder if I was doing something wrong.

IMG_0207.jpg

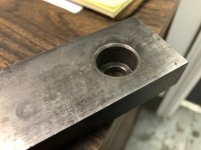
How the part looked before grinding (the other side)
IMG_0208.jpg
 
Generally looks not bad, but really hard to say without knowing the parameters; table speed, cross advance rate, down advance rate,coolant flow, finishing cuts.... As well it is quite possible that the wheel needs dressing.
 
Not bad for your first time but we don't know the wheel grit/hardness, how much/how fast you took the material off, dry or wet, how sharp was the diamond dress, etc. It may also be some loose stones for all we can tell. This looked like CRS and that often looks like that after a dull diamond dress without care taken for the last spark-out pass. There's some burning going on but I'd have to watch/know what you did. You'll improve your technique and the surface will also. Congratulations if you purchased the grinder.
 
Thanks! It was without collect. Initally I took a few passes between 2-5 thow, genearly learning how the thing felt. I was finingh up when I bumped the depth wheel and accidently started taking 10 thow out of the part. I did a few more passes to get the marks out then did a light finishing pass at about 3-4 teths.

I don't recall what the wheel was.
 
Probably just the wheel suffering from the bump and subsequent heavy cut(s). Your crossfeed looked good. Your rough cuts were maybe a bit heavy. For an unknown wheel and kind of adverse conditions it looks good. ID your wheel and dress it and experiment a little. Technique is half the battle with a manual surface grinder. Before you buy another wheel(s) see what you have and practice with it. If this is for general shop work you will learn to make almost any wheel do what you need to do. For production work you will need the close to perfect wheel.
 
If it's your first time I will presume that you'll be doing general type grinding. After you do a lot of reading on the subject you'll want to experiment with the reality of doing the work itself. I would suggest that you use as coarse a wheel grit as possible while obtaining the surface finish you require. Most of the time a 46 grit was adequate for general work, the 60-80-100-120 grits were for fine work or holding geometry dressed on the wheel. The higher the grit number the greater the chance of burning the surface of the work piece. You needn't worry about bond or hardness right now if it's general work, you'll concern yourself with that when it comes time to do production work. You don't need a diamond wheel (unless it's for precision carbide grinding) or any of the real expensive wheels right now, won't help you. Use the green wheels (silicone carbide) for non-ferrous materials and seek a greater understanding of wheel wear, wheel loading, heat control, work material properties, and a sundry other topics/techniques that you'll need to know first. Depending on what you'll be doing there are plenty of fixtures and things (radius dresser, surface plate, indicators, vacuum, etc.) you'll need to purchase to be fully operational. Try to be selective when dressing a radius on a wheel, it's a waste to dress geometry on a wheel only to need to remove it on a later job so order wheels in sets of 3 seemed to work for me. Good luck.
 
A diamond dresser is Darn cheap, 1/4- 1/2 carat is a good size, a steel block 2 x 2 x 3/4+ to hold it. Also dressing sticks of about the same grit as the wheel, breaking the edges of the wheel, dressing the sides. I dry grind most of the time, using Cold air blower to control heat on multiple pass jobs, or thin material.


Back
Top