What's new
What's new

Wheel type and grit for hardened steel

texasgeartrain

Titanium
Joined
Feb 23, 2016
Location
Houston, TX
I have an old B & S #5 surface grinder. The wheel ID is 3", and can accommodate I believe up to a 1" wide wheel. And wheel OD can be up to 10".

I'm not using coolant right now.

I want to run a few thousandths off a hardened Aloris tool holder. I don't know which steel they use. I'd like a finer finish.

What wheel type and grit would you guys recommend ?

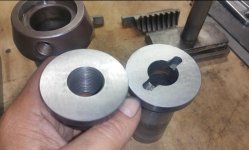
A pic of the holder type I want to run. I will be running the two sides adjacent to dovetail, you can see wear dis-colorization there in pic, I need to take those two surfaces down a bit to help dovetail fit.
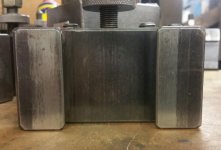
248.jpg
 
Short answer is whatever wheel you have on hand.

1) This isn't for production where wheel choice makes a difference

2) You're not taking more than a few .001's off a relatively small surface

3) This isn't really a high precision (+/- .0001) job

4) It's just hardened tool steel not some exotic material that warrants a special wheel.

A 46 grit AO wheel should do well enough for a short job like this. Did you try looking information up to educate yourself? I don't mind giving advice but always appreciate when someone tries to do the homework and presents what they find when asking a blank "What's best?" sort of question. Dry grind will be ok with a solid hold on the workpiece and a good mag-chuck. Be safe.

I appreciate the advice. I can't read the specs on current wheel, but at a guess i was thinking it was a 46 k. It generally leaves a nice finish on cast or un-hardened steel. I just ran another hardened piece, and it left some visible scratch marks. I was running about .00025 on final passes.

I own a few grinders, but i haven't needed to buy or change a wheel in a while, and some info has flown out of my head, lol. I do quite a bit of daily/weekly reading and research. But with several projects going on. . . yeah, i was looking for a quick answer, :D
 
The visible "scratch marks" may have had more to do with the way the wheel was dressed, the diamond (if not sharp), or loose grains in the wheel than the wheel selection itself. Finish pass will almost always be better with a fresh wheel dress (if needed) and the last few .0001's dusted off. I keep track of the finish (and heat) as I'm grinding and try to leave about +.0007 on a finished surface so it can cool off and will allow .0002-.0003 for the final pass and spark-out after the material does the thermal reduction. I'll decide if a fresh dress of the wheel is needed at that point. You can also do the same check at the beginning of the job to test what finish the wheel will leave at the final pass. Grinding is a work in progress, things need to be checked and decisions made during the entire process. Use the 46 grit, or what looks like it if the code isn't readable. If the finish isn't good enough for this application then something else besides the wheel selection isn't correct like the factors I mentioned at the beginning of this reply. Ganbatte.
 
Just for looks that could be wear-off of the bluing they used so few figue 8 rubs on a sheet of abrasive paper might make it bright and new looking...and just for looks you cant see that side.
Wishing to grind it dry a 46 k through L should do just fine. (A spray bottle for home made coolant should be part if you surface grinder accessories. Two table spoons of washing soda in a quart of water.) Just dry for that part is Ok with taking your time and adding an inch or two of over travel at the long travel ends. Likely the part only needs .001 take to clean up. Bring the parked fresh dressed to hand rub the surface to see .0005 or less difference in your down dial to be sure you set-up has the part flat, you may need to shim it if the take side is not flat.. Use small cross feeds taking .0003 to .0005 down feed and increment across with long travels. You might even try .0002 for that first pass to see what your wheel likes. Any time it seems you are losing wheel RPM in a grind you are likely taking too much.

*Should first lightly hone the opposite of the side to be ground to see there are no bugs or burrs opposite.
It looks like a chunky part so should mag down very well.
 
Here's pics of the parts with scratch marks I mentioned, may be a little hard to see, but look like wavy lines:

222.jpg 254.jpg

Those two parts mate, with nut tightening down on top of what is a retaining bolt with spanner slot in the top. I only took a few thousandths off each. .0005" until even surface. Then .00025". I let work cool about 10 minutes before final .00025 pass. Let cool again, and without changing depth, ran a dusting pass.

I got them flat, and scratches are not anything I can feel with a finger tip. But with finger nail, I can slightly tell. Those two surfaces being pretty is not all that important to me.

In fact the tool holder does not really need to be pretty. But I thought if I could, I would.

I do dress wheel before each use. My process is to center diamond dressor on mag chuck. And directly crossfeed in. I run .001" passes that way with dressor until an even dust dispersal comes off OD of wheel. I feed in pretty quickly during this. The condition of diamond could be questionable.

For anyone interested, all this is for an old Aloris tool post, and then I sort of hi-jacked my own thread with trying to get holders to fit a new Aloris Tool Post:
O/T Attempted repair of a frozen Aloris Too lpost
 
Such a finish would be good for mating parts so they would not slide, but I understand why someone would not like the looks of it. It seems a very odd finish I have not seen. I wonder if there is end way play in your spindle, so push / pull on the wheel and see if the up/down way has lose travel and if it is in the up-ways or in the spindle. Also check to see your long travel oil pot are full with way oil.
A straight up diamond and set at center will get a flat top and so not dress , but just rub the wheel, is that the case? often the diamond shank comes up at about a 15* angle and using and turning often makes facets like a diamond ring shape, the facet edges are better for dressing a wheel.
 
Last edited:
My process is to center diamond dressor on mag chuck.[/URL]


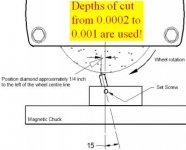
-Does this mean you're locating the tip of the diamond directly under the center of the wheel axis? If so you need to be a bit past the axis (to the left for CW rotation) and if it's a "post" type diamond to have it either vertical or angled away from rotation (depends upon how diamond is mounted to holder).

Odd looking marks that aren't "scratches" but look like something going on elsewhere than the wheel itself. Possibly excessive movement (thrust) along the axis or a harmonic for those parts? Have you had this with other pieces? Ever checked the spindle for play/wear? Can't tell from photo but the marks look like they're not all going the same direction. How were these pieces held? How do you determine the wheel is fully dressed? Is the diamond solidly located in the holder? Interesting surface finish and speculation on my part. Reply when you can.
 
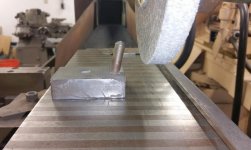
The holder for diamond is 15 degrees. I point the angle directly toward wheel, like in pic:

255.jpg

Grabbing the wheel with both hands, There is no end thrust, or up and down play that I can feel.

While not anal about it, I have aimed for centerline when dressing wheel.

One factor I didn't previous mention, on the parts I showed you pics, Near the end of final passes, I had a noticeable grinding pattern, with the marking like I mentioned. Though from where I was standing, I didn't have a great eyeball on it.

Well on final light passes, I rotated the parts somewhere between 60 and 90 degress to try and break that pattern.

The wheel does turn CW from my standing position, so you suggest aiming slightly left of center, also which direction do you suggest the 15* be pointed ?
 
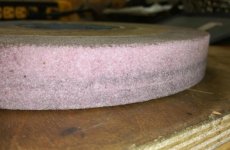
Was routing through my collection of wheels for other machines, and forgot I had this, for this machine. I can only read the rpm spec, and OD is wore down to about 8". But it feels finer, I'm thinking 60 or 80 grit, though I couldn't guess letter designation.

I'm wondering if it may be a better choice for this particular project.

256.jpg 257.jpg
 
STOP! Just STOP!. You will not solve any problem by using a worn down stump of unknown wheel. You have your dresser 90 degrees out. The diamond should lean into the rotation of the wheel about 10-15 degrees. This prevents the diamond from digging in and possibly exploding the wheel. There is no reason to angle from the side.That worn out stump wheel will not even have enough sfm to be properly called grinding. The last thing a would be grinder needs is a fine grit wheel. The coarse wheels are much more forgiving and will produce an adequate finish for any but cosmetic jobs. You need a proper diameter wheel, properly mounted, and properly dressed. Your pics appear to show movement in 2 axes at once. That is a problem of it's own. If you can lock the Z axis before each pass, try that. if the marks become straight to the X axis then you have found a problem. Fix that first. One step at a time and you will find success.
 
Use the diagram from eKretz and the comments from tdmidget. As for grabbing the wheel to check for play....that's not a good enough procedure. For a machine that should produce work accuracy to .0001's you want to check play/wear with a dial indicator that reads to at least .0005 (for ease of use) and indicate on the spindle itself. You really should do some reading on the subject, it's on the internet and is free.

You moved/rotated the work for the last pass? It does help to include ALL information with photos so people like me don't jump to wild conclusions.

Can't really tell from the photo but that diamond looks about as round on the tip as a ball bearing. Yes a diamond isn't supposed to wear but it does fracture over time. You need to rotate the diamond in the holder now and then. If your diamond doesn't have sharp facets (doesn't look like it) then you need to get a new one. This makes a noticeable difference in dressing the wheel.

Does the long travel have a lock? You really need to lock the table when dressing. Any movement, no matter how slight, will affect the wheel dress and the resulting finish it imparts to the work surface. Even just vibration through the table will affect it. A solid, POSITIVE lock is required when dressing. You'll either have sliding stops on either end, a clamping lever under the table, or both. Use BOTH if available. If no locking mechanism is present then your table is free to drift with the force transmitted from the wheel through the diamond to the table. That is NOT a good arrangement for dressing and I would NOT attempt it again until this is remedied. Need I explain why?

Your work (gunsmith I presume) involved a lot of reading/research. Why would you not do the same for each machining method you use? I applaud you asking questions to get better results. I would offer greater applause for also doing some homework about one of the more dangerous machine methods in the shop. This is not intended as negative criticism, I'm hoping to set you on a path to learning. I do want to help you, I also want you to learn to help yourself. Improvements will come twice as fast that way.
 
Hey guys I appreciate it. I can't recall all the where or when I figured out to do what I was doing. But I did remember videos on youtube from Don Bailey at Suburban Tool I had watched some years ago.

In this first vid, he dresses the same as I described, with 15* in same direction I was going. Also he runs from center line. He does it twice at 6:10 and 11:10 in the vid:
YouTube

In this second vid, it appears the dressor is straight up, not a 15*. He does that starting about 1:00 minute into vid:
YouTube

He seems pretty knowledgeable. Is he doing it wrong, or is there more than one way of doing things, for perhaps different reasons or results ?

On locking the z axis, the only thing I see is a thumb screw that will tighten onto shaft for hand wheel, which I can try, but I was thinking thats not really going to lock the whole overhead spindle assembly to whatever ways it drives up and down on.
 
Of course things can be done in more than one way. That doesn't mean because so-and-so does it this way or that way it's automagically the best way - or the right way. The way Don is dressing that wheel will work as long as he keeps rotating the diamond in the holder (assuming it's at a 15° tilt in the other direction), but it's not optimal. If you want to keep your diamond in good shape and cutting sharp, dress the wheel like the diagram shows. It is the best way.
 
No he's not doing it "wrong". Moving slightly to the left of center (CW rotation) is to ensure the diamond tends to move away from wheel contact rather than into the wheel as it would if just to the right of center. This is a safety habit.

You will also note that he has a secure lock on the table (uses his left hand) that he applies before moving the cross feed.

Locking the up/down movement isn't what happens with the thumbscrews, they're for setting your "zero" or a predetermined amount of down feed. Locking up/down axis isn't required, the weight of the head (fairly heavy) is resting on the axis feed screw thread flanks.

Diamond can be vertical or angled, it's about eliminating the possibility of the diamond "digging into" the wheel through vibration or table movement. The advice of placement and angle is not about an absolute, going-to-happen result. It's more about eliminating the possibility/likelihood of it happening and/or reducing the effect if/when that happens. Will it make a difference for you? Can't say it will but if it does will you know it is? This is just eliminating another variable factor that may/may not affect the finish.

As eKretz has pointed out there are many different techniques for surface grinding. Some prioritize finish, some for speed, some for accuracy, and some are for safety. We're attempting to provide you with safety and surface finish with a minimum of fuss or theory. What Don does is good for Don. What I do is good for me. If I'm not having success with my methods I'll try Don's or even yours to obtain good results. What you've seen from Don hasn't produced the results you seek. This may be from not following everything he does, not understanding what he does, an unknown factor, or it just doesn't work with your machine. Don's techniques aren't "wrong", neither are eKretz, tdmidget, Michiganbuck, or mine until the results show to be wrong. Yours aren't working, why not try what some of us are suggesting before pointing out what you've seen? Just a suggestion, you can ask about comparative "why" when a solution is arrived at.
 
Your work (gunsmith I presume) involved a lot of reading/research. Why would you not do the same for each machining method you use? I applaud you asking questions to get better results. I would offer greater applause for also doing some homework about one of the more dangerous machine methods in the shop. This is not intended as negative criticism, I'm hoping to set you on a path to learning. I do want to help you, I also want you to learn to help yourself. Improvements will come twice as fast that way.

I do appreciate good advice. I was doing a bit of that work as a side, and carried that user name from related sites when I joined practical machinist. I gave it up a few years back as regulations could make it a legal headache. Predominately I do commercial marine engine, gear, and power generation work. I generally work 60 hour weeks.

Having a variety of machines, I spend a great deal of time on research on what free time I have. But how many years does it take to learn a new career on a journeyman level in my spare time? :D

I log in to ask and answer questions in part for the social aspect, hanging out with similar minded folks, and learning new things. Plus researching by myself can lead to bias learning. Here I can get opinions galore. . . :D
 
I generally work 60 hour weeks. Having a variety of machines, I spend a great deal of time on research on what free time I have. But how many years does it take to learn a new career on a journeyman level in my spare time? :D
:D

-As a first time home owner I find myself mounting the learning curve on an almost daily basis. How long does it take for professional results on an unfamiliar topic? Way longer than any of us have time for it would seem.

We'll get you there, opinions included at no extra charge.
 
From here the wheel in post 10 looks more like a 24 grit and the pink wheel in post 11 looks like a 46. Both wheels should grind with lines following the long travel. You might hone strike the dresser bottom to see that it flat or a tad concave, not rounded like convex and not having any bugs or burrs.. For my liking that diamond is hanging way too far out of the holder. Turn the diamond a twist in the holder to see the sharpest facet pointing up, locate it like ekertz suggested in post 11. I would try the pink wheel.
Dress the wheel with a .001 down feed to knock out the high grits, dressing .0001 0r .0002 often dulls the grits and does not knock them out IMHO.

This is a test: set a broad base piece of stock on the chuck.
Come down with ½” of the fresh dressed wheel over the part. Down feed .0002 and traveling with long travel and no cross feeds to begin light sparking. Travel well off the part at the right and left long travels. with long and even pause off the part, with .0002 down feeds when off the part and long travel across again. Give the part a hand spray of homemade coolant. Continue .0002 downs and travel, long traveling and down feeds until you have just cleaned up the part. Dont race with your longs but just comfortabl travels.

Inspect the part to see smooth long travel lines in the finish ..or something other ->report the other/ post a photo.

With only long travel lines showing in the part surface finish (the condition we want), now crank .015 with cross travel when off the part then long travel over the part. Continue to cross .015 when off the part and then take a long pass and cross feeds all the way to grind the whole part. Do not cross feed when the wheel is on the part. but do cross feed when tha wheel is off the part on the right and left.

Oh, and with manual surface grinders the axis name are long, cross and down…never XYZ. This is because all CNC surface grinder manufacturers do not agree on what is XYZ.

Finding the grinder Ok re grind your dresser, all sides to .0002 square just for practice/fun. No, dont grind away all the angles and such 100% just grind it to the basic rectangle, if soft drill a diamond hole in the side height and a hole at one end at 15* so you can use your diamond in different places..
 
Last edited:


Back
Top