What's new
What's new

14” Springfield Lathe

mmurphy001

Plastic
Joined
Oct 10, 2015
Location
KCMO
A few years ago, I bought this lathe and used it a little but never had a chance to really do much with it. I’m now building out a hobby machine shop and figured it was time to get this guy in shape.

History of the lathe as far as I know it.
It has a metal tag showing it came from Mid-West Machine tools & supply company in Davenport Iowa. I bought it from the owner of a former machine shop in Port Byron Ill which is about 20 miles from Davenport. The person I bought it from was the employee of and later owner of the machine shop from the original owner. Which makes me the second or third owner depending on how you look at it. I will reference it as the third owner for clarity. Owner #2 said this lathe was the “personal” lathe of owner #1. Nobody used it except for him. That comment makes me think that what I call owner #1 really was the original owner – the math works out anyway. So the story goes that after #2 bought the machine shop he delegated this lathe to be the “casting” machine since it was so heavy and rigid. By Casting machine, I mean it was the lathe to turn rough cast iron. Apparently, sometime during history someone kept bugging #2 to sell him this lathe. I don’t remember the details but to keep him quiet owner #2 moved this lathe to his home. I believe it was used there but not a lot. When I bought it 5 years ago #2 said it had been at his home for 25 years.

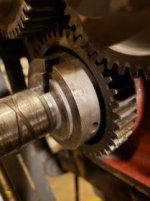
Here’s a couple pics of it the day I got it home. Sorry for the bad pictures. My phone at the time had a cracked and foggy camera lens.

Picture5.jpg Picture6.jpg
 
History part 2
From that time, I’ve used it very occasionally for some light touch up machining. I made some A-arm bushings out of Delrin for my ATV and a few other light projects. During that time, I realized the feed for the auto feeds mostly worked but was slipping. Then I had a forced relocation-move and had to drop all machine work for a few years. I’m finally back to a position to build out my shop (now in a basement instead of my metal building) and first bought a Mill now I’m getting this guy in shape.

Although it turned out to be a bad Idea, I thought a nice power-wash bath would be in order since this thing was very filthy. It partly worked but I did get some water in places I did not want. But mainly this thing has a coating of something on all the cast iron parts similar to body putty. After most of the paint and a lot of “holes” of the body putty came off with the power wash causing the surface to be very rough. So, yes, I know it looks like $**t but I was not wanting to restore the lathe just get it in good working order so I could use it. If it turned out to be a good lathe, then I would consider restoring it. To cover up the crappy finish I used hammer tone paint which hides a multitude of sins but makes the lathe look funny. At some point I may take it all apart and do a proper paint/finish job on him. It really needs a full restore because I know the ways have at least 10 thousands of wear in them maybe more. Regrinding the ways are not in the picture at this point.

One last odd (at least to me) thing is almost everything seemed to be made “in-house” you can see the machining marks on the bolts where they turned down hex stock to make their own bolts and nuts. The other thing is they were not shy about using flawed castings – maybe this is the way all machine manufacturers are -- I don’t know -- but a lot of the castings have flaws – not in critical areas but they do indeed have areas where the sand fell down and got in the way of the cast iron when it was pored again no flaws in critical areas but there do seem to be a lot of the castings with flaws.

Tags and Serial number.
Picture2.1.jpgPicture2.2.jpgPicture2.3.jpgPicture2.4.jpg
 
Your lathe looks a lot like this one : Springfield Lathes - Older Models

I'm wondering if perhaps you have a WWII "wartime finish" lathe. Supposedly these were '20s and '30s lathes, but...

If it's overbuilt as you say, the casting flaws don't matter much. Bondo will fix you right up!

And if you haven't seen it already, Doc's Machine has an exhaustive thread here on PM on rebuilding a Springfield.
 
It was fairly routine for the bulk of castings to be left somewhat rough before paint/finish. Obviously the working and faying surfaces would be machined or ground as appropriate, but many makers did not remove all the sand texture on the rest of the castings. Especially rough spots would be filed or ground down, then the pits would be filled as you found.

It is still routine today, at least for heavy industries without nuclear or aerospace requirements, for foundries to weld up flaws and cracks in fresh castings.
 
But mainly this thing has a coating of something on all the cast iron parts similar to body putty.

-That's very common. Prior to the War, virtually all machine tool manufacturers would do "body work" to the castings, to smooth them and fill in pits and generally make the thing look nice.

That was one of the major points to the "War Production Board" oversight- the tags that say "this machine conforms to the War Production Board", etc. The WPB basically said not to waste time and valuable materials simply making the machines look good. Speed was more important than appearance.

Which is why so many machines have that "this machine conforms..." tags, stencils or even cast into the body. The war production wasn't as polished and shiny and smooth as most operators were used to, and the manufacturers wants that tag there to basically say "they usually look better than this, but the WPB made us do it this way".

Still, even the wartime machines often had at least one coat of a sort of brush-on filler, a thick primer sort of thing. My Springer, made in '43, had a coat of an almost rubbery material as the primer layer. I scraped what I could off and simply sanded and painted over the rest.

One last odd (at least to me) thing is almost everything seemed to be made “in-house” you can see the machining marks on the bolts where they turned down hex stock to make their own bolts and nuts.

-That, too, was very common, especially in Wartime. Remember we didn't have as much automated production as we do today, and it was common for a large manufacturer to have their own shop just for fasteners in-house. (Ford in particular was one- they went so far as to emboss "Ford" in bolt heads for any vehicle they supplied. Basically subtle advertising.)

And even if they didn't, during the full-on war production, bolts were I'm sure critical items. Machine tools were, too, but still slightly down on the list below tanks, planes and cannons.

On mine, the bolts that hold the QCGB on were probably made in-house (machined, not rolled) while the bolts that hold the bed to the bases were likely made by a dedicated factory- they're proper production allen-head.

The other thing is they were not shy about using flawed castings[.]

-Yep. Generally speaking, mine are pretty good, but with the exception of the QCGB and the tailstock base.

The gearbox has cast-in lines indicating the range-lever selection. On mine, these lines were partly obliterated- the iron just never really filled in the grooves. There's also a machined face where the gear selector lever locks into the mating hole. I wanted to keep this unpainted, showing the machined surface, but there was a big void in it. I filled that in, smoothed it and painted it over.

And on the tailstock, the base casting has two bosses sticking up, for the side-to-side adjuster screws to bear against. One of these, I found, had been milled away and replaced by a bolt-in steel block.

It could be a repair of some later crash, but I can't imagine how something like that could break. I think it's more likely that the casting didn't fill all the way in, and instead of scrapping it, they saved it by milling it and fitting it with the add-on part.

I'm wondering if perhaps you have a WWII "wartime finish" lathe. Supposedly these were '20s and '30s lathes, but...

-I honestly don't have any idea where the cutoff was, but yes, his is definitely an older model than mine. Possibly- but by no means definitely- too old to be a war finish machine. I can't read the serial number (is it me or are the pictures really small?) but I'm told the first two digits are the year it was made.

Doc.
 
Thanks for the feedback Doc. I saw the UK website for the Springfield 5 years ago when I first got the lathe but had mostly forgotten about it. It seems like there is more detail there than I remember or I just glossed over it.

I come from an automotive/heavy equipment background so a lot of my comments may be shaded that direction. I'm use to all parts being hardened and castings needing to hold oil or in general be a little better. Plus this is a pretty old lathe so I need to keep that in mind.

As for the pictures. They are scattered everywhere, phone, Facebook, server storage, so far I find them and put them in a word doc as I write it up. Then I save them out one at a time to post. Since I have them reduced down in my document it must save them out that size. I think that is the problem. I need to organize them and upload larger versions. I've read and gleaned a lot of information from posts but I'm pretty new to creating them. I've wrote up a lot in advance in word but since I can only post 5 pictures at a time I've had to break it up. Plus every post has to be approved so I've had to wait a day or so between posting. Actually, as of now I've went through the Apron and QCGB completely taking it apart and cleaning them. I'll eventually get all that posted.
 
First repair Needed - slipping feeds.
One of the keys in the forward/reverse mechanism broke and would hold partially. While engaging the autofeed it would slip if put under too much pressure. – Well, maybe this was not my slipping problem stay tuned for the QCGB disassembly.

Here is the replacement I made on the left and the original Broken one on the right.
 

Attachments

  • Picture3.1.jpg
    Picture3.1.jpg
    15.7 KB · Views: 55
  • Picture3.2.jpg
    Picture3.2.jpg
    12.4 KB · Views: 30
  • Picture3.4.jpg
    Picture3.4.jpg
    14.4 KB · Views: 31
  • Picture3.5.jpg
    Picture3.5.jpg
    10.3 KB · Views: 32
  • Picture3.3.jpg
    Picture3.3.jpg
    10.2 KB · Views: 25
Here is the shifting lever for the forward/reverse of the leadscrew and power screw. I added them because I was very curious as to how that was connected when I was trying to fix the broken key. Pictures go in order from gear box to where the dog gears where the broken key was.


Picture4.1.jpg. Picture4.2.jpg. Picture4.3.jpg
 
Seized lead screw.

While attempting to get the pump in the apron to pump oil to the cross-slide ways I was spinning the power and lead screw as fast as they would go thinking it would pump faster. Not knowing it is a simple lever pump driven by the handwheel for the carriage. During this time the machine slowed down and stopped spinning. The wore out belts started spinning instead (luckily). Turns out the lead screw was not getting oil to the inboard ½ inch of where the lead screw spins in the housing on the tail stock end of the lathe. I had originally not intended to remove the gearbox or apron/saddle because I just wanted to use the lathe not rebuild it even though I was finding lots of black iron dust everywhere. Well, finding that the gooey mess blocking the flow of oil to part of the bearing surface in the holder forced me to change my mind. That weekend my sons were home for a visit, so I enlisted them to help me remove the apron and gear box for cleaning. Since they were there for only the weekend, I power washed the gearbox. Looked it over, lubed it up and had them help me put it back on Sunday before they left. I probably should have dissembled it but given I would have no help and that everything was taking oil well I decided to forgo anything other than a good bath. The Apron was another issue. I figured I could handle it on my own and it looked way more complex. In the end it was a good thing I took it apart because I found oil passages that were mostly or in a few cases fully blocked from a grey/black sludge. I neglected to take photos of that, but I did take some of the Apron and gear assemblies.

I’ll point out a few of the more interesting things I found inside there.

First was trying to get the lead screw off so I could remove it from the gearbox. It had two locking collars but I could not figure out how to take it off. That was part of my need to have my boys help. I needed to take the gearbox off while the lead screw was still on it. Here is what I found on the inside. Yep, the only way to get it off is to remove the Gearbox then remove the lead screw.

Picture5.1.jpg Picture5.2.jpg Picture5.3.jpg Picture5.4.jpg Picture5.5.jpg

The shiny specks are flecks of metal mostly cast iron. The last picture is where the leadscrew goes through the gearbox housing. Notice gear with set screws on one side and two locking nuts to keep the lead screw from pushing back into the rest of the gearset on the other. Also, when assembled on the Lathe it would be in the uppermost section of the gearbox therefore completely un-accessible.
 
-I honestly don't have any idea where the cutoff was, but yes, his is definitely an older model than mine. Possibly- but by no means definitely- too old to be a war finish machine. I can't read the serial number (is it me or are the pictures really small?) but I'm told the first two digits are the year it was made.

Doc.

The serial number for my lathe is 835 so according to this site: http://vintagemachinery.org/pubs/2624/21005.pdf My best guess is it was built in late 1935 or early 1936. I'll probably settle on 1936 unless I find differently. It looks like they were only building about one 14" lathes per month around the time mine was built.

Looking at the numbers They were also building about the same number of 16" and double the numbers of 18-20". For the bigger lathes the numbers are too sparse to tell how many. So, from 1919-1940 they were building about 50 lathes/yr. with a spike in the larger ones from 1934 on.

Given these numbers it's interesting how mine is the only 14" I know of but there's a few 16" out there. We should see more 18-20" lathes.

Anyway, interesting stuff.
-- Murph
 
I’m a little out of order here because I cleaned/inspected the Apron first. I was not going to remove and disassemble the QCGB. It seemed ok but the Apron had so much gunk in it and all the oil passages were plugged or almost plugged. I still refused until I was removing the pressed in caps covering the oil cups on top of the QCGB. I cleaned them the best I could then found one of them completely blocked and not accepting oil. That convinced me of the need to clean it up so in the end I went ahead and re-removed the QCGB. This post will show the disassembly of the QCGB. I had put long hold down bolts in the place of the normal bolts so I could have more room when putting the gearbox shafts back in place.

The rightmost oil cup is full of Brakeclean and is not draining. I had put small brushes in the passages and pulled out a lot of gunk but that guy had three plugged passages.
6.1.jpg

Here is the QCGB off the lathe, all other shafts removed.

6.2.jpg

This is the gearbox from what would be the bottom looking up when it is mounted.
6.3.jpg

One last picture is the (I really don’t know what it is called) bearing housing on the tailstock end of the lathe that holds the 4 shafts.

6.4.jpg
 
It ended up being a good thing I went through the QCGB. While assembled everything looked good but upon disassembly I found one big problem and a few wear items.

Here is the gear removed from the end of the lead screw. There are two Axial load roller bearings for the lead screw. The gear holds one end and the two collars apply the preload.
QCGB_7.1.jpg

Here is the gear change lever. -- Note: I’m pushing out the crud with a brush. -- if you can see it in the picture.
QCGB_7.2.jpg

Everything comes apart fairly well with maybe a few taps except for the gear cluster they have a pressed fit so the only way to remove it is with a press. This took a while to figure out. The gear on the bottom kept “locking up” when I would press on the gear cluster shaft making me think there was something other than the two taper pins holding it. After a while I figured out the bushing in the center portion of the housing was getting pushed to one side and would lock up the gear.
QCGB_7.3.jpg

Here is the surprise. The built-in keyway was sheared off on the largest gear which is the slowest feed speed for the carriage and cross-slide. It looked like they swedged the center hole with the key in place. So, I ended up broaching my first keyway in the gear. -- good thing I just bought a key broach set for another project. Seems I was so excited it worked I did not get a picture of it.
QCGB_7.4.jpg
 
Bare Apron gearbox. Note the one bearing – it gave me fits before I figured out it had slid out about 1/16” of an inch when pulling off the gear that goes in it. When putting it back together it would hit first and bind up all the gears in the housing. I took the back off about a dozen times and disassembled it almost completely before I figured out what it was. The other ones are just pictures of the bare housing.

The oil pump sends all oil up to the saddle in the single oil line. Second picture shows the top of the apron and the oil galleys. From there it drips back down into the apron, cross slide ways and saddle ways as shown in the second picture. The third picture is the front side fully/mostly stripped. The one lever I left on engages the half nuts and seemed ok to leave alone. The last picture is of the bottom of the apron gearbox. The pads for brackets hold the lower two control arms in place. Also note. If you want to drain the oil from the gear box you can simply remove one of the bolts since they are drilled all the way through into the oil reservoir.

Apron_8.1.jpg Apron_8.2.jpg Apron_8.3.jpg Apron_8.4.jpg
 
Now some of disassembly since I did not take any of re-assembly.

Apron_9.1.jpg Apron_9.2.jpg Apron_9.3.jpg Apron_9.4.jpg Apron_9.5.jpg


First is a bad picture of the “back” of the apron stuck in the vise. I was trying to figure out how that gear came off – in reality on assembly it should be put into the gearbox and nothing is on the back of the assembly.
Second shows the oil galleys and one of the handles removed. Note there is a collar under there, and you can remove both collars to remove those last two gears. – carefully there are multi-piece thrust bearings on those shafts.
Third shows another view of those gears. The bevel gear is where the main power for the auto feeds are put into the gearbox the other two are the drives for the carriage and the cross feed. The clutches are engaged by beveled areas on the gears being pulled together when you raise the handle. – I really should have taken a pic of the handle assembly but on disassembly they kind of fell apart and on reassembly I was unsure if I had it correct so I did not want to document my mistakes. Last two are the “locks” for those two gears on their shafts. One is a set screw between the bevel and the power gear the second is the setscrew in the end of the shaft.
 
Here are a few pictures of the Babbitt bearing for the lead screw. A pre and post cleaning of the threads. You probably can’t tell but there are a bunch of metal shavings embedded in the Babbitt material. It took about an hour with a pick and a pin punch of the correct diameter to clean out the metal in the Babbitt. For some reason there was a lot more embedded in the top Babbitt than the bottom one. There looks to be a lot of Babbitt left in there so I should be good for a while. The last pic is the assembled apron ready for installation. Since I was by myself I set the Apron on some wood blocks that were about a half inch low and then bolted it up. I tried using the pump in the apron to prime everything but that was going to take a long time so i lowered it back down and filled the oil passages with oil then bolted it back on again. I’m really doubtful the apron will get enough oil but I’ll wait and see.


Apron_10.1.jpg Apron_10.2.jpg Apron_10.3.jpg


Back
Top